|
17.08.2008
Building a Custom VPN-Q 2006 CMAK Profile for L2TP/IPsec VPN Connections using Certificates for IKE (machine) Authentication and EAP-TLS for PPP (user) Authentication (with a simple certificate)
VPN-Q 2006 includes out-of-the-box a custom CMAK profile that can be used wih EAP-TLS with the user certificates stored on a smart card.
But you may want, part of some tests, to store the user certificates on the users' machines.
Note that the recommended way is to store the users' certificates on smart cards.
Or you may want to build your own custom CMAK profile when the certificate is stored on a smart card.
Let's start.
We won't repeat all the steps which we're already covered here.
We'll just mention the essential ones.
Run the CMAK wizard as described here.
Once you've reached the CMAK Wizard - Edit VPN Entries: Security Tab and clicked configure the Advanced Security Settings, see Figure1, select Use Extensible Authentication Protocol (EAP), Smart Card or other certificate (encryption enabled).
In the VPN Strategy drop-down menu, Only use Layer Two Tunneling Protocol (L2TP) was selected.
The Use a pre-shared key when using L2TP/IPsec checkbox is not checked, because we are using certificates for IKE authentication.
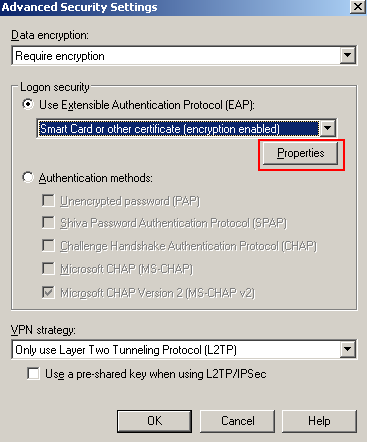
Figure1: CMAK Wizard - Advanced Security Settings
Click the Properties button.
I'm not using a smart card to store the certificate, instead the certificate was stored in the User Certificate Store, so I've selected Use a certificate on this computer, and Use simple certificate selection (Recommended), see Figure2. If you use a smart card, select the Use my smart card option.
I want to make sure that the client validates the server's certificate, so I've checked the Validate server certificate checkbox, I've specified the server's name into the Connect to these servers text box, this is the name that appears on the certificate ISA will use for EAP-TLS authentication (if you have multiple certificates installed on ISA, you can use the RRAS console to select the one you want to use for EAP-TLS).
Also, I've specified the CA which issued ISA's certificate within the Trusted Root Certification Authorities area, in this case, a private enterprise CA.
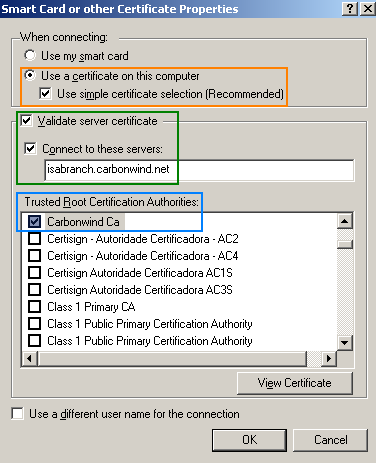
Figure2: CMAK Wizard - Smart Card or other Certificate Properties
Click OK to close the Smart Card or other Certificate Properties window.
Click OK to close the Edit Virtual Private Networking Entry window.
Then continue to configure the other settings using the CMAK wizard as described here.
When you've reached the Support Information window, enter something useful to describe this CMAK profile, see Figure3.
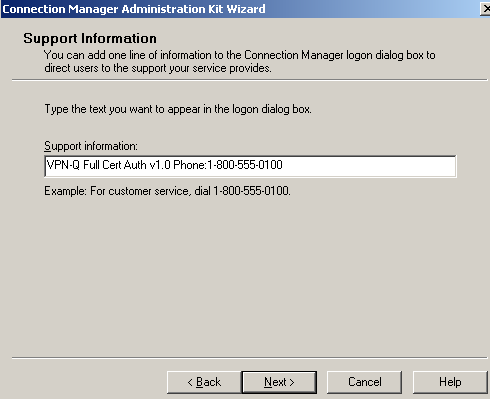
Figure3: CMAK Wizard - Support Information
Configure the other settings using the CMAK wizard and finish the creation of this profile.
We're almost there.
We just need a few more touches.
I will edit the isavpnq.cms file which was created by the CMAK wizard in the C:\Program Files\cmak\Profiles\isavpnq folder. Note that the manual modifications to this file described here have been already done, see Figure4.
Since we are using a certificate for user authentication, I want to hide the User Name and the Domain, see Figure4, so that the users to see a clean connection window, see Figure5.
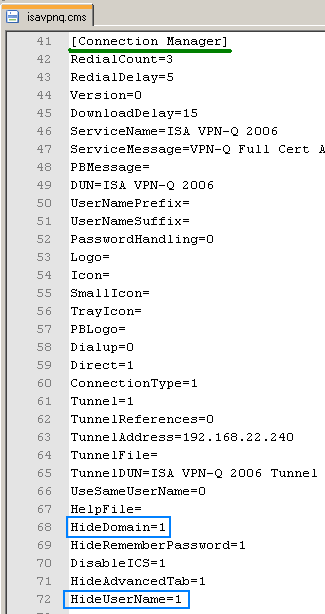
Figure4: Edit isavpnq.cms
And now simple run the CMAK wizard editing the isavpn profile without making any changes, in order that our manual modofications to be incorporated into the isavpnq.exe file.
Install this custom CMAK profile on a computer configured with a certificate that can be used for IKE authentication (certificate stored within the Computer Certificates Store) and with a certificate that can be used for EAP-TLS authentication (certificate stored within the User Certificates Store).
After the installation, click Connect, see Figure5.
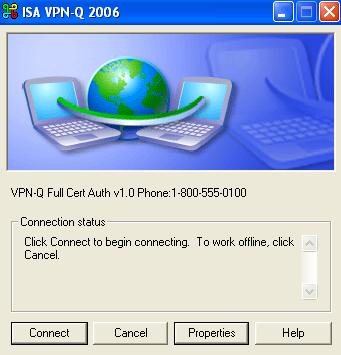
Figure5: ISA VPN-Q 2006 - Custom CMAK Profile: Connect
|