|
17.08.2008
Building a Custom VPN-Q 2006 CMAK Profile for L2TP/IPsec VPN Connections using Pre-shared Keys for IKE (machine) Authentication and MS-CHAPv2 for PPP (user) Authentication
- 1. A Quick Overview
- 2. Needed Files For Building the Custom CMAK Profile
- 3. Building the Custom CMAK Profile to be Used with L2TP/IPsec Connections with Pre-shared Keys for IKE (machine) Authentication and MS-CHAPv2 for PPP (user) Authentication
- 4. Installing the Created CMAK Profile on Windows XP
- 5. Installing the Created CMAK Profile on Windows Vista
- 6. "Automatically configure proxy settings" Possible Issues
- 7. CMAK Custom Action - Group Policy Update
1. A Quick Overview
You can manually create your own CMAK profiles to work with VPN-Q 2006 if you need to include some custom settings. Some of these custom settings may be, just to name a few:
- modify the routing table on the VPN clients to support the "same subnet scenario", see http://blogs.technet.com/yuridiogenes/archive/2008/03/28/routing-issues-accessing-internal-resources-through-vpn.aspx
- fix the Windows XP VPN clients issue when the wrong DNS server from the wrong interface is used, see http://support.microsoft.com/default.aspx?scid=kb;en-us;311218 and http://www.isaserver.org/tutorials/work-around-VPN-clients-split-DNS.html
- give to the VPN clients the connection-specific DNS suffix for the VPN adapter. I've blogged about that here: http://www.carbonwind.net/blog/post/2008/07/02/Adding-the-connection-specific-DNS-Suffix-for-the-VPN-adapter-using-CMAK.aspx. This is useful for non-domain member machines, which will be able to resolve single lable names using DNS, without the need of a WINS server.
- maybe to preconfigure the Web Proxy settings on the VPN clients
- maybe map some drives once the VPN connection is active and then disconnect them when the VPN connection is terminated, see http://blog.msfirewall.org.uk/2008/06/using-cmak-to-configure-isa-server-vpn_10.html for an example
- force a group policy update once the VPN connection is active for domain members machines, for an example see http://www.isaserver.org/tutorials/work-around-VPN-clients-split-DNS.html for an example
- if your ISA Server is behind a NAT device, you can apply on your XP or Vista L2TP/IPsec clients, a regfix(XP KB818043, Vista(KB926179), see http://blog.msfirewall.org.uk/2008/06/using-cmak-to-configure-isa-server-vpn_10.html for an example.
- some custom graphics/icons, the company's license agreement, support phone numbers
CMAK is a powerful tool, which allows an advanced level of customization, improves the end-users' experience and simplifies administration.
2. Needed Files For Building the Custom CMAK Profile
Basically we need four files for the CMAK profile to get running the VPN-Q 2006 client on the users' machines. These file are(see Winfransoft's KB How to build your own Connection Manager profile with VPN-Q 2006 integration):
- vpnqc.exe - found in the C:\Program Files\VPN-Q 2006 folder on the ISA server
- licence.xml - found in the C:\Program Files\VPN-Q 2006 folder on the ISA Server.
- rqc.exe - found in the C:\Program Files\Cmak\Support folder on the ISA server. By default, along with the VPN-Q 2006 files on ISA, the CMAK tool is installed too.
- update.log - this is an empty file, simply create a new empty .txt file and renamed it.
I've added into a folder on the machine on which I will run the CMAK wizard the files that are to be used within this article, see Figure1.
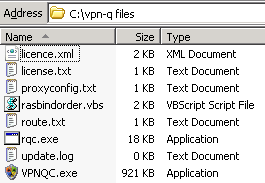
Figure1: CMAK - Needed Files
We will build a simple CMAK profile here to be used with L2TP/IPsec connections, using a pre-shared key for IKE authentication(machine authentication) and ms-chapv2 for PPP authentication(user authentication). Because, in this way, troubleshooting will be easier, if this is the first VPN-Q 2006 custom CMAK profile you create. Once you get the picture, you can move towards ones that involve EAP-TLS for user authentication for example.
3. Building the Custom CMAK Profile to be Used with L2TP/IPsec Connections with Pre-shared Keys for IKE (machine) Authentication and MS-CHAPv2 for PPP (user) Authentication
Let's get started.
I'm running the CMAK wizard on a Windows Server 2003 R2 SP2 x32.
Click Next on the Welcome to the Connection Manager Administration Kit Wizard window, see Figure2.
Note that if you are not sure or do not understand some settings from the CMAK wizard, you can check CMAK's manual, which contains a lot of information.
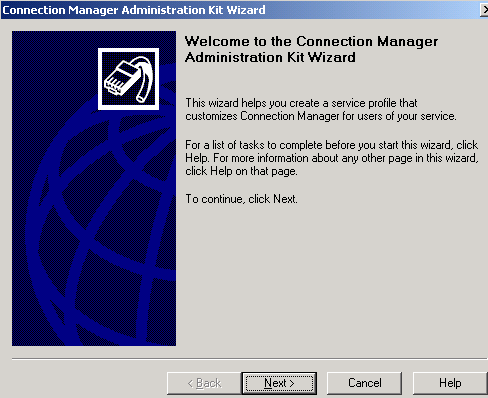
Figure2: CMAK Wizard - Welcome Screen
Select New profile, see Figure3.
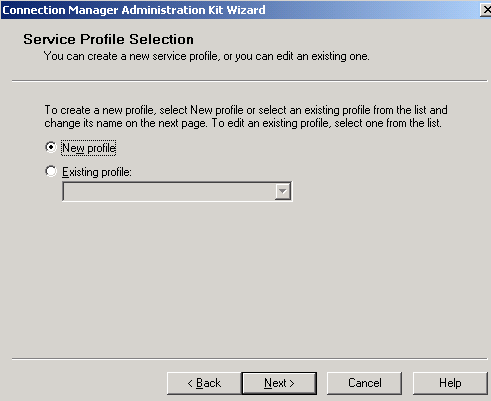
Figure3: CMAK Wizard - New Profile
In the Service name text box I've entered ISA VPN-Q 2006 see Figure4. This name will appear as the name of the VPN connection in the Network Connections window on the clients' machines.
Specify a name for the executable file in the File name text box. I've called it isavpnq. As we will see later, this name plays a role when we will add some Custom Actions.
Click Next.
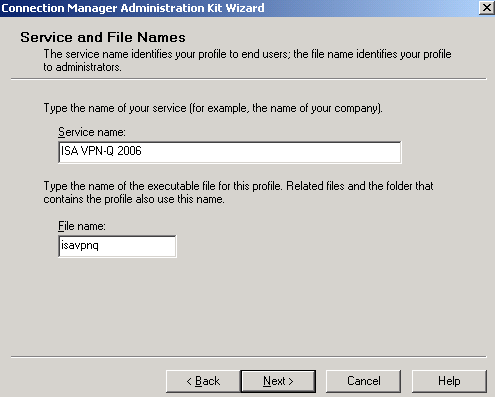
Figure4: CMAK Wizard - Service and File Names
I do not want to add a Realm Name, so I've selected the Do not add a realm name to the user name option, see Figure5.
Click Next.
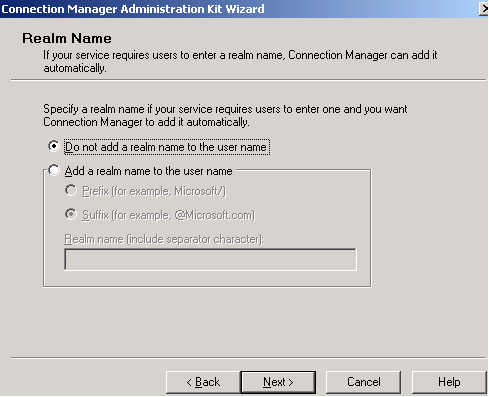
Figure5: CMAK Wizard - Realm Name
There aren't any CMAK profiles to be merged, see Figure6. I've just clicked Next.
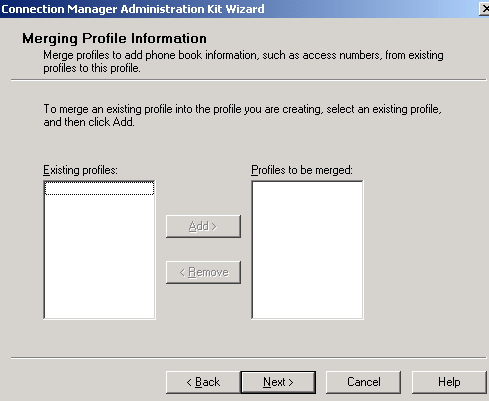
Figure6: CMAK Wizard - Merging Profile Information
There isn't a pre-existing phone book(which contains the address of the VPN server), so I've put a checkmark in the Phone book from this profile checkbox.
I've selected the Always use the same VPN server option(there is one ISA Server), and entered ISA's IP address. If you want, you may use ISA's FQDN, which may be a better option in case ISA's IP address changes, you just update your DNS entry, and you do not need to distribute new CMAK profiles.
Note: - If ISA is behind a NAT device, and you enter an IP address, this will be the external IP address of the NAT device, and not ISA's IP address. So carefully analyze the NAT rules on the NAT device in front of ISA, otherwise you will not be able to connect.
- Also if you use a FQDN, is assumed that this is a public DNS name, or at least a name that the VPN clients will be able to resolve.
The Use the same user name and password for VPN and dial-up connections option is not needed, because there isn't a dial-up connection to be made before the VPN link will be established. See Figure7.
Click Next.
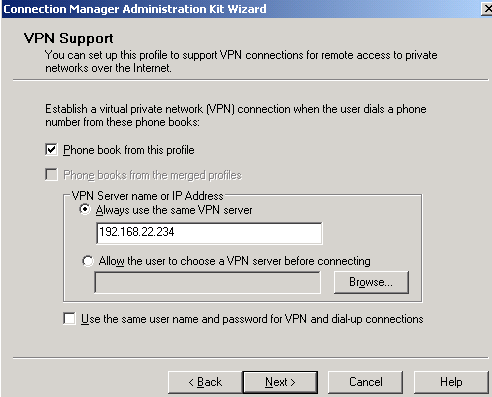
Figure7: CMAK Wizard - VPN Support
You can configure the TCP/IP and Security settings of the VPN connection. Select ISA VPN-Q 2006 Tunnel <Default> and click the Edit button, see Figure8.
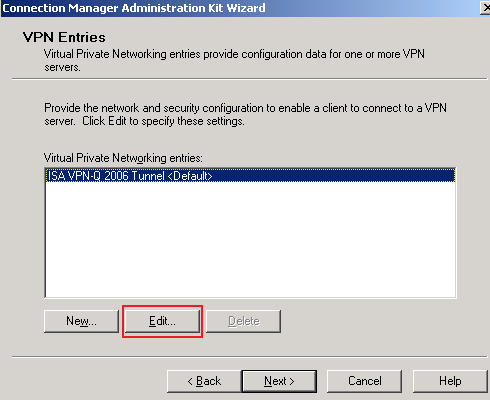
Figure8: CMAK Wizard - VPN Entries
On the General tab, I've put a checkmark into the Disable file and printer sharing checkbox because I do not want to share files and printers on the VPN clients. The Enable clients to log on to a network option does not affect Windows XP or Vista clients, just Windows 95, Windows 98 or WindowsME VPN clients.
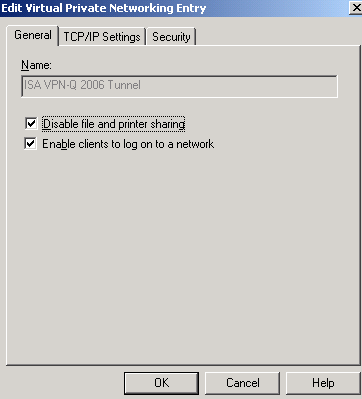
Figure9: CMAK Wizard - Edit VPN Entries: General Tab
On the TCP/IP Settings tab, the Server assigns addresses option is selected.
Also, very very important, the Make this connection the client’s default gateway checkbox is selected.
This will force the VPN client to use the VPN link to direct the traffic to all non-local networks (the networks that VPN client is not directly connected to) through the VPN tunnel.
This means that the VPN client will access Internet through ISA.
Remember that the VPN client once is connected to ISA, it becomes part of the corporate network, so it must follow the same firewall policy, say no porn, no p2p activities...
The Use IP header compression option will improve performance, so it might be a good idea to check the respective checkbox. See Figure10.
Click Next.
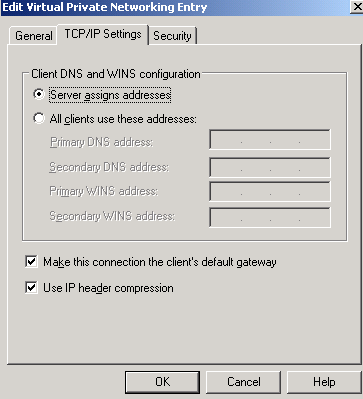
Figure10: CMAK Wizard - Edit VPN Entries: TCP/IP Settings Tab
On the Security tab I've selected the Use advanced security settings option. Click Configure. See Figure11.
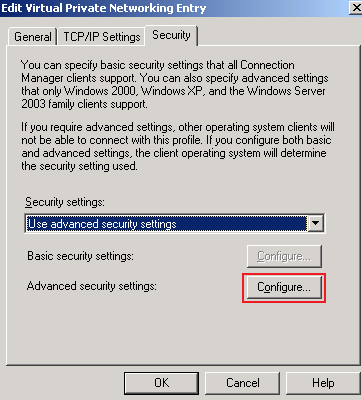
Figure11: CMAK Wizard - Edit VPN Entries: Security Tab
In the Advanced Security Settings window:
- Require encryption is selected
- only Microsoft CHAP Version 2 (MS-CHAP v2) checkbox is checked(the most secure password based authentication protocol from the ones listed there, I've talked a little bit about L2TP/IPsec user authentication protocols in http://www.carbonwind.net/ISA/L2TP/l2tp2.htm)
- Only use Layer Two Tunneling Protocol (L2TP) was selected
- and the Use a pre-shared key when using L2TP/IPsec checkbox was checked. If you use certificates for IKE authetincation, let this checkbox unchecked.
See Figure12.
Click OK in the Advanced Security Settings window.
Click OK too in the Edit Virtual Private Networking Entry window.
Click Next.
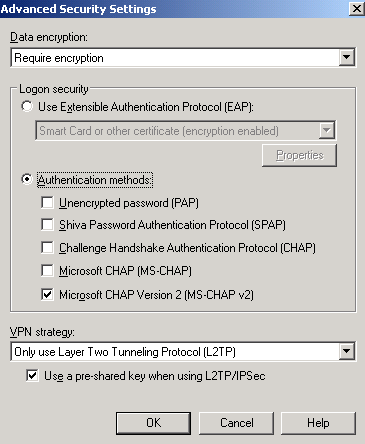
Figure12: CMAK Wizard - Edit VPN Entries: Security Tab - Advanced Security Settings
Since we are using a pre-shared key for IKE authentication, the Pre-shared Key screen appears. I will enter the pre-shared key in the Enter key text box.
I will also enter a PIN used to encrypt the pre-shared key, PIN than the users will need to provide when they will install this CMAK profile on their machines. See Figure13.
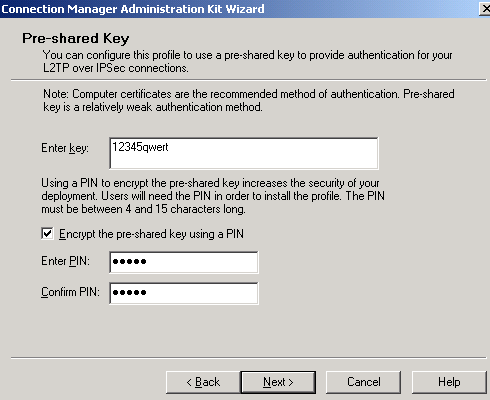
Figure13: CMAK Wizard - Pre-shared Key
We're not using any Phone Book, so I've removed the checkmark from the Automatically download phone book updates checkbox. See Figure14.
Click Next.
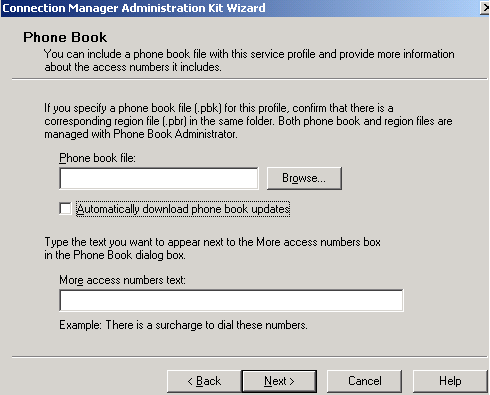
Figure14: CMAK Wizard - Phone Book
We are not using any Dial-up Networking Entries, so just click Next on this page. See Figure 15.
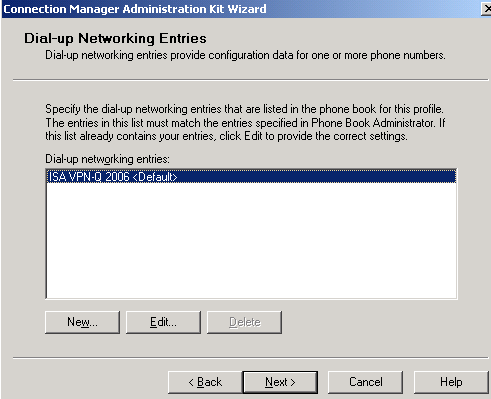
Figure15: CMAK Wizard - Dial-up Networking Entries
As said before, we want to support the "same subnet scenario", so we will Define a routing table update.
I've already prepared the route.txt file. Click the Browse button to locate the route.txt file you want to include. See Figure16.

Figure16: CMAK Wizard - Routing Table Update
The route.txt file contains the following blue text(192.168.10.0/24 represents ISA's Internal Network), see CMAK's help for more details(please do not modify the METRIC value from DEFAULT).
Note that you can add routes through CMAK profiles like so, if the Use default gateway on remote network checkbox is checked on the client's VPN adapter, as it should be. If this checkbox is not checked, a wrong route will be added(probably sending packets directly through the gateway configured physical adapter). The problem is that you do not know the IF value for the PPP adapter(random number), thus you cannot specify it.
If you want to add routes using CMAK profiles when the Use default gateway on remote network checkbox is not checked on the client's VPN adapter, you can try the script found here (I have not tested it). Or try to add the routes through DHCP options, Option 249. You will need to configure the DHCP relay on ISA, so that the DHCP Inform packet sent by the VPN client to reach the DHCP server.
ADD 192.168.10.0 MASK 255.255.255.0 default METRIC default IF default
Note: The user must be logged with administrative credentials on the client computer otherwise routing update tables will not be applied. This is stated in the CMAK help and in this Microsoft article: http://technet2.microsoft.com/windowsserver/en/library/cc37da78-1138-4186-9abb-32b31ca8eac41033.mspx.
Click Next.
If you plan to configure the Automatically configure proxy settings option to force the VPN clients to use the ISA Server server as their Web Proxy server, then you might experience some issues. Take a look here for an explanation.
Remember that we are already using the Make this connection the client’s default gateway option, thus all traffic non-destined to the local subnet from the VPN client, including Internet web traffic too passes through ISA. We can require authentication on our rules on ISA(without the need to make the VPN client a Web Proxy Client), because this is one of the major capabilities of ISA Server 2006, to apply a firewall policy to specific VPN users/groups(the ISA Server 2006 used here was a domain member). ISA will use the credentials of the connected VPN user for authentication.
The Restore the users’ previous proxy settings after disconnecting checkbox is checked also.
I've already prepared the proxyconfig.txt file using the sample provided in CMAK's help. Click the Browse button to locate the proxyconfig.txt file you want to include. See Figure17.
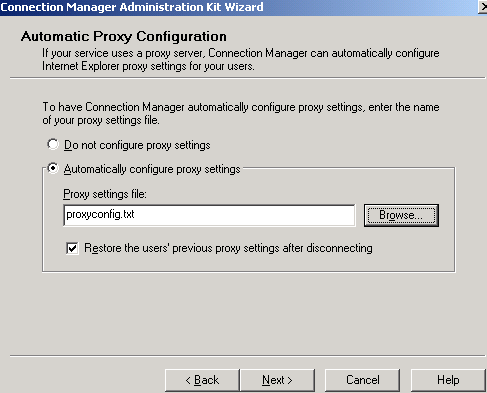
Figure17: CMAK Wizard - Automatic Proxy Configuration
The proxyconfig.txt file contains the following text:
[Automatic Proxy]
AutoProxyEnable=0
AutoConfigScriptEnable=1
AutoConfigScript=http://isa2006.carbonwind.net:8080/array.dll?Get.Routing.Script
[Manual Proxy]
ProxyEnable=0
Click Next.
And now we've reached the Custom Actions page. Figure18 shows the custom action used here.
Note that some of them are built-in ones, like to update your routing table or to configure your IE proxy settings, they been added by the wizard automatically.
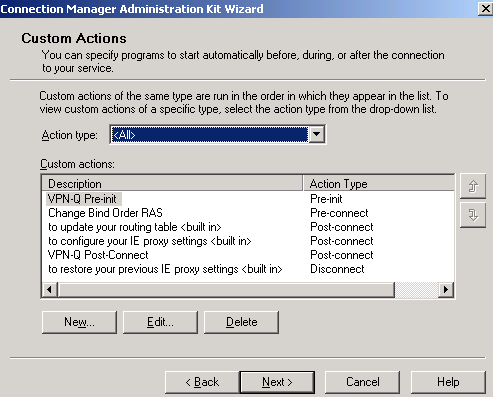
Figure18: CMAK Wizard - Custom Actions
Others, have been manually defined by clicking the New button on the Custom Actions screen.
First let's take a look at the two ones required by the VPN-Q 2006 client.
In Figure19 you can see the VPN-Q Pre-init action which is required for VPN-Q 2006.
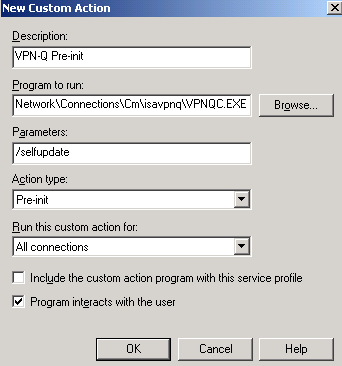
Figure19: CMAK Wizard - Custom Actions - VPN-Q Pre-init
Actually you cannot see the entire text from the Program to run box(do not click Browse). I've entered:
%APPDATA%\Microsoft\Network\Connections\Cm\isavpnq\VPNQC.EXE
When the CMAK profile will be installed on the client computer will follow the above path, in the user's Documents and Settings or All users' Documents and Settings folders, the user needs admin credentials on his/her machine to install it for all users.
Remember when I've said that the file name plays a role in some of the custom actions we will define ?
The VPNQC.EXE files along with the rest of the files included in the self executable CMAK profiles, will be installed in the isavpnq folder. If we do not specify this folder in the Program to run path, the custom action will fail.
In the Parameter box I've entered:
/selfupdate
Do not check the Include the custom action program with this service profile checkbox. We will manually added it later.
Click OK to close the New Custom Action window.
In Figure20 you can see the VPN-Q Post-Connect action which is required for VPN-Q 2006.
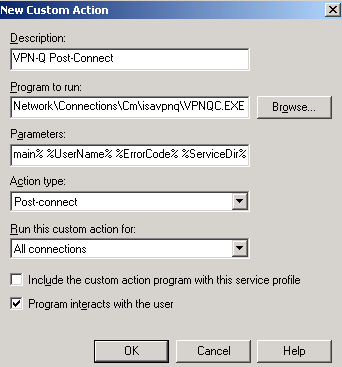
Figure20: CMAK Wizard - Custom Actions - VPN-Q Post-connect
I've entered(do not click Browse) in the Program to run box:
%APPDATA%\Microsoft\Network\Connections\Cm\isavpnq\VPNQC.EXE
and in the Parameters box:
%ServiceName% %TunnelServerAddress% %Domain% %UserName% %ErrorCode% %ServiceDir%
Do not check the Include the custom action program with this service profile checkbox. We will manually added it later.
Click OK to close the New Custom Action window.
The Change Bind Order RAS Pre-Connect custom action has been defined as in Figure21. This is useful if we want to quickly fix the KB311218 issues for Windows XP VPN clients. This is not required for Windows Vista machines.
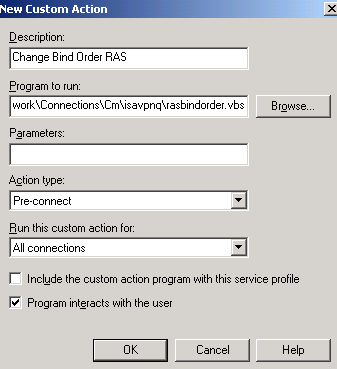
Figure21: CMAK Wizard - Custom Actions - Change Bind Order RAS
I've entered(do not click Browse) in the Program to run box:
%APPDATA%\Microsoft\Network\Connections\Cm\isavpnq\rasbindorder.vbs
And the script file(.vbs) contains-I've added the comments-(You can find the original script at
http://www.ureader.com:80/message/89324.aspx):
'This script will place the \Device\NdisWanIp entry on the top in the
'registry value Bind found under 'HKLM\SYSTEM\CurrentControlSet\Services\Tcpip\Linkage\
'In case the entry is already at the top, no registry update takes place.
Const HKLM = &H80000002
sComputer = "."
Set oReg = GetObject("winmgmts:{impersonationLevel=impersonate}!\\" _
& sComputer & "\root\default:StdRegProv")
sKeyPath = "SYSTEM\CurrentControlSet\Services\Tcpip\Linkage"
sValueName = "Bind"
oReg.GetMultiStringValue HKLM, sKeyPath, sValueName, arValues
arValuesNew = Array()
For i = 0 To UBound(arValues)
If i = 0 Then
If LCase(arValues(i)) = "\device\ndiswanip" Then
' entry is alredy first in the list, no point in continuing
Exit For
Else
' put NdisWanIp in the first element in the new array
ReDim Preserve arValuesNew(0)
arValuesNew(0) = "\Device\NdisWanIp"
End If
End If
If LCase(arValues(i)) <> "\device\ndiswanip" Then
iCountNew = UBound(arValuesNew) + 1
ReDim Preserve arValuesNew(iCountNew)
arValuesNew(iCountNew) = arValues(i)
End If
Next
If UBound(arValuesNew) > -1 Then
oReg.SetMultiStringValue HKLM, sKeyPath, sValueName, arValuesNew
End If
Click OK to close the New Custom Action window.
Click Next.
In Figure22, Figure23, and Figure24 you can see the options you can define for your custom graphics and icons that are to be displayed on the client computer. I've left the default ones right now, as my drawing skills are miserable.
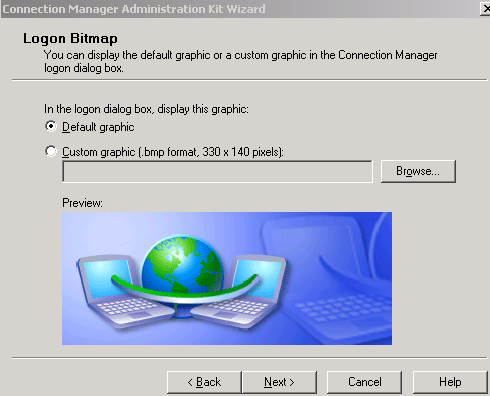
Figure22: CMAK Wizard - Logon Bitmap
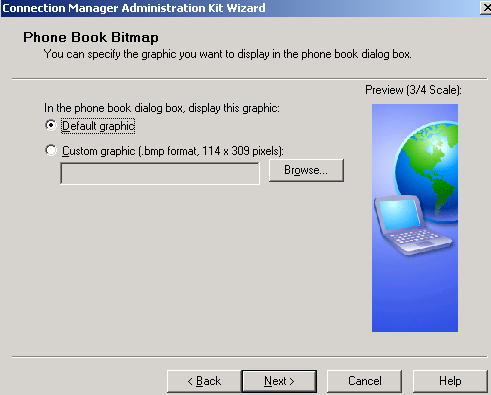
Figure23: CMAK Wizard - Phone Book Bitmap
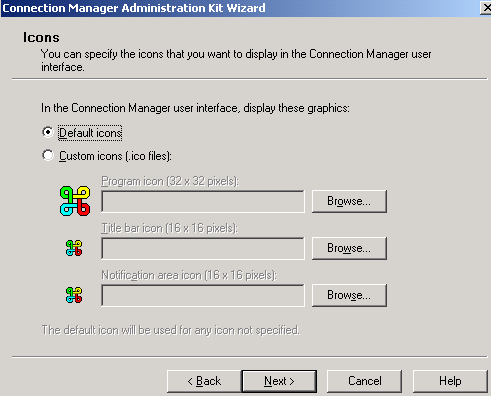
Figure24: CMAK Wizard - Icons
I did not added any commands within the Notification Area Shortcut Menu window, commands that will be displayed by the Connection Manager for the icon in the notification area of the taskbar .
I've just clicked Next. See Figure25.
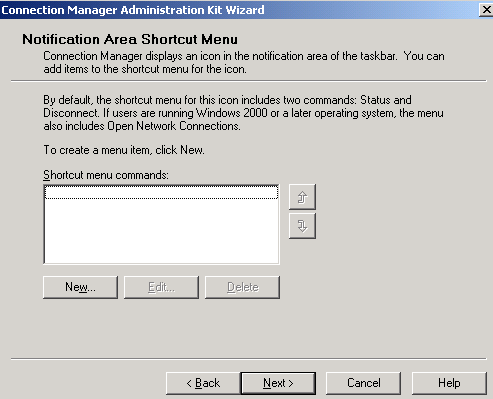
Figure25: CMAK Wizard - Notification Area Shortcut Menu
I do not have any custom help file to include, I will leave the default one, so once again I've clicked Next. See Figure26.
Figure26: CMAK Wizard - Help File
In the Support Information window we can enter some information that will appear in the logon dialog box. I've entered a version number for this CMAK profile and a support phone. If a user experiences some troubles, he or she can call that number and tell the support person about the version of the CMAK profile installed on his or her computer, see Figure27. Maybe there is a newer one, and she or he is using an older version, thus it cannot successfully connect anymore.
Click Next.

Figure27: CMAK Wizard - Support Information
We can install Connection Manager 1.3 on clients that do not already have it installed on their computers, so the checkbox Install Connection Manager 1.3 with service profile is checked. See Figure28.
Click Next.
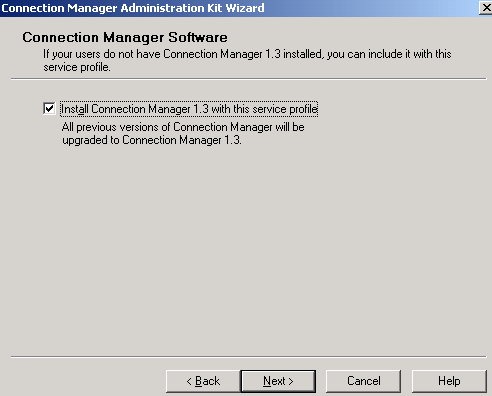
Figure28: CMAK Wizard - Connection Manager Software
I've added a test custom License Agreement, see Figure29. This will apear when the clients installs this profile.
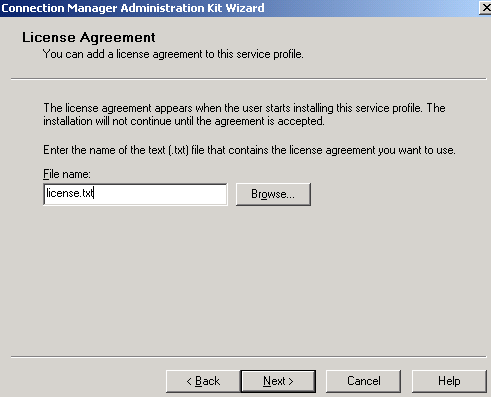
Figure29: CMAK Wizard - License Agreement
I've entered a few lines in it:
Please read these terms and conditions carefully before installing this software as they contain important information about your rights and obligations. It governs your use of the VPN connection.
.........
Click Next.
And we must specify a few Additional Files, see Figure30. We've already talked about them, and they been added in a folder in order to not have to search for them. Click the Add button to add them.
Click Next.
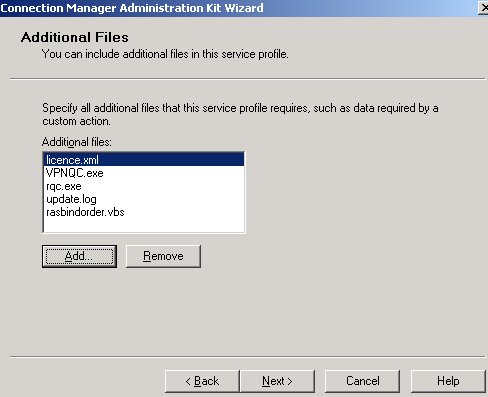
Figure30: CMAK Wizard - Additional Files
Now put a checkmark into the Advanced customization checkbox, see Figure31. I did so because I want to add the connection specific DNS suffix.
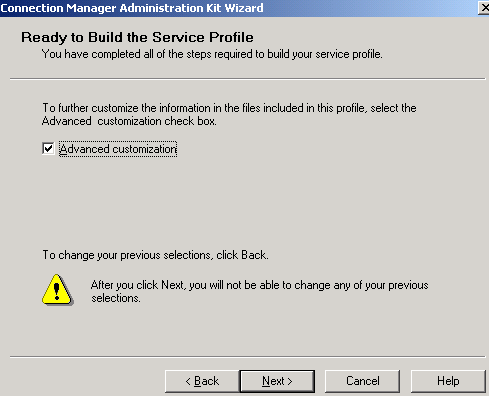
Figure31: CMAK Wizard - Advanced Customization
In the Section name drop-down menu select [TCP/IP&EntryName Tunnel], in my case TCP/IP&ISA VPN Tunnel. In the Key name area enter DNSSuffix. And in the Value field type your DNS suffix, in my case, carbonwind.net. Click Apply. See Figure 32.
Click Next.
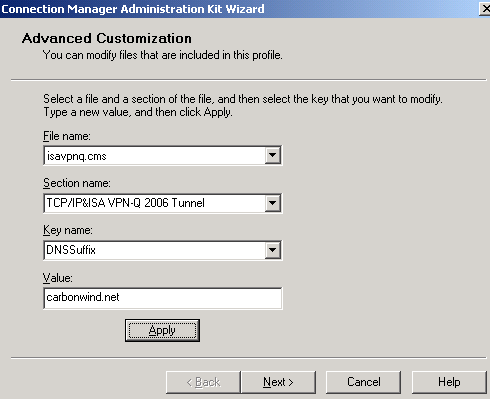
Figure32: CMAK Wizard - Advanced Customization: DNS Suffix
Click Finish. Note the path where will be saved your self-installing CMAK profile. See Figure 33.
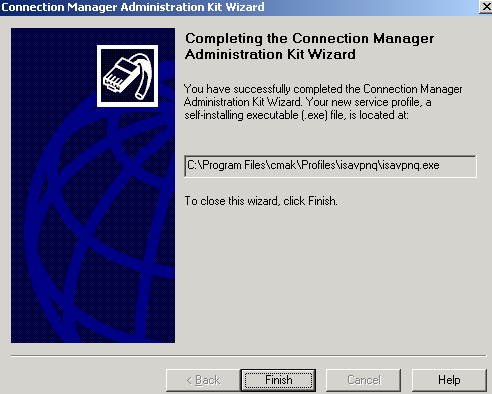
Figure33: CMAK Wizard - Finish
We're not done yet.
Locate the isavpnq.cms in the C:\Program Files\cmak\Profiles\isavpnq folder.
Open it with your favourite text editor.
In the [Connection Manager] section(for more details see the Connection Manager Keys Microsoft TechNet doc):
- change the Dialup value from 1 to 0. If so, the General tab from Properties will not be displayed in the Connection Manager user interface for the VPN connection on the client machine, see Figure35.
- I've also set the ConnectionType value to 1, which means to connect by using a direct connection. However, this key will apply only if both the Dialup and the Direct values are set to 1. The user cannot change this option in the General tab from Properties(as the General tab is not displayed anymore) in the Connection Manager user interface for the VPN connection on the client machine.
- add the HideRememberPassword key with a value of 1. The Save password checkbox will not be shown, a possible dangerous option, see Figure36.
- Add the DisableICS key with a value of 1. This will block the user to share the VPN connection with Internet Connection Sharing (ICS) from Properties in the Connection Manager user interface for the VPN connection on the client machine(anyway the Advanced tab will be hidden), see Figure37.
- Add the HideAdvancedTab key with a value of 1. The Advanced tab in the Connection Manager user interface for the VPN connection will not be displayed, see Figure37.
Thus, we will end up with a "clean" VPN connection, see Figure38 and Figure39. If desired, the Logon domain text box can be supressed by setting the HideDomain key to 1.

Figure34: Edit isavpnq.cms

Figure35: General Tab
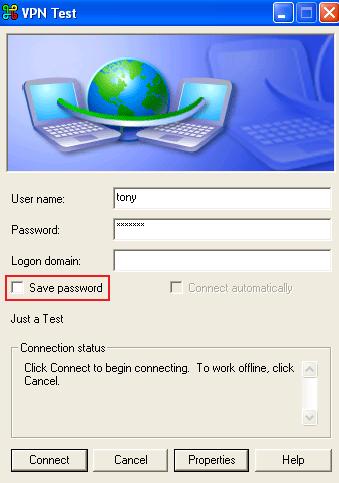
Figure36: Save Password
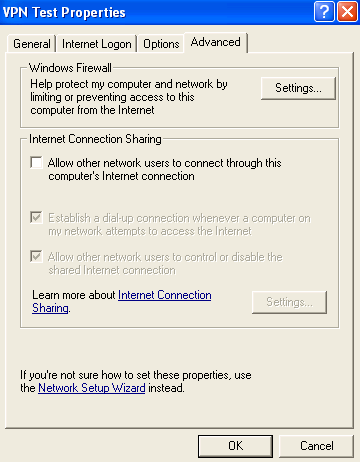
Figure37: Advanced Tab
Figure38: "Clean" VPN Connection
Figure39: Options Tab
After modifying the isavpnq.cms file, we need to run the CMAK wizard by selecting the isavpnq profile without making any modifications in order that the changes made in the isavpnq.cms file to be read and incorporated in the self-installing isavpnq.exe file, see Figure40.
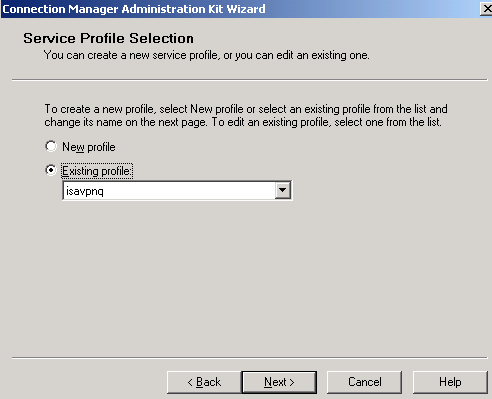
Figure40: Edit isavpnq.cms
Click Yes when asked if you want to overwrite the file, see Figure41.
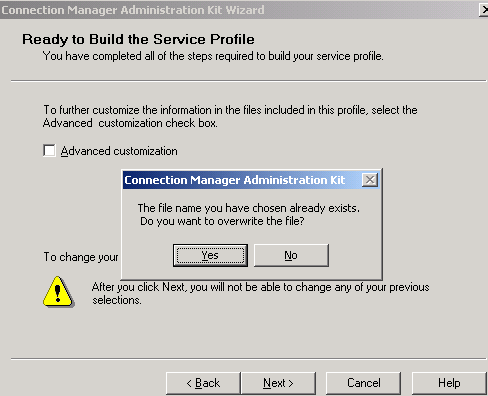
Figure41: CMAK Wizard - Overwrite Profile
And now we have the isavpnq.exe file which we need to distribute to the VPN users.
See Figure42.
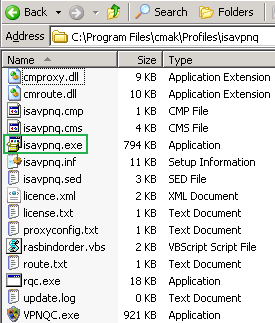
Figure42: Install ISA VPN-Q 2006 CMAK Profile - Click Yes
4. Installing the Created CMAK Profile on Windows XP
I'm installing it on a Windows XP SP3 x32 machine.
Double-click the isavpnq.exe file on your XP machine, see Figure43.
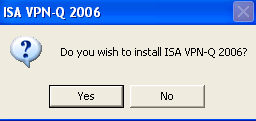
Figure43: XP - Install ISA VPN-Q 2006 CMAK Profile: Click Yes
Click Yes in the License agreement window, see Figure44.
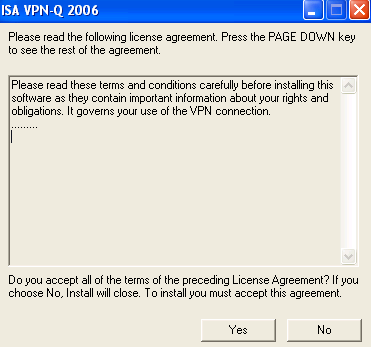
Figure44: XP - Install ISA VPN-Q 2006 CMAK Profile: License Agreement
Enter the PIN used to encrypt the pre-shared key, see Figure45.

Figure45: XP - Install ISA VPN-Q 2006 CMAK Profile: Enter PIN
If you are logged with a user which has admin privileges, you will have the option to make this connection available for all users, see Figure46. If you are a simple user, you will not have this posibility, see Figure47.

Figure46: XP - Install ISA VPN-Q 2006 CMAK Profile: User with Admin Rights Screen
Figure47: XP - Install ISA VPN-Q 2006 CMAK Profile: User without Admin Rights Screen
Enter your credentials and connect, see Figure48.
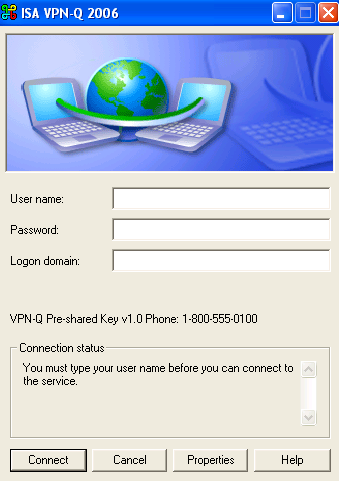
Figure48: XP - ISA VPN-Q 2006 Connection
If everything was configured correctly, the VPN-Q 2006 Client will start after you connect, and will analyze your system.
If you have a healthy machine, you will be removed from quarantine.
See Figure49 and Figure50.

Figure49: XP - VPN-Q 2006 Checks: Progress

Figure50: XP - VPN-Q 2006 Checks: Detail
Run an nslookup command to check if the correct DNS server is used for name resolution. It should be the internal DNS server, from the PPP adapter, see Figure52. I have created a Reverse Lookup Zone on the internal DNS server(that's why I get the FQDN for 192.168.10.2).

Figure52: XP - nslookup
Run an ipconfig /all command to check if you have the Connection-specific DNS Suffix, see Figure52.
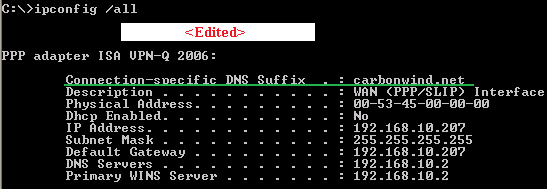
Figure52: XP - ipconfig /all
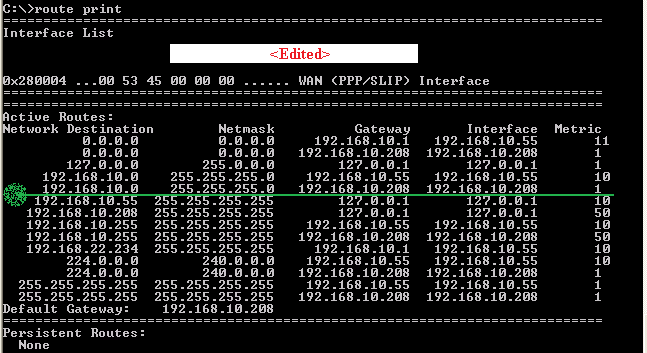
In case you are in the "same subnet" scenario, you should have the correct route in your routing table. Run a route print command. See Figure53.
Remember that you need to be logged with admin privileges on this machine otherwise routing update tables will not be applied.
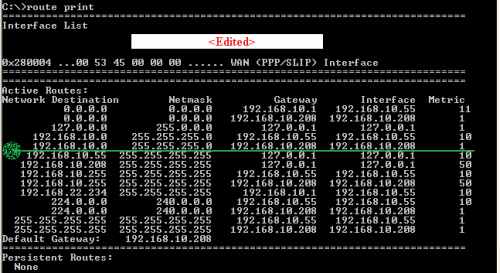
Figure53: XP - route print
5. Installing the Created CMAK Profile on Windows Vista
I'm installing it on a Windows Vista SP1 Utimate x32 machine.
Double-click the isavpnq.exe file on your Vista machine, see Figure54.
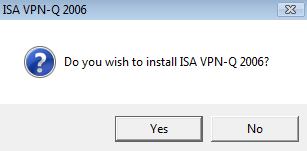
Figure54: Vista - Install ISA VPN-Q 2006 CMAK Profile: Click Yes
Click Yes in the License agreement window, see Figure55.
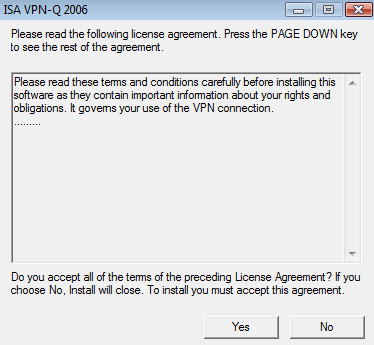
Figure55: Vista - Install ISA VPN-Q 2006 CMAK Profile: - License Agreement
Enter the PIN used to encrypt the pre-shared key, see Figure56.
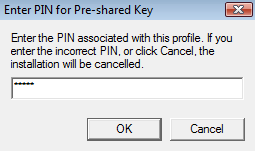
Figure56: Vista - Install ISA VPN-Q 2006 CMAK Profile: Enter PIN
If you are logged as admin, you will have the option to make this connection available for all users, see Figure57. If you are a simple user, you will not have this posibility, see Figure58.

Figure57: Vista - Install ISA VPN-Q 2006 CMAK Profile: Admin Screen
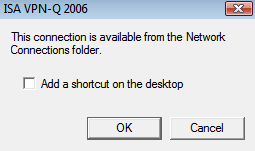
Figure58: Vista - Install ISA VPN-Q 2006 CMAK Profile: Non-Admin Screen
Enter your credentials and connect, see Figure59.
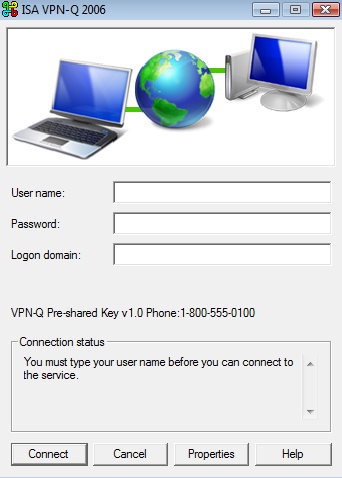
Figure59: Vista - ISA VPN-Q 2006 Connection
Vista informs me that Connection Manager needs elevated privileges in order to update my routing table, see Figure60, UAC is enabled, see Figure61.
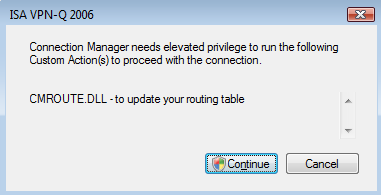
Figure60: Vista - ISA VPN-Q 2006: Elevated Provilege
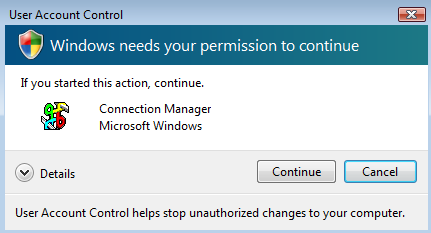
Figure61: Vista - ISA VPN-Q 2006: UAC
If everything was configured correctly, the VPN-Q 2006 Client will start after you connect, and will analyze your system.
If you have a healthy machine, you will be removed from quarantine.
See Figure62 and Figure63.
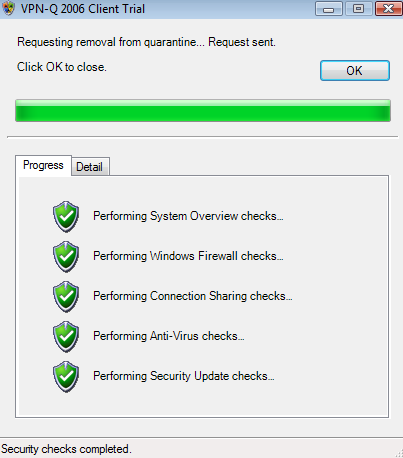
Figure62: Vista - VPN-Q 2006 Checks: Progress
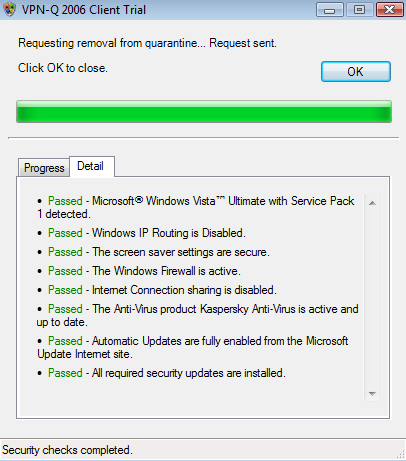
Figure63: Vista - VPN-Q 2006 Checks: Detail
Run an ipconfig /all command to check if you have the Connection-specific DNS Suffix, see Figure64.
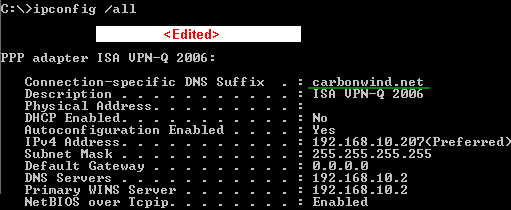
Figure64: Vista - VPN-Q 2006: ipconfig /all
Run an nslookup command to check if the correct DNS server is used for name resolution, although this should not be a problem for Windows Vista machines. The internal DNS server, from the PPP adapter, is used, see Figure65. I have created a Reverse Lookup Zone on the internal DNS server(that's why I get the FQDN for 192.168.10.2).

Figure65: Vista - nslookup
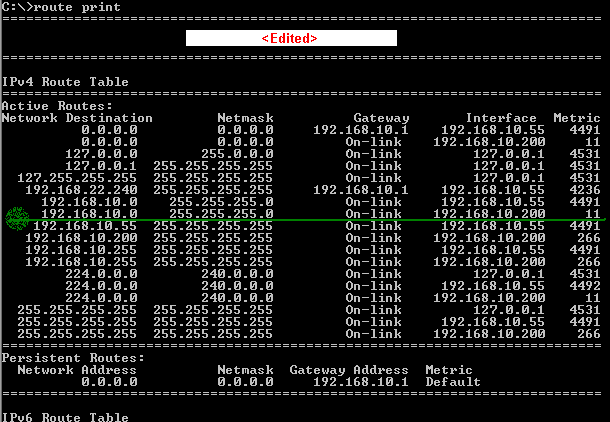
In case you are in the "same subnet" scenario, you should have the correct route in your routing table. Run a route print command. See Figure66.
Remember that you need to be logged with admin privileges on this machine otherwise routing update tables will not be applied.

Figure66: Vista - route print
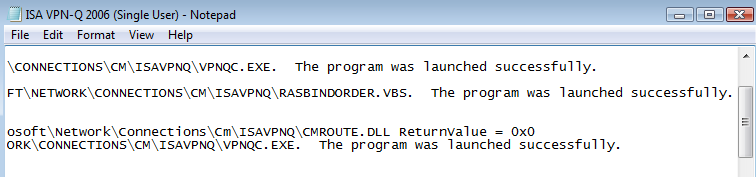
If you want, you can check the connection's log, to view if your custom actions were executed correctly. See Figure67 and Figure68.
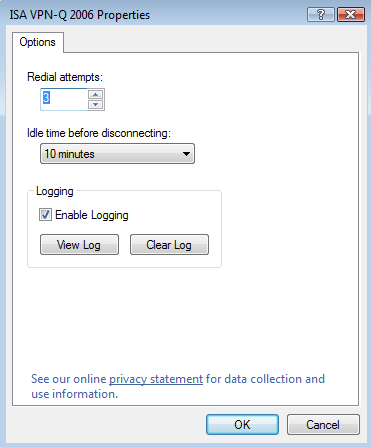
Figure67: Vista - ISA VPN-Q 2006 - View Log
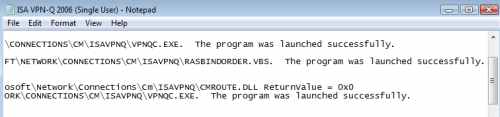
Figure68: Vista - ISA VPN-Q 2006 Log
6. "Automatically configure proxy settings" Possible Issues
The VPN-Q 2006 Client will use(in this test) the Microsoft Update service to obtain the security update policy.
It's a quick check made by the VPN-Q 2006 Client just to make sure the machine has the latest patches installed.
If we take a look on ISA, at the firewall policy created by the VPN-Q wizard, we can notice that it is set to "All Authenticated Users". This means that authentication is required. See Figure69.

Figure69: ISA VPN-Q Access Rule Used to Obtain Security Update Policy by the VPN-Q 2006 Client
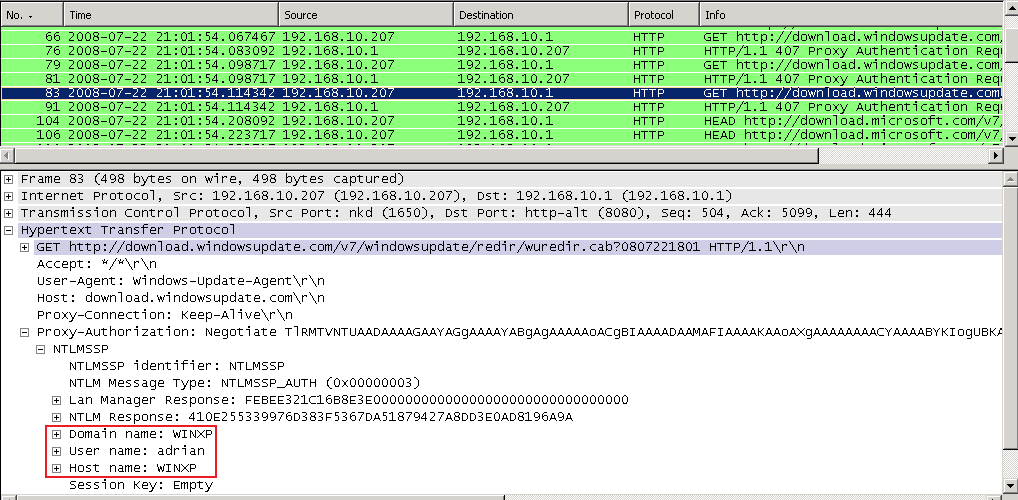
I will connect from a remote non-domain member machine(workgroup) logged in with the local user adrian. The VPN connection user is tony, a domain user.
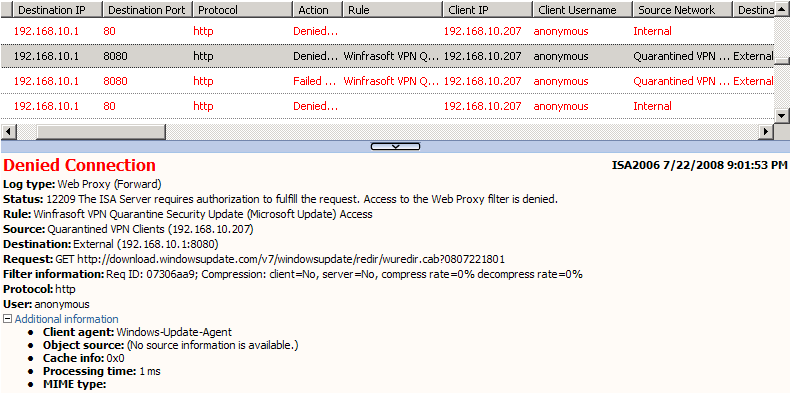
And the security checks will fail, the VPN-Q 2006 Client saying that was "unable to find missing patches" because the "Microsoft Update or WSUS Server could not be contacted". See Figure70.
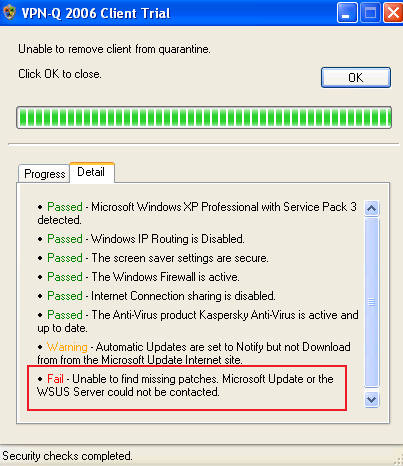
Figure70: VPN-Q 2006 Client - Failed
If we take a look at ISA's logs, we will notice some denied/failed anonymous requests, see Figure71.
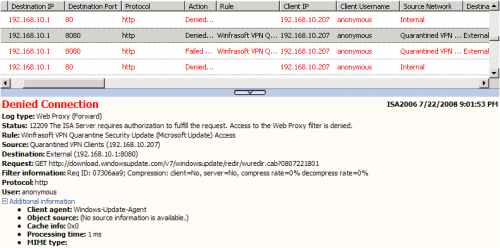
Figure71: ISA Log - Update Checks Denied
I've also started a Wireshark capture on ISA, on the WAN(PPP/SLIP) Interface.
As can be seen in Figure72, ISA requires proxy authentication, and the credentials of the local user adrian were sent(a normal behaviour), not the credentials of the VPN user, tony.
Obviously ISA cannot verify these credentials.
Thus the HTTP requests cannot make it through the proxy authentication process.
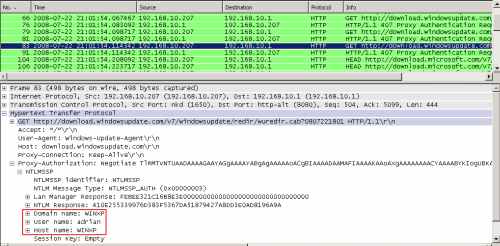
Figure72: Wireshark Capture - Authentication Credentials
Of course, if I was logged on a domain-member machine, as tony, ISA could verify my credentials, and in this case the Automatically configure proxy settings would not create any problems.
7. CMAK Custom Action - Group Policy Update
If you want to update the group policy on domain member computers, you can do that with a custom action. Note that the way it is presented here, this update will take place while the VPN clients are in the Quarantine Network. So you need to allow the required protocols for the allowed users. Read more here.
In Figure73 and Figure74 you can see the custom action added to the CMAK profile.
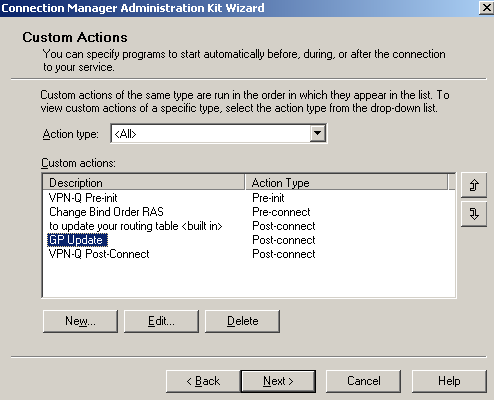
Figure73: CMAK Wizard - Custom Actions
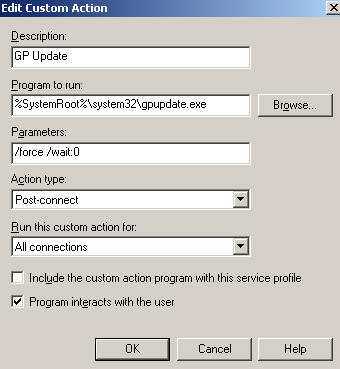
Figure74: CMAK Wizard - Custom Actions: GP Update
|