|
15.06.2007
Simple ISA 2004/2006 Lab with VMware Virtual Server
- 1. Lab Creation with VMware Virtual Server
- 2. Importing VMs from Virtual PC in VMware
My favourite virtualization software comes from VMware.
So how can we use virtualization for an ISA 2004/2006 Lab ?
From VMware we have to choose a product first. VMware Server is free and has quite a lot of features so it should be a good option.
We will need to create four VMs for our lab: ISA, domain controller, DMZ server and client PC. But before doing so let’s talk about the network settings that are available in VMware Server.
Please check our VMware Server Networking Options for more details.
1. Lab Creation with VMware Virtual Server
For our simple ISA 2004/2006 lab we will use a classic ISA network design, 3- leg Perimeter, which is comprised from three networks: the External network, the Internal Network and a Perimeter Network.
The first thing to do is to create the VMs based on our network diagram. It is very simple. Just click File/New/Virtual Machine and follow the wizard.
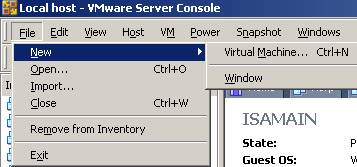
Figure1: VMware Server Adding a VM
Bellow is the network diagram for our lab:

Figure2: Lab Diagram
The RemotePC is actually our real host.
ISA’s external interface belongs to my real LAN 192.168.22.0/24 because we need Internet access. The Default Gateway from its external interfaces is my router which connects me to the Internet. So in reality ISA is not connected directly to the Internet, it’s behind a NAT device. The RemotePC is connected directly to ISA’s external interface like any other device available on my real LAN.
Our ISA firewall as required by our lab design has three NICs on it.
We have located on ISA’s Internal network two machines: a domain controller called DCMain(which also is a DNS, DHCP and CA server) and a client computer. On the DMZ(perimeter) network we have a machine called DMZMain which can serve as an anonymous Web server for example.
ISA 2006 VM is called ISAMain. The domain controller’s name is DCMain, the client PC is named XPMain.
For the Operating Systems running on the VMs we can choose to buy them or go to www.microsoft.com and register for some trials. This is true in case of Windows OS or ISA Firewall. As writing this article for ISA Firewall trials we only have ISA 2006 Firewall (Ent and Standard) available on Microsoft’s site. For Windows Servers, 2003 R2 Server is available(Standard and Enterprise) and also Windows 2008 Beta. For Windows XP only the 64-bit version can be access through the trial program(however for running a 64-bit guest host in VMware we need a 64-bit CPU with virtualization enabled on it, check this link from the VMware site, also there is a tool there for testing your PC).
So let’s create the required virtual networks for our lab.
For the Internal network of ISA we will use the VMnet2 network and for the Perimeter network the VMnet3 network.
First we need to add the corresponding virtual adapters which will be automatically bind to VMnet2 and VMnet3 virtual networks.
Go to “Host Virtual Network Adapters” and click the “Add” button and add VMnet2 and VMnet3:
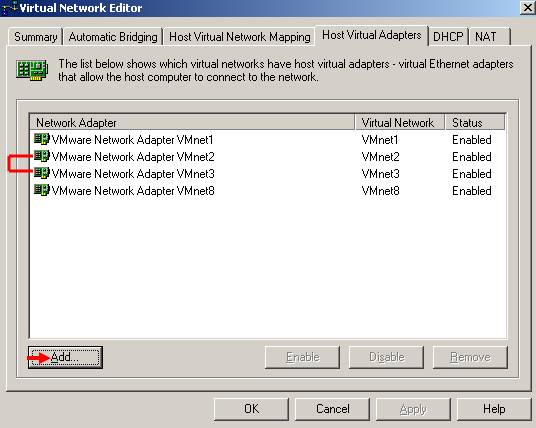
Figure3: VMware Server Virtual Network Editor
Now we should have two more NICs available and enabled on our host:

Figure4 VMware NICs on Real PC Note: If you don’t disable these network adapters on your PC, your computer will be directly connected to the virtual networks(for example leaving connected VMware Network Adapter VMnet2 means that you can direcly access the virtual hosts from VMnet2(like 192.168.10.0/24)). I just disable them in my lab.
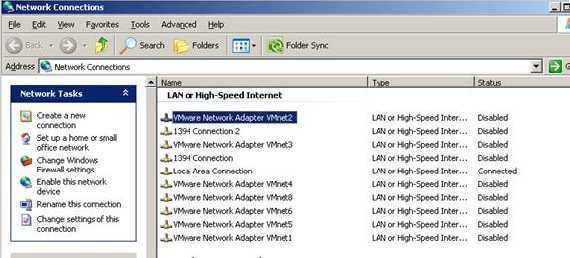
Figure5: Network Connections Panel on Real PC
We will choose for VMnet2 192.168.10.0/24 and for VMnet3 192.168.30.0/24 using“>”:
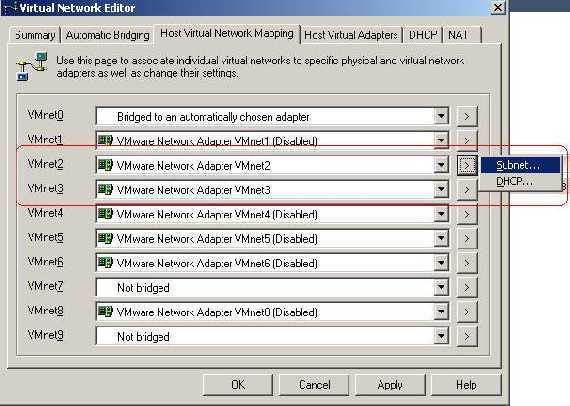
Figure6: VMware Virtual Server Virtual Network Editor(Host Virtual Network Mapping)
So our Summary should look like bellow for VMnet2, VMnet3 and VMnet0(for it since I have only on physical adapter I had left in place the bridging to an automatically choosen adapter).
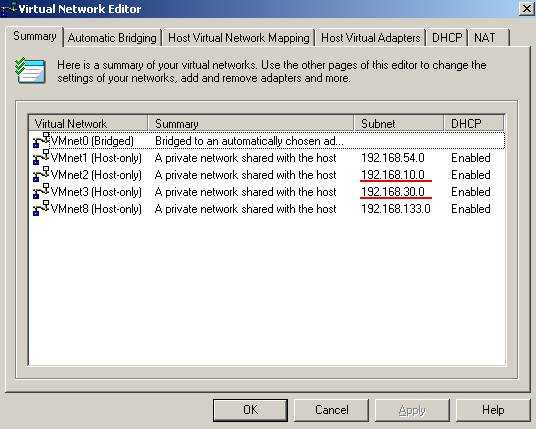
Figure7: VMware Virtual Server Virtual Network Editor(Summary)
VMnet2 will be for the Internal Network(DCMain+XPMain) and VMnet3 for DMZ (DMZTest). As you can see from above the VMnet networks have DHCP enabled on them. This will not count because I have disabled the VMware DHCP Service(see bellow).Try not to confuse the “Host-only” setting with the “Host-only network connection”.
As said before the “Host-only” network connection setting works automatically with VMnet1 adapter and network.
If we want connectivity between the VMnet2 and VMnet3 virtual networks we need to do routing between them(ISA will take care about this for us).
We can disable DHCP and NAT from VMware because we don’t need them for our lab.
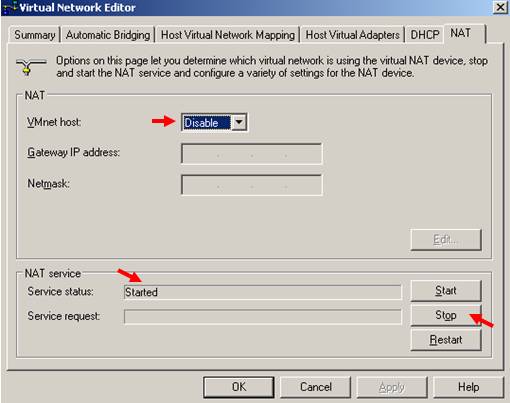
Figure8: VMware Virtual Server Virtual Network Editor(NAT)
Stop DHCP:

Figure9: VMware Virtual Server Virtual Network Editor(DHCP)
Go to the Services(on our real host)and disabled the Vmware DHCP and NAT services. Below I have also configured the two required services: VMware Authorization Service andVMware Registration Service to be manually started in order to optimize my PC performance. I will start them manually when I need to use VMware Server.

Figure10: Services on Real PC
If you are curios and take a look at the “Local users and Groups” on your PC you will see that VMware has created a new user and a new group listed below. You should not touch these two.
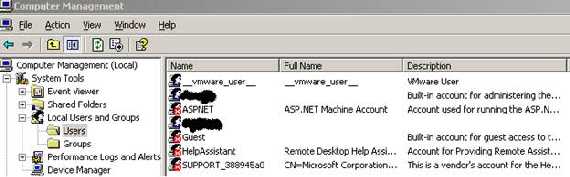
Figure11: Local Users on Real PC
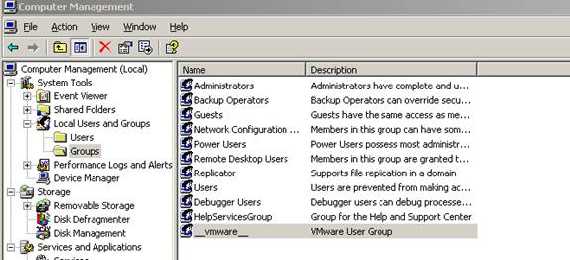
Figure12: Local Groups on Real PC
Now that we have added on VMware the required VMnets, let’s set ISA. Right click on it and go to Settings:
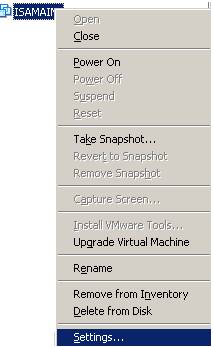
Figure13: Accessing ISAMain VM’s Settings
And from here add two more network adapters(simple click the Add button) and set them like this: 1:bridge; 2:VMnet2; 3:VMnet3.
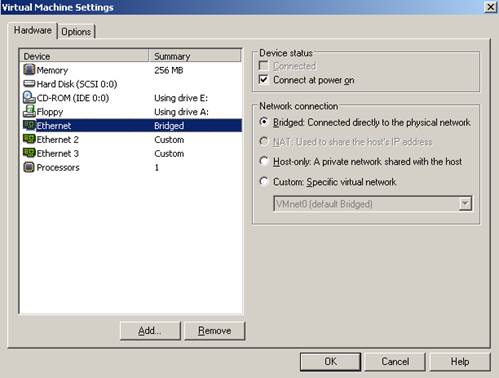
Figure14: ISAMain VM Network Connection Adapter 1
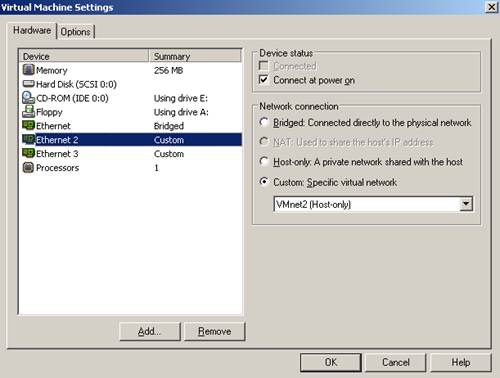
Figure15: ISAMain VM Network Connection Adapter 2
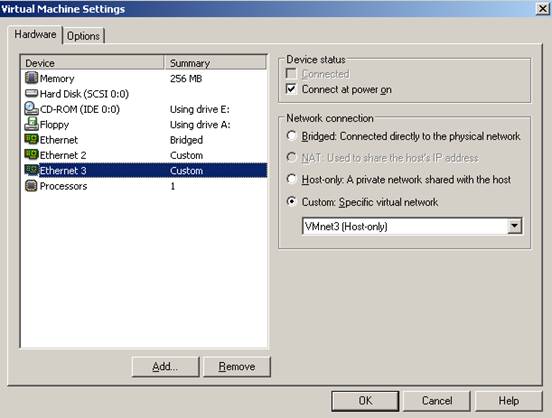
Figure16: ISAMain VM Network Connection Adapter 3
Head on DCMain and set the adapter: VMnet2.
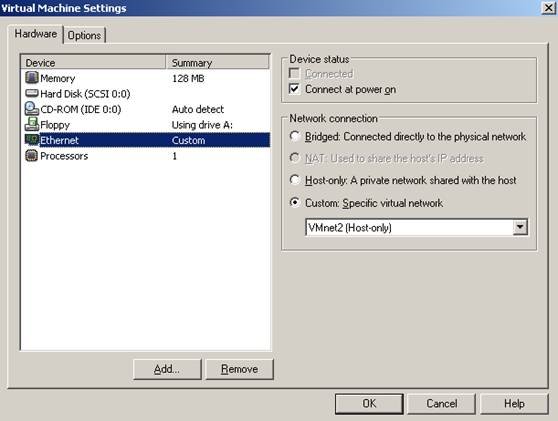
Figure17: DCMain VM Network Connection Adapter
For XPMain, same story, one adapter: VMnet2.

Figure18: XPMain VM Network Connection Adapter
For DMZTest, one adapter, this time: VMnet3.
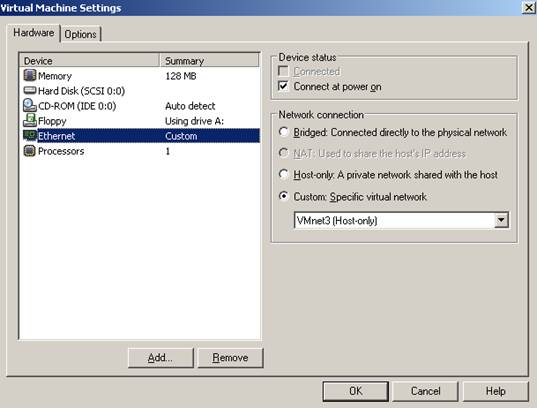
Figure19: DMZMain VM Network Connection Adapter
Now the VMs have the right network settings.
So it’s time to install the required Windows OS on every VM.
After these steps are completed log on ISA.
The default adapter order is: External Interface, Internal interface, DMZ Interface(as defined by us from the VM network settings).
Make sure you do not alter this order yet. Go on and add IP addresses on these adapters like bellow:
ISATest: Adapter1 (Extern): 192.168.22.234, DG: 192.168.22.1 DNS : None
Adapter2 (Intern): 192.168.10.1 DG : None, DNS :192.168.10.2
Adapter3 (DMZ): 192.168.30.1 DG : None, DNS : None
After you have added these settings you can go and properly order the adapters like in normal ISA setup(first Intern, then DMZ, Extern). Also you should give them other names : Wan, Lan and DMZ.
DCTest: Intern: 192.168.10.2 DG: 192.168.10.1 DNS :192.168.10.2
XPTest: Intern: 192.168.10.3 DG: 192.168.10.1 DNS :192.168.10.2
DMZTest: DMZ: 192.168.30.2 DG: 192.168.30.1
From now you can proceed and install the Active Directory services, theDNS Server, make the ISA VM a domain member and finally install the ISA firewall software.
Next time we will create a more advanced ISA lab with VPN site-to-site links and other stuff.
2. Importing VMs from Virtual PC in VMware
Yes, you can import any VM from VPC but attention with your IP addresses because VMware will keep the IP settings for each NIC from VPC but you will not see that adapters because "they are no longer on the computer(VM)". You will get a notice if you will put the same IP addresses(just click No):
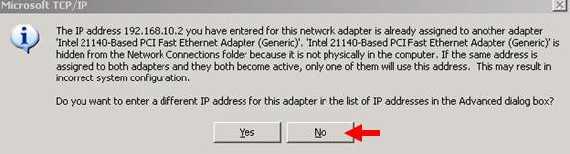
Figure20: Warning on VM
There is no problem with that if you are not having enabled the Loopback Adapters when running VMware(reffer to the creation of this lab with Virtual PC). Click “File/Import”:

Figure21: Import a VM in VMware Server
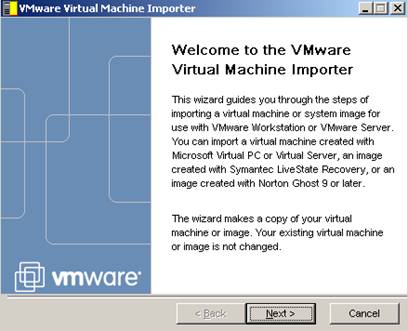
Figure22: Import Wizard VMware Server
You can choose from “Typical” or “Custom”:
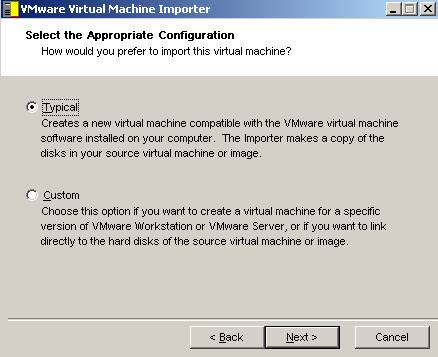
Figure23: Import Options Wizard VMware Server
The difference is that with “Typical” the process is straight, this means you give the location of VPC files *.vmc:

Figure24: Import Wizard VMware Server: Location of the file to Import
Then select the location where to create the VM:
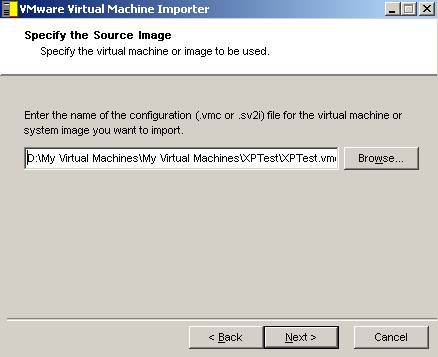
Figure25: Import Wizard VMware Server: Destination of the VMware VM
And it makes of copy of the VM, this time in “VMware format”:

Figure26: Import Wizard VMware Server: Summary for Typical
As with “Custom” you give the location of VPC files *.vmc:
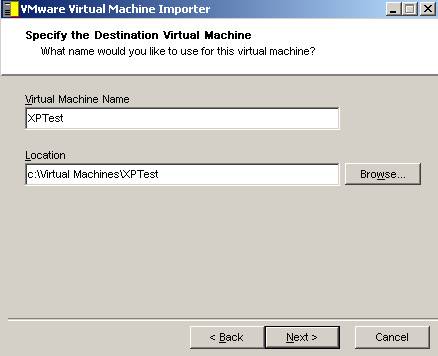
Figure27: Import Wizard VMware Server: Location of the file to Import
Then select the location where to create the VM:
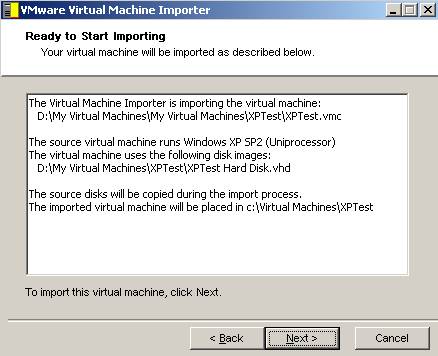
Figure28: Import Wizard VMware Server: Destination of the VMware VM
Now a new window appears where you can choose the VM format(with what VMware products to be compatible with):
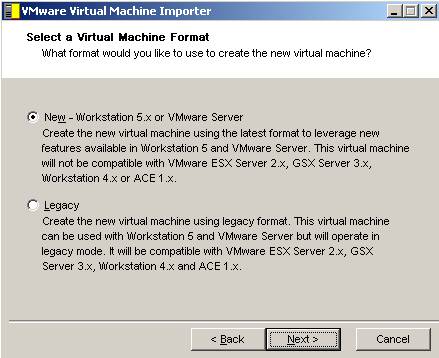
Figure29: Import Wizard VMware Server: The VM Format
After hitting “Next” you have another option in which you can make a copy of the VM just like in “Typical” or for not waisting any time you can link directly the existing VM:
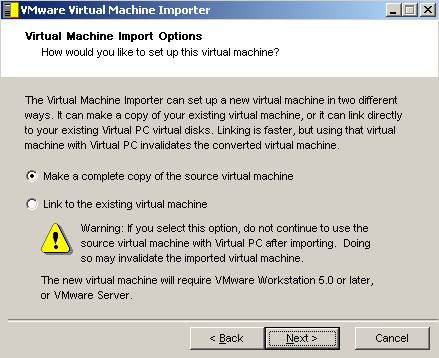
Figure30: Import Wizard VMware Server: Copy or Direct Link
And that’s it:
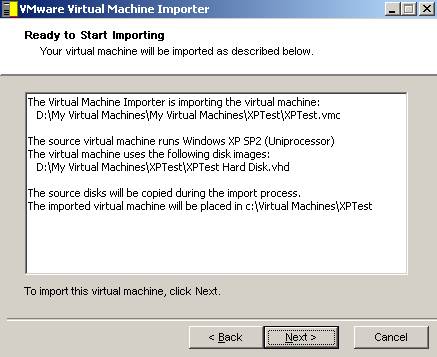
Figure31: Import Wizard VMware Server: Summary for Custom
- VMware Server Networking Options
|