|
01.01.2008
How to Create a VPN site-to-site IPsec Tunnel
Mode Connection Between an ISA 2006 Firewall and a Cisco Router
- 1. Overview
- 2. Configure ISA
- 3. Configure the Cisco Router
- 4. Test the s2s
- 5. Monitor the s2s on ISA
- 6. Monitor the s2s on the Cisco
Router
- 7. Configure some Basic Firewall
Rules on the Cisco Router
- 8. A Traffic Simulation Test
1. Overview
In this article we will establish a site-to-site VPN connection between an ISA
2006 Firewall and a Cisco
Router.
One site is using ISA
2006 Firewall Standard Edition installed on Windows
2003 R2 Standard SP2. The network behind the ISA 2006 Firewall is
192.168.10.0/24.
The other site is using a Cisco
3620 router. If you wonder about the IOS type and version, it’s running
IP/FW/IDS PLUS IPSEC 3DES(c3620-ik9o3s-mz), version 12.2(40).
OK, the version is old but it will not matter since it supports 3DES. Also since
it has the IOS firewall on it we can setup it as a firewall too. If you have
newer versions of IOS, you can benefit from the enhanced firewall support. It’s
all about the amount of money you have to spent(or about the router you have
bought). The network behind the 3620 router is 192.168.40.0/24.
Figure1 describes the network diagram.
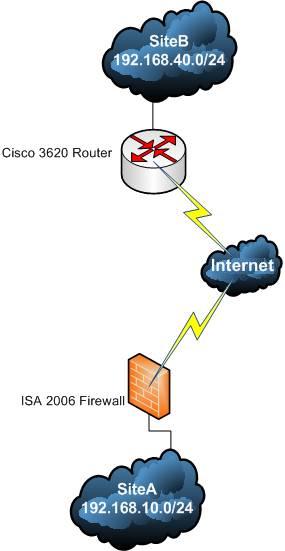
Figure1: The network Diagram
2. Configure ISA
If you plan to build a quick lab, you can setup ISA 2006 in VMware(please refer
to our article
ISA VMware Simple Lab). Everything is identical except that the DMZ Server
and the Client PC are not running.
Before moving to configure your device
please make sure you have read the following docs from VPNC(Virtual
Private Network Consortium):
Documentation Profiles for IPsec Interoperability
Cisco IOS VPN Configuration
Microsoft Internet Security and Acceleration 2004 Server IPSec Interoperability
Profile VPN Consortium
Also there are plenty of docs on Cisco and
Microsoft sites related to IPsec tunnel mode site-to-site setup and
troubleshooting.
Let’s first configure ISA 2006.
Since we already have explained some of these settings in our How
to Create a VPN Site-to-Site IPsec Tunnel Mode Connection Between a Vyatta OFR
and an ISA 2006 Firewall, we will not repeat them here.
Head to “Virtual
Private Network(VPN)” into the “Remote Sites” tab.
Click “Create
VPN Site-to-Site Connection”. I’m going to call it Branch. Select “IP
Security Protocol (IPsec) tunnel mode”. Click “Next”. Specify
tunnel endpoints(see Figure2):
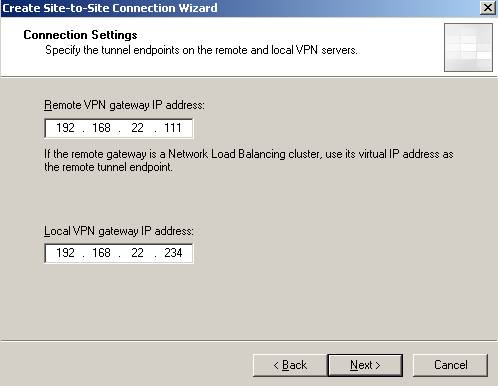
Figure2: Tunnel Endpoints
I’m using a pre-shared key for this lab(see Figure3).
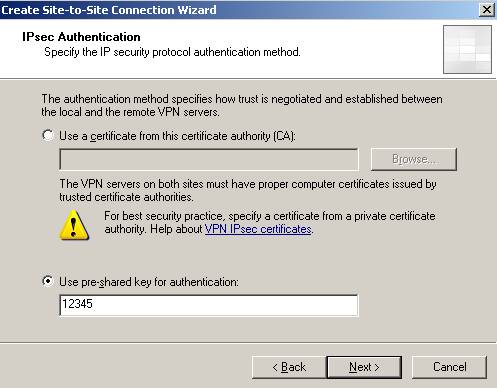
Figure3: Enter the pre-shared key
Specify the remote network address ranges(see Figure4). I also
included(with ISA 2006 this is done automaticaly by the wizard) the remote
endpoint IP address, 192.168.22.111 so I can test connectivity from it(I will do
the same on the 3620 router for ISA).
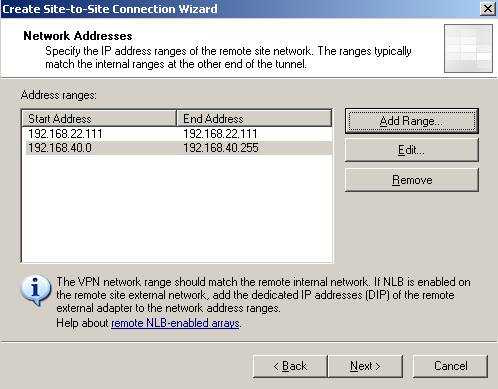
Figure4: Remote network address ranges
Create the network rule with a “route” relationship and the access rule allowing
“All outbound traffic”. Click “Finish”.
Now double click
the Branch remote site, click “Connection” tab and “IPsec settings”(seeFigure5).
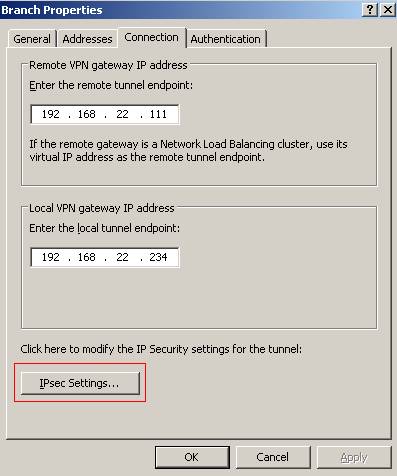
Figure5: Branch Properties
Now we will configure the IKE Main Mode settings(see Figure6).
IKE is defined in
RFC2409, an “Internet Official Protocol Standards" (STD 1)”.
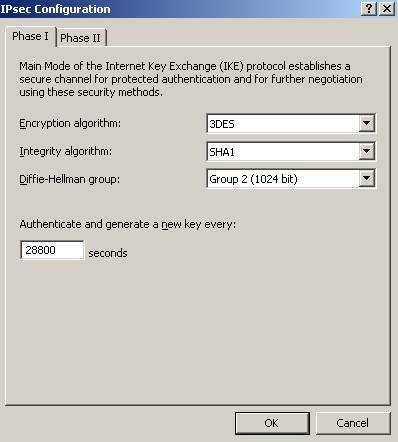
Figure6:IKE Main Mode settings
Figure6 shows the parameters used for IKE Main Mode. ISA can use
2048-bit MODP Diffie-Hellman Group 14 but the Cisco router does not(it can use
1536-bit MODP Diffie-Hellman Group 5 which is not available on ISA). The IKE SA
lifetime is set to 28800s(8 hours). On the Cisco routers this is by default set
to 86400 seconds(24 hours). If you are curios, we are actually using a
cryptographic suite presented in RFC4308(“Internet
Official Protocol Standards" (STD 1)”), Suite "VPN-A”. In this RFC it is
stated that if we use IKEv1 with Suite "VPN-A" we “must” set the IKE SA
lifetime to 86400 seconds(24 hours) and the IPsec SA lifetime to 28800s(8
hours). However this is way to long if traffic it’s actually passing between the
two sites. It is better suited to use by default IKE SA lifetime set to 28800s(8
hours) and IPsec SA lifetime set to 3600s(1 hour). The combination of 3DES and
DH 1024 is not that strong these days(you can get some directions reading NIST
Guidelines for Public-Key Sizes).
Moving to IKE Quick Mode, you can see
the ones used in this lab in Figure7. The IPsec lifetime is set
to 3600s(1 hour). Cisco routers by default use the 3600s(1 hour) for IPsec
lifetime. PFS for keys is used meaning that keys for ESP will be obtain by
running a fresh DHE exchange and not derived from the keying material obtain in
Main Mode. Therefore greater resistance to cryptographic attacks is achieved. No
IPsec lifetime in Kbytes is set(IPsec life type are expressed in kilobytes
and/or seconds, see RFC2407).
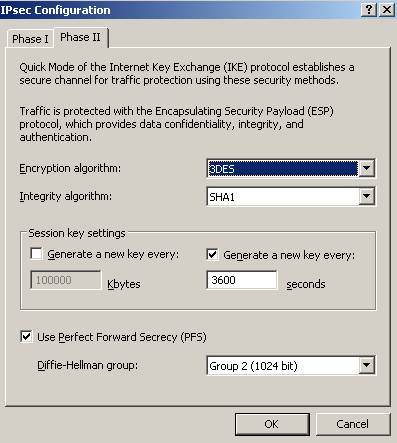
Figure7: IKE Quick Mode parameters
Click “OK” to save the changes.
Apply the new settings on ISA 2006.
So by now ISA 2006 is configured. The remote site has been created, the access
and network rules defined, the IKE parameters set and the remote network address
range was specified.
Note that there is an IPSec SA Idle Timer or an idle
timeout for a Quick Mode SA.
On Cisco routers the IPSec SA idle timer was
introduced on Cisco
IOS version 12.3. So I cannot apply this in my lab since I’m using IOS
version 12.2.
On Windows 2003 the IPSec SA Idle Timer can be set from
registry. The default idle timeout for a Quick Mode SA is 300 seconds. You can
modify it from registry(you can find the registry modification in KB
917025). If you are running ISA on a Windows 2003 SP1 this timer will apply
even if there is traffic. You need to upgrade to SP2 to get rid of this
issue(check this KB923339).
3. Configure the Cisco
Router
Time to configure the Cisco router.
We need to use the exact same settings
for IKE parameters on the Cisco 3620 router(called R1).
ISA 2006 Firewall
is doing NAT from Internal to External. The Cisco 3620 will do the same thing. I
suppose I should have used the Cisco
Router and Security Device Manager (SDM), but that's the way it goes right
now.
“interface FastEthernet0/0
description "External Interface"
ip address
192.168.22.111 255.255.255.0
ip nat outside
interface FastEthernet1/0
description "Internal Interface"
ip address 192.168.40.1
255.255.255.0
ip
nat inside
ip nat inside source list 111 interface FastEthernet0/0
overload
access-list 111 deny ip 192.168.40.0
0.0.0.255 192.168.10.0 0.0.0.255
access-list 111 deny
ip 192.168.40.0 0.0.0.255 host 192.168.22.234
access-list 111
permit ip 192.168.40.0 0.0.0.255 any
ip route 0.0.0.0 0.0.0.0
192.168.22.1”
From above, you can notice that 192.168.40.0/24 was
excluded from the NAT process(access-list 111) when accesing
192.168.10.0/24 and host 192.168.22.234(actually the last exclusion is used by
ISA 2006 for testing connectivity from it to 192.168.40.0/24).
A default
route was also created on the Cisco 3620 router pointing to my real LAN DG so
that the router and hosts behind it to have access to the Internet.
Test
your configuration by trying to access a web site from a host behind the Cisco
router. You should be able to do so.
Check the access-list 111 for matches(see Figure8):

Figure8: sh access-list 111
Let’s visualize the default IKE Phase I settings(see Figure9):

Figure9: IKE Phase I default settings
They do not match our ISA settings so we will create another policy, “isakmp
policy 15”(seeFigure10).
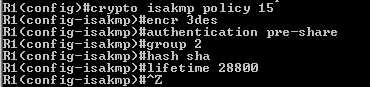
Figure10: A new isakmp policy
Check what we have done. As you see(see Figure11) the settings
of “isakmp policy 15” match the ones used on ISA 2006 for IKE Main
Mode.
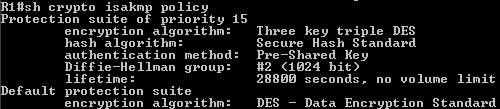
Figure11: Isakmp policy 15
Next let’s specify the pre-shared key(the same used on ISA 2006., see Figure12): 
Figure12: Specify the pre-shared key
Now we need to define the Quick Mode parameters(see Figure13):
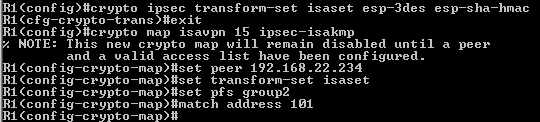
Figure13: Router IKE Quick Mode parameters
We are using with isaset “transform-set” the same settings from
ISA 2006 for IKE Quick Mode, we also enabled PFS. With “access-list 101”
we will specify the network address ranges for the remote site.
Let’s
create the “access-list 101”(see Figure14).
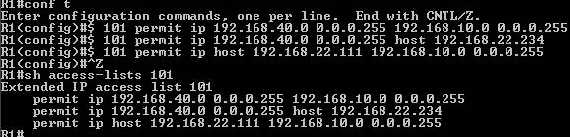
Figure14: Access-list 101
First line defines the remote network 192.168.10.0/24(which can be accessed by
local network 192.168.40.0/24). The second line is used to allow connectivity
testing from ISA 2006 to 192.168.40.0/24. And finnaly, the third one permits
connectivity testing from the Cisco 3620 router to 192.168.10.0/24. Actually
you can use the ping command on Cisco IOS to specify the source interface(thus
the source IP) but it’s faster to just type ping X.X.X.X.
And bind
the “crypto map isavpn” to the outgoing interface “f0/0”(see Figure15).

Figure15: Binding the “crypto map isavpn” to
the outgoing interface “f0/0”
Check what you have done(see Figure16):

Figure16: sh crypto map int f0/0
And that’s it. No firewall settings yet on the Cisco 3620 router. The router
config can be found
here.
4. Test the s2s
So let’s try and bring the tunnel up. To do so, we will ping from a host behind
the Cisco router 192.168.40.2, to a host behind ISA 2006 Firewall,
192.168.10.2(see Figure17). You can use Wireshark to
capture the packets on ISA’s external interface and visualize the IKE
negotiations and packets protected by IPsec ESP(see Figure18).
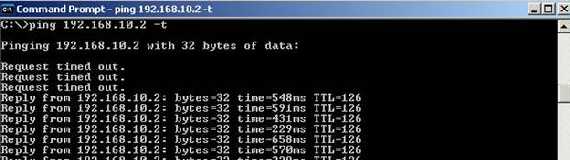
Figure17: ping 192.168.10.2 from 192.168.40.2
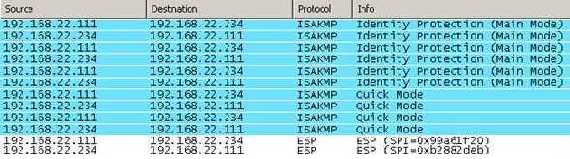
Figure18: Wireshark capture
And it works.
A connectivity test from the Cisco router to 192.168.10.2(see Figure19):

Figure19: A connectivity test from the Cisco router to
192.168.10.2
You can use the ping command and by defining “extended commands” you can specify
the source interface(thus the source IP address), see Figure20.
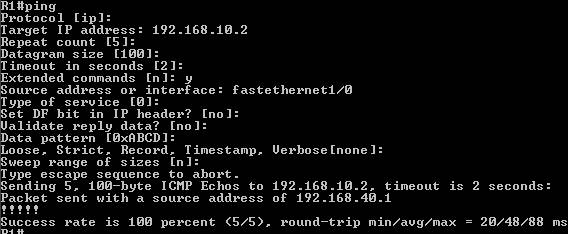
Figure20: Ping extended commands
A connectivity test from ISA 2006 to 192.168.40.2(see Figure21):
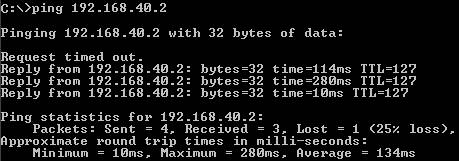
Figure21: A connectivity test from ISA 2006 to 192.168.40.2
A connectivity test from 192.168.10.2 to 192.168.40.2(see Figure22):
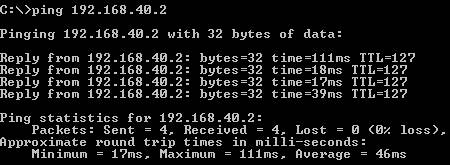
Figure22: A connectivity test from 192.168.10.2 to 192.168.40.2
5. Monitor the s2s on
ISA
Open the “IP Security Monitor” mmc on ISA and check on ISA the Main Mode and
Quick Mode SAs(see Figure23 and Figure24).
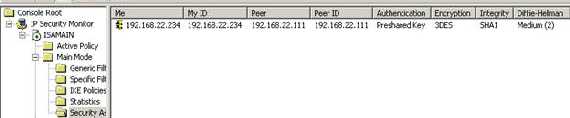
Figure23: IKE Main Mode SA on ISA 2006

Figure24: IKE Quick Mode SAs on ISA 2006
6. Monitor the s2s on
the Cisco Router
Moving onto the Cisco router let’s check if the access-lists have done their
job(see Figure25):

Figure25: Checking for matches in access-lists
Show IKE Main Mode SA on the Cisco router(see Figure26):

Figure26: Show IKE Main Mode SA on the Cisco
router
Show IKE Quick Mode SAs on Cisco router(Figure27 shows
just a small part of the output): 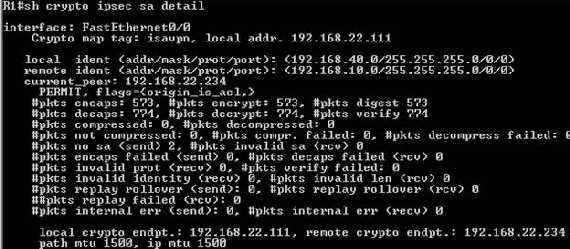
Figure27: Show IKE Quick Mode SAs on the Cisco
router
7. Configure some Basic
Firewall Rules on the Cisco Router
Since this IOS version has firewall capabilities we can secure the external
interface. The bellow configuration is just basic stuff, some quick added lines
to the router configuration. As said before the IOS version is old so the
protocols supported with Context-Based
Access Control are limited. First thing I will do is to add and
extended-access list on the external interface to allow and block traffic. I
will allow IKE, IPsec ESP, returning DNS traffic, returning ICMP replies to the
router and traffic from 192.168.10.0/24 to 192.168.40.0/24(on newer IOS versions
the last two lines of the access-list are not required).
“access-list
121 permit udp host 192.168.22.234 eq isakmp host 192.168.22.111 eq isakmp
access-list 121 permit esp host 192.168.22.234 host 192.168.22.111
access-list 121 permit udp any eq domain host 192.168.22.111 gt 1023
access-list 121 permit icmp any host 192.168.22.111 echo-reply
access-list 121 permit ip host 192.168.22.234 192.168.40.0 0.0.0.255
access-list 121 permit ip 192.168.10.0 0.0.0.255 192.168.40.0 0.0.0.255”
“interface FastEthernet0/0
ip
access-group 121 in”
And I want to inspect HTTP traffic from 192.168.40.0/24 to the external world(if
your IOS version has DNS support you can do the same for DNS protocol and delete
the DNS line from access-list 121). For this I will use Context-based
access control (CBAC).
“ip inspect name test http timeout 3600
interface FastEthernet0/0
ip inspect test out”
Also some extra lines on the external interface to block ICMP “Host
unreachable”, “Redirect”, and “Mask Reply” messages. So
in the end the configuration on the router external interface will look like:
“interface FastEthernet0/0
ip address 192.168.22.111
255.255.255.0
ip access-group 121 in
no ip
redirects
no ip unreachables
ip nat
outside
ip inspect test out
duplex auto
speed auto
crypto map isavpn”
The “full firewall” configuration is here.
You can try now to access a HTTP web site from a host behind the router(meaning
that you will alos test that DNS is working if you use FQDN). I did so from
192.168.40.2. Note that with this config in place, hosts belonging to
192.168.40.0/24 are only allowed to access external resources using DNS and HTTP
protocols. Don’t go to a HTTPS web site because it will not work.
Check that the access-list 121 is working(see Figure28):
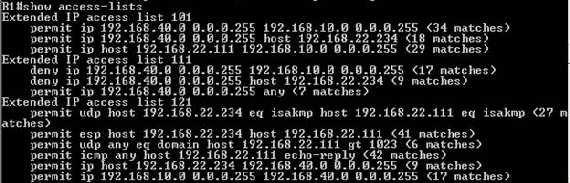
Figure28: Check that access-list 121 is working
Actually you can for example configure the 192.168.40.0/24 computers to use ISA’s
IP address 192.168.10.1 as their web proxy by creating an access rule allowing
HTTP/HTTPS from Branch to External on ISA . Note that we
already added the remote end-point IP addresses to the remote network address
ranges on both sides. To block direct Internet access from hosts belonging to
192.168.40.0/24 use aproppiate access-lists.
8. A Traffic Simulation
Test
I have simulated some traffic between the two sites by using a ping command for
over an hour. The tunnel stayed up and not a single packets was lost(except the
ones from the start of the ping command when the tunnel was not up yet). A new
Quick Mode was negotiated after an hour(as configured). See Figure29, Figure30, Figure31, Figure32.
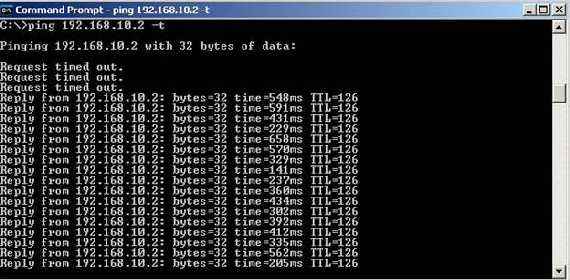
Figure29: Starting the ping marathon
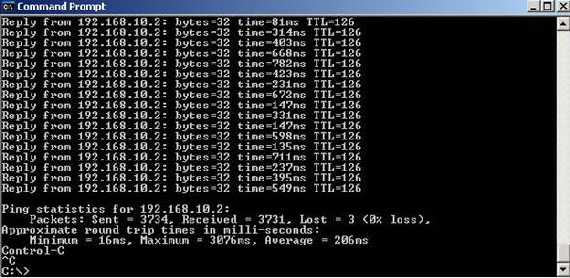
Figure30: Ending the ping marathon
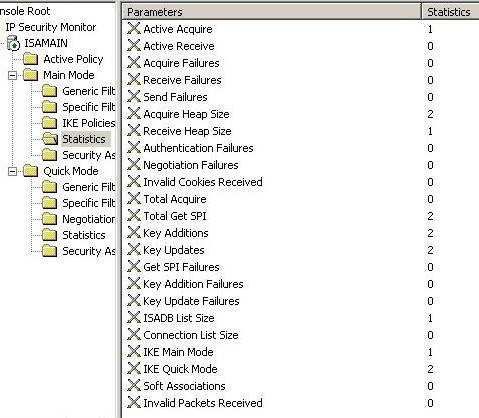
Figure31: IKE Main Mode Statistiscs from ISA
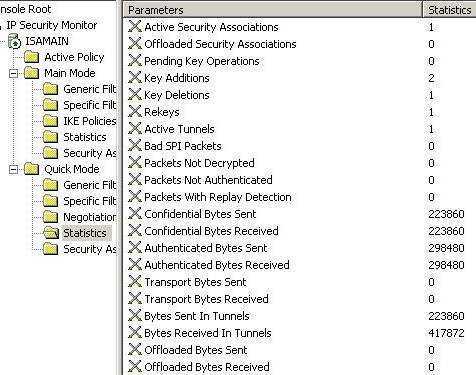
Figure32: IKE Quick Mode Statistiscs from ISA
- Cisco 3620
Configuration File without Firewall Settings
- Cisco
3620 Configuration File with Firewall Settings
|