|
21.12.2007
How to Create a VPN Site-to-Site IPsec Tunnel Mode Connection Between a Vyatta OFR and an ISA 2006 Firewall
- 1. Overview
- 2. Configure ISA
- 3. Configure Vyatta
- 4. Test the s2s Connection
- 5. Monitor the s2s on Vyatta
- 6. Monitor the s2s on ISA
- 7. Create Some basic Firewall Rules on Vyatta
1. Overview
In this article we will establish a site-to-site VPN connection between an ISA 2006 Firewall and a Vyatta OFR(Open Flexible Router) VC3.0 and we will talk a little bit about Vyatta.
Vyatta is an open-source router, firewall and VPN solution.
Its aim is to take on Cisco's turf by providing "an alternative to over-priced, inflexible products from proprietary vendors"(according to Vyatta's site).
Vyatta's flexibility comes from the deployment scenarios(you can choose x86 hardware, blade servers, even virtualization through VMware VMs for example). Your have the freedom to integrate applications. You can build your own custom machine, you are not limited to use fixed hardware components.
I've always been very pleased when someone offers me for free a trial version of their software because I'm able to see, feel, touch, taste myself its capabilities. The ability to quickly build my personal lab without huge costs, to see the device in action, under my test scenarios, it's a critical point for me. Maybe it's just me, but I cannot be convinced to take on granted the manufacturer words, by just reading the documentation.
Vyatta is availabe as a download on the manufacturer site, either as a CD-ROM image(Community Edition) or as a VMware Virtual Appliance.
I won't hide my feelings and opinions about Vyatta, as I must say I was pleasently impress by it and I consider Vyatta OFR an awesome product. But you do not have to trust my words. You can see it yourself.
A very impressive fact about Vyatta is represented by the outstanding support you can receive from the Vyatta team even as a simple person trying Vyatta for the first time. Quick and sharp answers are provided by both Vyatta officials or by Vyatta users on the email mailing lists. The guys from Vyatta are always opened in discussing bugs or currently not working settings. They are also very quick in providing workarrounds.
I feel the need to ask you: Haven't you tried Vyatta yet ?
So what are you waiting for ?
ISA 2006 Firewall is a stateful packet-inspecting, circuit-filtering, application layer firewall, VPN server, Web Proxy and Caching Solution. It provides application filters for HTTP, DNS, SMTP, FTP, RTSP.... Within ISA 2006, the Web Proxy Filter is an application filter and not an independent service.
ISA 2006 Firewall is available as a trial on Microsoft site.
Knowing all these we can easily build a low cost lab, either to test the capabilities of the two machines or get ready to use in production for example, a site-to-site VPN connection(the subject of this article).
Because we can have our own lab, we can test this site-to-site VPN connection, find out the optimum configuration for both devices and mitigate some problems that might appear in production. After all these, the production deployment should be an easier, automated task to accomplish.
In fact, we can find out even if the scenario is feasible or not, in the comfort and safety of our lab.
Vyatta's VPN is based on Openswan.
Figure1 describes the network diagram.

Figure1: The network Diagram
One site is using ISA 2006 Firewall Standard Edition installed on Windows 2003 R2 Standard SP2. The network behind the ISA 2006 Firewall is 192.168.10.0/24.
The other site is using Vyatta OFR VC3.0. The network behind Vyatta is 192.168.40.0/24.
You can build the entire lab using VMware Virtual Server.
Vyatta Community Edition, comes with a comprehensive documentation( a Quick Start Guide, a Configuration Guide and a Command Reference) available as a free download at:
http://www.vyatta.com/documentation/index.php
Before moving to configure your ISA 2006, please make sure you have read the following docs from VPNC(Virtual Private Network Consortium):
Documentation Profiles for IPsec Interoperability
Microsoft Internet Security and Acceleration 2004 Server IPSec Interoperability Profile VPN Consortium
Also there are plenty of docs on Microsoft site related to IPsec tunnel mode site-to-site setup and troubleshooting.
2. Configure ISA
Let’s first configure ISA 2006.
Head to “Virtual Private Network(VPN)” into the “Remote Sites” tab.
Click “Create VPN Site-to-Site Connection”.
I’m going to call it Vyatta(see Figure2).
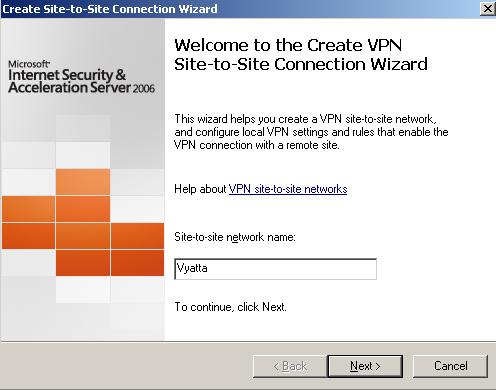
Figure2: Site-to-Site Connection Wizard
Select “IP Security Protocol (IPsec) tunnel mode”(see Figure3).
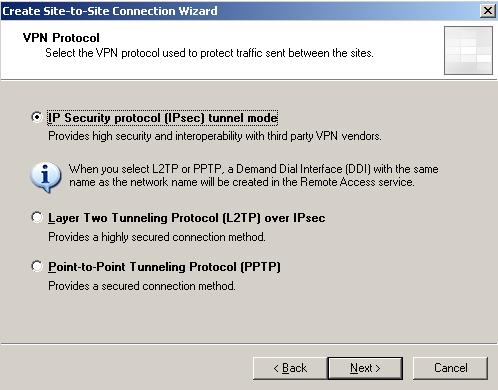
Figure3: The VPN Protocol
Specify the tunnel endpoints(see Figure4)
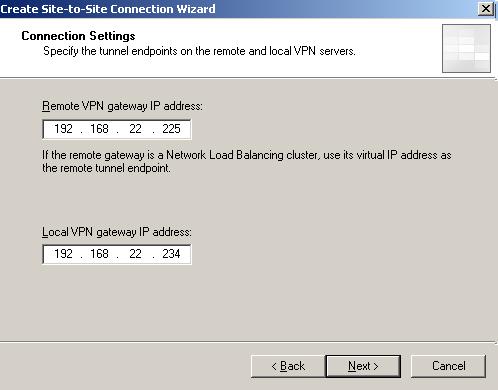
Figure4: Specify the Tunnel Endpoints
For the Authentication method for IKE Main Mode choose pre-shared key(see Figure5).
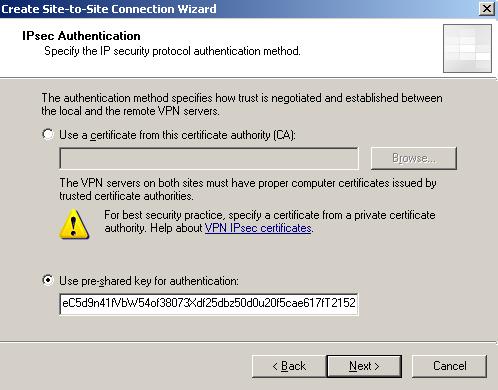
Figure5: The Authentication method for IKE Main Mode
Vyatta supports as authentication methods RSA Digital Signatures and pre-shared keys.
Although the "certificate authentication" method uses RSA Digital Signatures, it requires a certificates exchange for obtaining the RSA public keys of the peers.
Vyatta allows you to manually specify the remote peer's public key. ISA does not support this.
This method is not scalable if you maintain multiple site-to-site connections and makes management complicated.
With the "certificate authentication" method, it's easy to revoke certificates in case the private key becomes compromise. Also, the certificate and its repective owner, can be easily identified.
However, ISA 2006 does not perform any field checks(like CN check) for the certificate received from its IKE peer. If the certificate is valid and was issued by a CA which ISA trusts(you need to specify on ISA which CA issued certificates that can be accepted for IKE authentication), the peer is authenticated. That's why you must use certificates issued by your private CA.
With the Digital Signature method, along with the other parameters used(DH, symetric encryption algorithm, hash function) you can define an overall security strength for your VPN connections(for example 128 bits of security).
Pre-shared keys are a weak method of authentication.
Pre-shared keys are susceptible to theft, loss and the IKE Main Mode(that's correct, I'm not reffering to Aggressive Mode here) is susceptible to an active MITM, which can lead to the cracking of weak pre-shared keys. Note that this is not a weakness of IKE Main Mode, it's a weakness of weak pre-shared keys(remember that the pre-shared key is not only used for authentication, is also involved in deriving keying material, here the attack is taking place, the attacker will try to determine the encryption key, by choosing pre-shared key values from his/her dictionary or by brute force, for the first IKE MM encrypted packet received from his/her victim, the other parameters like DH shared secret are known because this is an active MITM attack). Since it's out of the scope of this article, we won't describe the method for attacking MM when using pre-shared keys.
The pre-shared key that I entered is 128 characters long(I applied SHA-512 over some "random" data, as random as data can be generated by my brain and fingers playing with the keyboard). Since I'm under Windows, I have used SlavaSoft HashCalc, a nice and handy tool. Note that the obtained pre-shared key is using a-f characters and 0-9 numbers. I have arbitrairly replaced some characters and now the pre-shared key is using a-z, A-Z characters and 0-9 numbers.
Why I'm not using special characters like #@%^()$* ?
Vyatta VC3.0 has a restrictive syntax check, so it won't accept such characters. When you commit your configuration, it will fail due to invalid pre-shared key. You can get past this limitation by modifying a file. Please read the following: https://bugzilla.vyatta.com/show_bug.cgi?id=2517
In ISA Std 2006 installed on Windows 2003 R2 Std SP2, I've noticed that I can enter a 260 characters pre-shared key. However if the pre-shared key is longer than 250 characters ISA will log a failure alert. So it appears that the 250 represents the limit length for ISA.
I'm not aware of the length limit on Vyatta/Openswan.
So enter your pre-shared key and click "Next ".
Now you have to enter the remote site IP address ranges. In our case 192.168.40.0/24. Click "Add Range" (see Figure6).
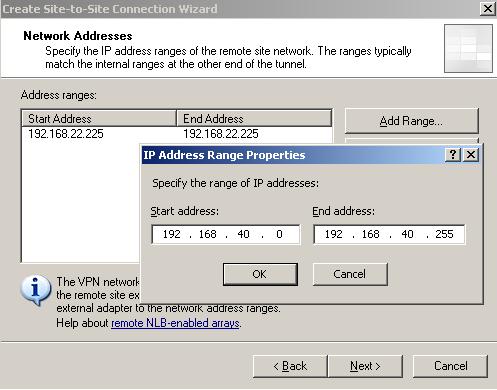
Figure6: Remote Site IP Addresses Ranges
As you can see from Figure6 ISA 2006 has already added to the remote site definition the remote endpoint IP address. For this lab I will just remove that.
Adding that IP address is very handy when you ping directly from Vyatta to hosts behind ISA. A different IPsec Security Association(SA) must exist because when you ping from Vyatta, the IP address of the interface on which the tunnel is terminated is used as source (in our case 192.168.22.225). Therefore for IKE QM negotiations, a filter between 192.168.22.225 and 192.168.10.0/24 must exist. Same story if we want to ping from ISA to some hosts behind Vyatta, we must add ISA's 192.168.22.234 IP address to the remote network definition on Vyatta otherwise a Negotiating IP Security response is received.
Click "Next".
You now have the oportunity to define a network rule on ISA(this is required). It will be a route relationship between the Vyatta Remote Network and the Internal Network of ISA. This rule also specifies the local subnet of the site-to-site connection. In our case it will be 192.168.10.0/24. Note that you can define this rule later, but if you want to specify only some IP addresses from ISA's Internal Network you cannot do that because you do not have so much flexibility under ISA's implementation of IPsec tunnel mode site-to-site connection(you can do that with L2TP/IPsec site-to-site connections in ISA).
We will define the rule now(see Figure7)

Figure7: The Network Rule on ISA
Click "Next".
We must define access rules allowing access between the remote Vyatta network and ISA's Internal Network and vice-versa. For our lab test I will simple allow everything between the two networks(see Figure8). Traffic inspection(both stateful packet-inspection and application layer inspection when possible) will be applied to communications between the two sites.
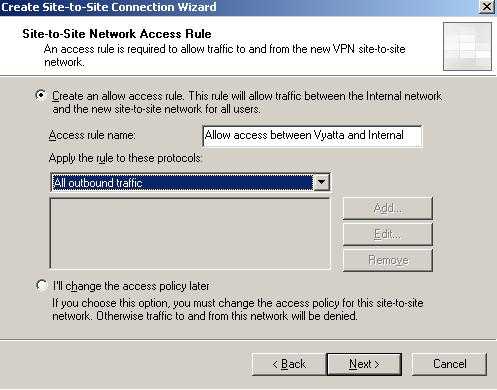
Figure8: Creating The Access Rule on ISA
Figure9 shows the access rule created by the wizard.

Figure9: The Access Rule on ISA
Click "Next" and “Finish”.
Now double-click the Vyatta remote site, click the “Connection” tab and the “IPsec settings” button(see Figure10).
Now we will configure the IKE Main Mode settings. IKE is defined in RFC2409, an “Internet Official Protocol Standards" (STD 1)”.
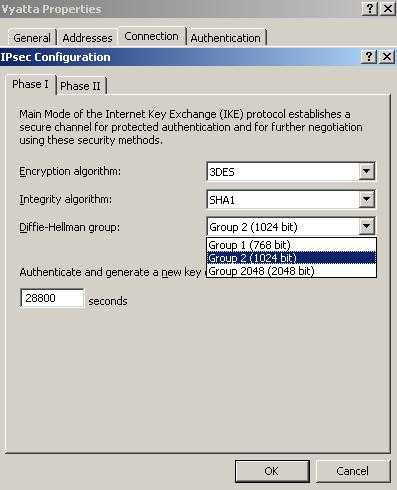
Figure10: IKE Main Mode Settings
ISA can use 2048-bit MODP Diffie-Hellman Group 14 but the Vyatta router does not(CLI). It can use the 1536-bit MODP Diffie-Hellman Group 5 which is not available on ISA.
The IKE SA lifetime is set to 28800s(8 hours). On the Vyatta OFR this is by default set to 28800s(8 hours) too.
If you are curios, we are actually using a cryptographic suite presented in RFC4308(Internet Official Protocol Standards (STD 1)), Suite "VPN-A". In this RFC it is stated that if we use IKEv1 with Suite "VPN-A" we must set the IKE SA lifetime to 86400 seconds(24 hours) and the IPsec SA lifetime to 28800s(8 hours). However this is way to long if traffic it’s actually passing between the two sites.
In this lab we use the IKE SA lifetime set at 28800s(8 hours) and the IPsec SA lifetime set to 3600s(1 hour). The combination of 3DES and DH 1024 is not that strong these days(you can get some directions reading NIST Recommendation for Key Management). The lifetimes should be changed for example depending the bandwith available between peers(there is a difference between 1.5 Mb between offices or 100 Mb or say, 1 Gb ISP where the QM lifetime will be quite low so numerous QM negotiations can occur using the same IKE SA).
3DES-CBC is used as the symmetric-key encryption algorithm and the hash function is SHA-1. Vyatta supports AES-CBC with key size of 128, 192 and 256 bits. However Vyatta does not support the ECP Groups for IKE proposed by NSA within RFC4753 ECP Groups for IKE and IKEv2 ( which "does not specify an Internet standard of any kind"). According to that RFC:
- "The groups proposed in this document correspond to the symmetric key sizes 128 bits, 192 bits, and 256 bits. This allows the IKE key exchange to offer security comparable with the AES algorithms."
ISA 2006 does not support AES(Vista is the first Windows OS supporting AES for VPN). There is an old chat on Microsoft site about AES and its key size requirements:
http://www.microsoft.com/technet/community/chats/trans/network/net0610.mspx
Remember the overall security strength mention above?
Well, here it goes: 3DES is supposed to provide a maximum 112 bits of security(the effective key length is 112 bits and not 168 bits due to a meet-in-the-middle attack).
The key for 3DES is derived from the Diffie-Hellman shared secret.
RFC2409 states that:
- The strength of a key derived from a Diffie-Hellman exchange using any of the groups defined here depends on the inherent strength of the group, the size of the exponent used, and the entropy provided by the random number generator used.
The Diffie-Hellman MODP(Modular Exponential) groups have different strength. The security stregth of DH 1024-bit(Group 2) is 80 bits as opposed of the DH 2048-bit(Group 14) which is 112 bits.
So if we want to benefit from the maximum strength of 3DES we should use DH MODP Group 14. However we cannot do that within Vyatta's CLI.
But the story does not end here. IKE uses an HMAC version of the hash algorithm as a prf(pseudo-random function) to generate the keying material. In our case SHA-1 is the hash function. The hash function has its own security strength, which may vary depending for what the hash function is used(HMAC, digital signature, key derivation function...). SHA-224 is a hash function that provides 112 bits of security, which is the strength of 3DES(see RFC3874). Note that SHA-224 is based on SHA-256.
Also the CA issues certificates using RSA-with-SHA1 or RSA-with-MD5 signature algorithms. The RSA key length along with the hash function used determine the strength of the signature algorithm.
But before panic erupt please take your time and read the following documents:
NIST Comments on Cryptanalytic Attacks on SHA-1
NIST's Policy on Hash Functions
RFC4270 Attacks on Cryptographic Hashes in Internet Protocols
RFC4894 Use of Hash Algorithms in Internet Key Exchange (IKE) and IPsec
RFC4945 The Internet IP Security PKI Profile of IKEv1/ISAKMP, IKEv2, and PKIX
Note that both RFC4270 and RFC4894 "do not specify an Internet standard of any kind".
RFC4945 represents an "Internet Official Protocol Standards (STD 1)".
I know the reading of RFCs might be painful so I will summarize for you.
First the NIST comments:
- " Federal agencies should stop using SHA-1 for digital signatures, digital time stamping and other applications that require collision resistance as soon as practical, and must use the SHA-2 family of hash functions for these applications after 2010. After 2010, Federal agencies may use SHA-1 only for the following applications: hash-based message authentication codes (HMACs); key derivation functions (KDFs); and random number generators (RNGs). Regardless of use, NIST encourages application and protocol designers to use the SHA-2 family of hash functions for all new applications and protocols."
Within RFC4894, Paul Hoffman from VPNC(VPN Consortium), describes the use of hash functions within IKEv1, IKEv2 and IPsec and how these hash functions are affected by the current known attacks explicitely when used within the above specified protocols. This document is about the security implications of reduced collision-resistance of common hash algorithms for the IKE and IPsec protocols.
The document states that:
- The hash function used(MD5 or SHA-1) as a prf is not susceptible to any known collision-reduction attack due to the always use of nonce values(which cannot be predicted in advanced by an attacker, nonce are merely random numbers, they provide additional freshness).
- IKEv1 also uses hash functions on the inputs to the PRF. The inputs are a combination of values from both the initiator and responder, and thus the hash function here is not susceptible to any known collision-reduction attack.
- IKEv1 uses authentication with digital signatures. Digital signatures use hashes to make unique digests of the message being signed. With the current known attacks, the only party that can create the two messages that collide is the IKE entity that generates the message.
- IKEv1 uses PKIX certificates for authentication. Any weaknesses in PKIX certificates due to particular ways hash functions are used, or due to weaknesses in particular hash functions used in certificates, will be inherited in IKEv1 implementations that use PKIX-based authentication. If IKE uses certificate authentication, you should strongly consider allowing the use of certificates that are signed with the SHA-256, SHA-384, and SHA-512 hash algorithms.
- ESP uses hash functions for authenticating packets when ESP is using its own authentication. Hash functions are always used in HMAC. MD5 used in HMACs is susceptible to forgery, and it is suspected that full SHA-1 used in HMAC is susceptible to forgery. There is no known reason for the person who creates legitimate packet authentication to want to spoof it.
RFC4894 concludes that:
- As described in earlier sections, IKE and IPsec themselves are not susceptible to any known collision-reduction attacks on hash functions. Thus, implementors do not need to make changes such as prohibiting the use of MD5 or SHA-1.
- Note that some IKE and IPsec users will misunderstand the relevance of the known attacks and want to use "stronger" hash functions. Thus, implementors should strongly consider adding support for alternatives, particularly the AES-XCBC-PRF-128 and AES- XCBC-MAC-96 algorithms, as well as forthcoming algorithms based on the SHA-2 family.
- Implementations of IKEv1 and IKEv2 that use PKIX certificates for authentication may be susceptible to attacks based on weaknesses in PKIX.
Regarding the use PKIX certificates for authentication RFC4945 states that:
- At the time that this document is being written, popular certification authorities and CA software issue certificates using the RSA-with-SHA1 and RSA-with-MD5 signature algorithms. Implementations MUST be able to validate certificates with either of those algorithms.
- Both the MD5 and SHA-1 hash algorithms are weaker than originally expected with respect to hash collisions. Certificates that use these hash algorithms as part of their signature algorithms could conceivably be subject to an attack where a CA issues a certificate with a particular identity, and the recipient of that certificate can create a different valid certificate with a different identity. So far, such an attack is only theoretical, even with the weaknesses found in the hash algorithms.
RFC4270 provides more more details about the attacks on hash functions.
According to the above mentioned NIST document(see Table 3), the security strength of SHA-1 can go up to 128 bits when used for HMAC, key derivation function and random number generation.
Moving to IKE Quick Mode, you can see the settings used in this lab in Figure11.
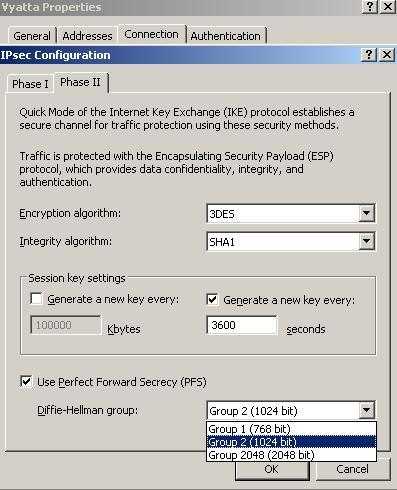
Figure11: IKE Quick Mode Settings
The IPsec lifetime is set to 3600s(1 hour). Vyatta OFR by default uses the 3600s(1 hour) for IPsec lifetime. No IPsec lifetime in Kbytes is set(IPsec life type are expressed in kilobytes and/or seconds, see RFC2407), however specifying a lifetime in Kbytes might be useful because when too much information is protected by the same keys, the risk of breaking the DH secret increases.
We cannot specify a lifetime in Kbytes in Vyatta from CLI.
PFS for keys is used meaning that keys for ESP will be obtain by running a fresh DHE exchange and not derived from the keying material obtain in Main Mode. Therefore greater resistance to cryptographic attacks is achieved. Note that without PFS, the risk of the shared DH secret to be broken increases if too many re-keys, using QM(when more keys are derived from it), take place over the same IKE SA.
The hash function for providing Integrity(per packet connectionless integrity-proof of the fact that data has not been altered in transit-, per packet data origin authentication-proof that the data was sent by the right peer-) is SHA-1(its HMAC version will be used within ESP). Regarding Integrity, RFC4303, IP Encapsulating Security Payload (ESP), "Internet Official Protocol Standards" (STD 1)", states that:
"Data origin authentication and connectionless integrity are joint services, hereafter referred to jointly as "integrity". (This term is employed because, on a per-packet basis, the computation being performed provides connectionless integrity directly; data origin authentication is provided indirectly as a result of binding the key used to verify the integrity to the identity of the IPsec peer. Typically, this binding is effected through the use of a shared, symmetric key.)"
Click “OK” to save the changes.
Apply the new settings on ISA 2006.
You can view the Site-to-Site Summary by right-clicking the newly created remote site and choosing Site-to-Site Summary(see Figure12).
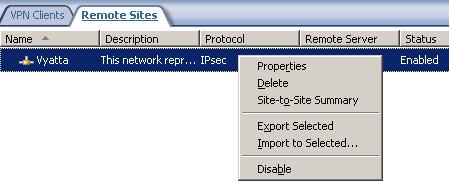
Figure12: Remote Site Properties
The Site-to-Site Summary is quite handy because we can have a quick look at the settings defined on ISA and also suggests the settings to be configured on the remote peer.
So by now ISA 2006 is configured. The remote site has been created, the access and network rules defined, the IKE parameters set and the remote network address range was specified.
3. Configure Vyatta
Befor we proceed to Vyatta's configuration, note that there is an IPSec SA Idle Timer or an idle timeout for a Quick Mode SA
on ISA. The purpose of it is to save resources.
On Windows 2003 the IPSec SA Idle Timer can be set from registry. The default idle timeout for a Quick Mode SA is 300 seconds. You can modify it from registry(you can find the registry modification in KB 917025). If you are running ISA on a Windows 2003 SP1 this timer will apply even if there is traffic. You need to upgrade to SP2 to get rid of this issue(check this KB923339).
This IPSec SA Idle Timer can lead to too many QMs over the same IKE SA when the tunnel is "idle"(there is no traffic) because Vyatta is set to autostart the tunnel. So when ISA deletes the IPsec SA and informs Vyatta about this, Vyatta acknowledges it, deletes the required IPsec SA and immediatelly start a new QM for obtaining a new IPsec SA. As you can see this can happen about every 5 minutes when the tunnel is idle. Try not to confuse this with the "persistent" state of the "tunnel". The IKE SA is not deleted and it will be renegotiated when expires.
You cannot configure Vyatta from the CLI to not automatically start the tunnel, thus to raise it when traffic is needed to pass(again we are not reffering to demand-dial interfaces, the tunnel is persistent, but Vyatta brings it up immediately it has finished booting and not when traffic destined for the remote site exits). There is an enhancement request for this: https://bugzilla.vyatta.com/show_bug.cgi?id=2506
So if you expect long idle periods you should increase the IPSec SA Idle Timer on ISA. Note that this is a global modification.
ISA 2006 does not support Dead Peer Detection(DPD), RFC3706 A Traffic-Based Method of Detecting Dead Internet Key Exchange (IKE) Peers("not specify an Internet standard of any kind").
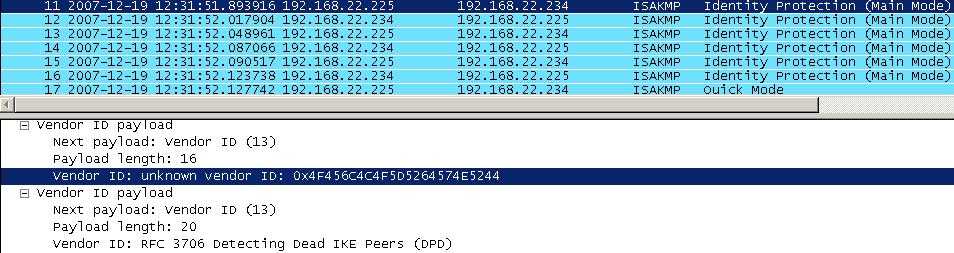
Vyatta supports Dead Peer Detection(DPD) and NAT-T(check Figure13, a Wireshark capture).
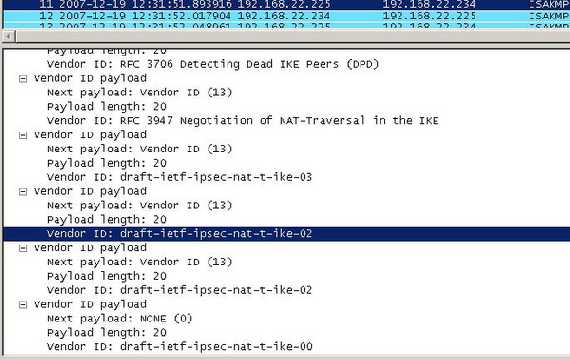
Figure13: DPD and NAT-T VIDs
As can be seen from Figure13, Vyatta provides NAT-T support per RFC3947 Negotiation of NAT-Traversal in the IKE, "Internet Official Protocol Standards" (STD 1)" and also for the draft versions. The support for the NAT-T implementations based on the draft versions is very important because(strange or not since almost three years have passed since the RFC3947 has been published) there are out there products based only on the draft versions.
ISA 2006 is such a VPN implementation based on the draft-ietf-ipsec-nat-t-ike-02(see Figure14).
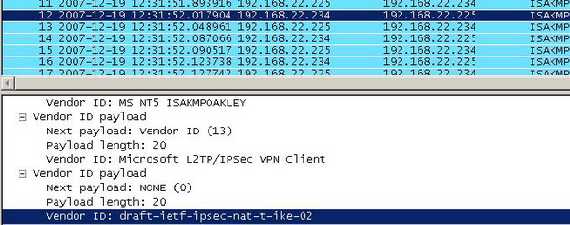
Figure14: ISA 2006 NAT-T VID
Windows Vista is the first Microsoft OS supporting NAT-T based on RFC3947.
NAT-T has been enabled on Vyatta with the command(although is not needed within this lab):
"set vpn ipsec nat-traversal enable"
Now we need to use the exact same settings for IKE parameters on the Vyatta OFR.
First will start building the configuration of Vyatta from zero. It is assume that the office is using Vyatta as a firewall, VPN endpoint and router.
We will define the NAT rules(we need to do some exclusions from the NAT process for the VPN site-to-site connection), define the VPN site-to-site connection, the firewall rules needed for Internet access, site-to-site communications and Vyatta itself.
Vyatta is installed as a persistent device. Check the documentation on how to do that(The Quick Start Guide).
In this lab Vyatta has two interfaces, etho and eth1.
eth0 represents the WAN interface and eth1 the LAN interface.
So we need to set the required IP addresses on both interfaces:
"set interfaces ethernet eth0 address 192.168.22.225 prefix-length 24
set interfaces ethernet eth1 address 192.168.40.1 prefix-length 24"
You need to comit your settings with the "commit" command.
Note that there is no firewall on Vyatta yet, meaning that Vyatta is fully accessible from both interfaces. Firewall rules must be set manually. We we'll do so later.
You may want to enable the webgui and the telnet or ssh services.
I wil enable the webgui and SSHv2.
"set service webgui
set service ssh protocol-version v2"
Comit your settings with the "commit" command. Note that you are not actually saving the settings throught a reboot with this command. For that you will need to run the "save" command which will save your configuration by default to "config.boot" file(which will be used during startup to load the configuration). You can specify another file for example "config1.boot" by running the "save config1.boot" command and later load this configuration with the "load" command. You can save/load your configuration on/from a TFP, FTP or HTTP server too.
So by now you can use your favourite web browser or SSH client to configure Vyatta.
Next we need to set up the NAT rules. You should carefully numbering your NAT rule. Since this is the first rule it would be good to start from, say, 10 and not 1 in order have some space in adding later another rules. Well, I'll start from 1 in my lab.
NAT type can be source, destination or masquerade.
We will use a Source NAT rule and we will filter based on source network and destination network.
"set service nat rule 1 type source
set service nat rule 1 source network 192.168.40.0/24
set service nat rule 1 destination network !192.168.10.0/24
set service nat rule 1 outbound-interface eth0
set service nat rule 1 outside-address address 192.168.22.225"
Comit your settings with the "commit" command.
As you can see the destination network is prefixed with the exclamation mark which means that the destination defined within this rule matches every network except the specified network(192.168.10.0/24).
We need this exclusion from the NAT process due to the VPN site-to-site connection. Packets from 192.168.40.0/24 destined to 192.168.10.0/24 are routed and not NAT-ed.
We could, for example, used a maquerade NAT rule like bellow instead of the Source NAT rule since we have only one "public" IP address.
"set service nat rule 1 type masquerade
set service nat rule 1 source network 192.168.40.0/24
set service nat rule 1 destination network !192.168.10.0/24
set service nat rule 1 outbound-interface eth0 "
192.168.10.0/24 represents the remote subnet. If the remote site contains another subnet, say 192.168.11.0/24(contiguous subnet), we can summarize as 192.168.10.0/23 and prefixed this subnet in our NAT rule, !192.168.10.0/23.
However if the remote site contains another subnet, say 192.168.20.0/24(non-contiguous subnet) we cannot summarize anymore and with our NAT rule, packets from 192.168.40.0/24 destined to 192.168.20.0/24, will be NAT-ed and there is nothing we can do from Vyatta's CLI to prevent this.
There is a Bugzilla report describing this type of scenarios:
https://bugzilla.vyatta.com/show_bug.cgi?id=2067
Also within that report there is a solution to this problem, by adding iptables rules. Note that if you add rules directly to iptables, you will need a startup script for them, otherwise, the rules will disappear when you reboot the system.
By now you should be able to ping from a host behind Vyatta another host located on the 192.168.22.0/24(for this lab).
Next we need to add a default route in order that hosts behind Vyatta to reach the Internet:
"set protocols static route 0.0.0.0/24 next-hop 192.168.22.1"
Commit your settings with the "commit" command.
Within this lab 192.168.22.1 represents the default-gateway.
You can test it by ping www.google.com (assuming the host behind Vyatta was configured with a DNS server so that is able to resove FQDN).
If there is no connectivity problem(you cannot ping ISA's External IP address because by default this not allowed on ISA) then you can proceed defining the site-to-site configuration on Vyatta.
As said before, Vyatta's VPN is based on Openswan. Therefore we should be able to spot the Openswan VID(see Figure15).
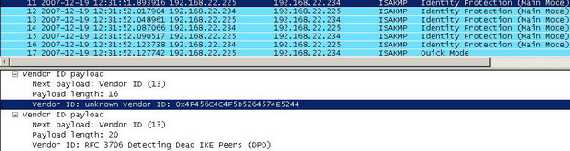
Figure15: OpenSwan VID
The VID from Figure15 belongs to Openswan 2.4.6. For more details about it check the bellow link:
Openswan - NTA-Wiki
We can view the Openswan version on Vyatta itself by running the "show vpn debug detail" command(at the Operational Mode):
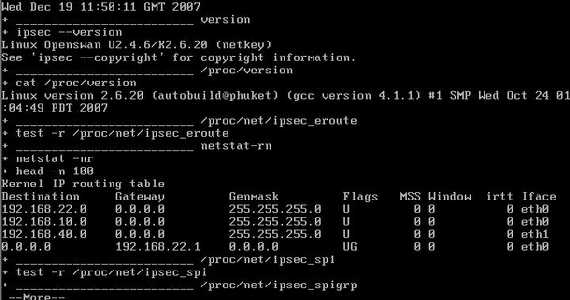
Figure16: Show vpn debug detail
First thing to be specified is the interface which will serve as the VPN tunnel endpoint:
"set vpn ipsec ipsec-interfaces interface eth0"
You can view the ipsec-interfaces by running:
"show vpn ipsec ipsec-interfaces"
Do not commit your configuration yet.
Specify the IKE MM settings, we are adding an ike-group on Vyatta called IKE-ISA. The default IKE lifetime on Vyatta is 28800s so you do not really need to specify it. The default hash function on Vyatta for IKE MM is SHA-1. However the default chiper is AES-CBC-128 which is not suported by ISA 2006.
"set vpn ipsec ike-group IKE-ISA proposal 1
set vpn ipsec ike-group IKE-ISA proposal 1 encryption 3des
set vpn ipsec ike-group IKE-ISA proposal 1 hash sha1
set vpn ipsec ike-group IKE-ISA proposal 1 dh-group 2
set vpn ipsec ike-group IKE-ISA lifetime 28800"
Do not commit yet your configuration.
As you can see these settings match the ones defined on ISA 2006.
You can view this IKE-ISA group by running:
"show -all vpn ipsec ike-group IKE-ISA"
Specify the IKE QM settings by adding an esp-group called ESP-ISA on Vyatta. PFS is enabled by default so the command for it is not really necessary(actually you will get a notice for that). Neither the IPsec SA lifetime which is by default 3600. As with IKE MM, the default hash function and chiper on Vyatta are SHA-1 and AES-CBC-128.
Also the default ESP mode is tunnel mode. Vyatta supports transport mode too.
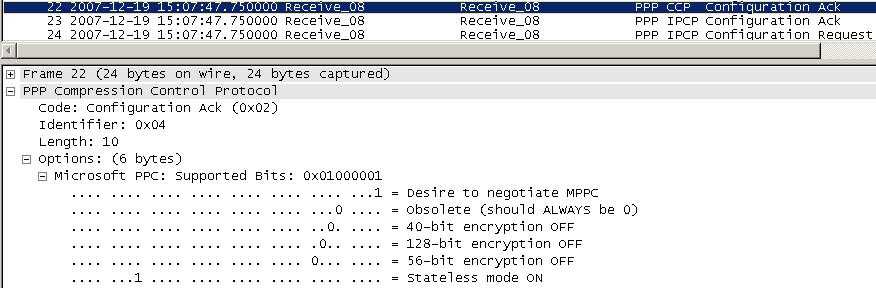
Compression is enabled by default on Vyatta (RFC3173 IP Payload Compression Protocol (IPComp), "Internet Official Protocol Standards" (STD 1)"). However ISA 2006 does not support IPComp for its implementation of IPsec tunnel mode(ISA supports compression with L2TP/IPsec, RFC2118 Microsoft Point-To-Point Compression (MPPC) Protocol, "does not specify an Internet standard of any kind", see Figure17).
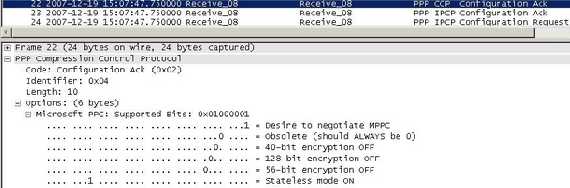
Figure17: L2TP/IPsec MPPC
IKE QM settings on Vyatta:
"set vpn ipsec esp-group ESP-ISA proposal 1
set vpn ipsec esp-group ESP-ISA proposal 1 encryption 3des
set vpn ipsec esp-group ESP-ISA proposal 1 hash sha1
set vpn ipsec esp-group ESP-ISA pfs
set vpn ipsec esp-group ESP-ISA lifetime 3600"
Do not commit yet your configuration.
Again, you can see that these setting match the ones defined on ISA 2006.
You can view this ESP-ISA group by running:
"show -all vpn ipsec esp-group ESP-ISA"
Next we will define the site-to-site specifying the remote peer's IP address, the authentication method and the pre-shared key, the local and remote subnets, the local IP address and the IKE MM and QM settings:
"set vpn ipsec site-to-site peer 192.168.22.234 authentication mode pre-shared-secret
edit vpn ipsec site-to-site peer 192.168.22.234
set authentication pre-shared-secret cdb4be24H0f5317dw74a1fb4Lb2j......
set ike-group IKE-ISA
set local-ip 192.168.22.225
set tunnel 1 local-subnet 192.168.40.0/24
set tunnel 1 remote-subnet 192.168.10.0/24
set tunnel 1 esp-group ESP-ISA
top"
I did not enter here the entire pre-shared key because is too long.
Now commit your setting by running the "commit" command.
And visualise what you have done:
"show -all vpn ipsec site-to-site peer 192.168.22.234"
Note that if the remote site network contains another subnet, 192.168.30.0/24, since the remote-subnet accepts just one subnet, we need to specify another tunnel :
"set tunnel 2 local-subnet 192.168.40.0/24
set tunnel 2 remote-subnet 192.168.30.0/24
set tunnel 2 esp-group ESP-ISA"
And we're doen with Vyatta's s2s configuration.
4. Test the s2s Connection
As said before, Vyatta will try to automatically bring up the tunnel(see Figure18). So if everything was set correctly you should have a running VPN tunnel between your sites.
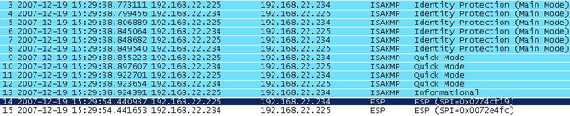
Figure18: Wireshark Trace for Tunnel Establishment
As you can see there is an ISAKMP Informational packet sent by Vyatta to ISA. So you would probably think something went wrong. Note from Figure18 the fourth IKE QM packet sent by ISA. RFC2409 specifies only three IKE QM messages. According to the Microsoft Technet article How IPSec Works, this fourth message contains "ISAKMP header, Notification":
"Notification. This payload has a connected notify message. This message is requested and sent between two IPSec peers running Windows Server 2003. Quick mode message 4 with the Notification payload is not required by the IKE standard and is used to prevent the initiator from sending IPSec-protected packets to the responder before the responder is ready to receive them"
Vyatta receives this messages and sends to ISA the ISAKMP Informational Exchange containing a "Notify Message", more exactly an "INVALID-PAYLOAD-TYPE" informing ISA that Vyatta has received an unrecognized or invalid payload type(see RFC2408 Internet Security Association and Key Management Protocol (ISAKMP), an "Internet Official Protocol Standards (STD 1)" and Content Requirements for ISAKMP Notify Messages). You can check all this in the Oakley.log on ISA.
So it appears that is not something that will break our tunnel. Note that if ISA initiates the tunnel, only three IKE QM messages are sent as per RFC2409 (ISA does not send anymore the fourth message).
You can test that the tunnel is up by running a ping command from a host behind Vyatta to a host behind ISA and vice-versa. It should work. If not troubleshoot first your configuration.
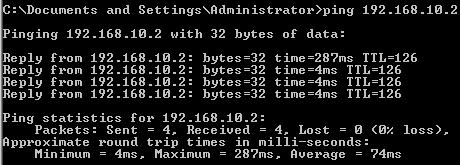
Figure19: Ping from 192.168.40.2 to 192.168.10.2
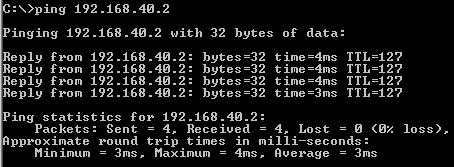
Figure20: Ping from 192.168.10.2 to 192.168.40.2
5. Monitor the s2s on Vyatta
You can check on both Vyatta established IKE SAs and IPsec SAs, see Figure21 and Figure22. Note that SPIs from Figure22 are not the same with the ones from Figure24, as
Figure24 was "taken" (printscreen) later.

Figure21: Vyatta show vpn ike sa

Figure22: Vyatta show vpn ipsec sa
6. Monitor the s2s on ISA
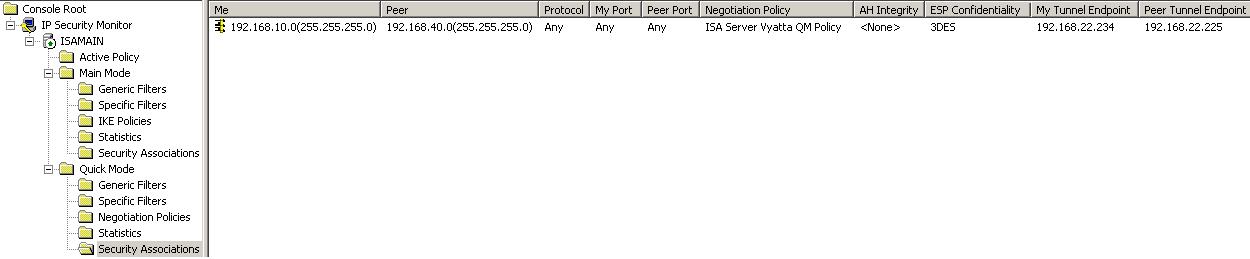
You can check on ISA the established IKE SAs and IPsec SAs, see Figure23 and Figure24.

Figure23: ISA IKE MM SA IPsec Monitor
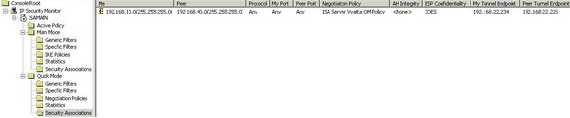
Figure24: ISA IKE QM SA IPsec Monitor
7. Create Some basic Firewall Rules on Vyatta
As said before there are no firewall rules on Vyatta yet.
Next we will add a basic firewall configuration for our lab. Remember to carefully number your rules.
We can apply the firewall instance as In, Out and Local per interface.
We start creating an In instance applied on eth1 interface, meaning that packets entering thist interface will be filtered by the firewall.
We will first create some rules for the communications between VPN sites, allowing almost everything just like on ISA:
Allowing TCP traffic:
"set firewall name intoext rule 10 action accept
set firewall name intoext rule 10 source network 192.168.40.0/24
set firewall name intoext rule 10 protocol tcp
set firewall name intoext rule 10 destination network 192.168.10.0/24
set firewall name intoext rule 10 state established enable
set firewall name intoext rule 10 state new enable
set firewall name intoext rule 10 state related enable
set firewall name intoext rule 10 state invalid disable"
Note that the "new" state does not strictly reffer to TCP SYN segments(required for starting a TCP connection, although the Vyatta_CommandRef_VC3_v02.pdf says that "For TCP, this will be packets with the SYN flag set") due to the fact that nf_conntrack_tcp_loose is currently set to "3" meaning that Vyatta might try and pick up any connections that were terminated as a result of a system reload or other unexpected failure thus certain "illegal" TCP segments could pass through Vyatta although stateful packet-inspection is enabled. If you set nf_conntrack_tcp_loose to 0, this "behaviour" is disabled. You can check all these using a network scanner like nmap. An enhancement request has been open to allow the nf_conntrack_tcp_loose value to be modified via the CLI:
https://bugzilla.vyatta.com/show_bug.cgi?id=2122
Allowing UDP traffic, unfortunetely we cannot use the "state" parameter for other protocols
then TCP with Vyatta VC3, there is a report on bugzilla for that:
https://bugzilla.vyatta.com/show_bug.cgi?id=2502
"set firewall name intoext rule 11 action accept
set firewall name intoext rule 11 source network 192.168.40.0/24
set firewall name intoext rule 11 protocol udp
set firewall name intoext rule 11 destination network 192.168.10.0/24"
And "ping traffic"(if we can call it like so, ICMP echo request and echo reply packets):
"set firewall name intoext rule 12 action accept
set firewall name intoext rule 12 source network 192.168.40.0/24
set firewall name intoext rule 12 protocol icmp
set firewall name intoext rule 12 destination network 192.168.10.0/24
set firewall name intoext rule 12 icmp type 8
set firewall name intoext rule 12 icmp code 0
set firewall name intoext rule 13 action accept
set firewall name intoext rule 13 source network 192.168.40.0/24
set firewall name intoext rule 13 protocol icmp
set firewall name intoext rule 13 destination network 192.168.10.0/24
set firewall name intoext rule 13 icmp type 0
set firewall name intoext rule 13 icmp code 0"
In this lab, hosts behind Vyatta are configured to use as their DNS server 192.168.22.1.
So a firewall rule allowing that:
"set firewall name intoext rule 14 action accept
set firewall name intoext rule 14 source network 192.168.40.0/24
set firewall name intoext rule 14 protocol udp
set firewall name intoext rule 14 destination address 192.168.22.1
set firewall name intoext rule 14 destination port-number 53"
Also hosts behind Vyatta are allowed to access HTTP and HTTPS web sites:
"set firewall name intoext rule 15 action accept
set firewall name intoext rule 15 source network 192.168.40.0/24
set firewall name intoext rule 15 protocol tcp
set firewall name intoext rule 15 destination network !192.168.10.0/24
set firewall name intoext rule 15 state established enable
set firewall name intoext rule 15 state new enable
set firewall name intoext rule 15 state related enable
set firewall name intoext rule 15 state invalid disable
set firewall name intoext rule 15 destination port-number 80
set firewall name intoext rule 15 destination port-number 443"
Finally we are setting the "intoext" as In instance on eth1:
"set interfaces ethernet eth1 firewall in name intoext"
Commit your settings. All other traffic entering the eth1 interface is implicitely denied.
You can test this firewall instance from a client behind Vyatta. You should not be able to ping any hosts except the ones from 192.168.10.0/24.
We will also apply a Local firewall instance on eth1. We are allowing SSH and HTTPS traffic for managing our Vyatta(using a SSH client or a web browser):
"set firewall name intlocal rule 1 action accept
set firewall name intlocal rule 1 source network 192.168.40.0/24
set firewall name intlocal rule 1 protocol tcp
set firewall name intlocal rule 1 state established enable
set firewall name intlocal rule 1 state new enable
set firewall name intlocal rule 1 state related enable
set firewall name intlocal rule 1 state invalid disable
set firewall name intlocal rule 1 destination port-number 22
set firewall name intlocal rule 1 destination port-number 443"
If you want to be able to ping from Vyatta itself hosts from the 192.168.40.0/24 subnet you need 'to permit the returning echo-reply packet(again unfortunetely we can't use the "state" parameter):
"set firewall name intlocal rule 2 action accept
set firewall name intlocal rule 2 source network 192.168.40.0/24
set firewall name intlocal rule 2 protocol icmp
set firewall name intlocal rule 2 icmp type 0
set firewall name intlocal rule 2 icmp code 0"
Finally we are setting the "intlocal" as Local firewall instance on eth1:
"set interfaces ethernet eth1 firewall local name intlocal "
Commit your configuration. Right now you cannot ping Vyatta(192.168.40.1) from any hosts from 192.168.40.0/24.
Next we need to secure the external local interface of Vyatta, eth0.
We will first create a Local firewall instance. IKE and ESP IPsec traffic(there isn'y any NAT device between ISA and Vyatta along the path, so no need for UDP port 4500) from 192.168.22.234 will be allowed:
"set firewall name extlocal rule 1 action accept
set firewall name extlocal rule 1 source address 192.168.22.234
set firewall name extlocal rule 1 protocol udp
set firewall name extlocal rule 1 destination port-number 500
set firewall name extlocal rule 2 action accept
set firewall name extlocal rule 2 source address 192.168.22.234
set firewall name extlocal rule 2 protocol esp"
As for the internal local instance you may want to ping from Vyatta External hosts:
"set firewall name extlocal rule 3 action accept
set firewall name extlocal rule 3 protocol icmp
set firewall name extlocal rule 3 icmp type 0
set firewall name extlocal rule 3 icmp code 0"
And apply "extlocal" as a Local firewall instance on eth0:
"set interfaces ethernet eth0 firewall local name extlocal "
Commit your changes.
By now Vyatta's external interface, eth0(IP address 192.168.22.225) does not respond anymore to ping, say nmap scans for TCP ports 22, 80, 443(which appeared as open before since we had enable the Webgui, SSH service on Vyatta) or other scans for TCP ports(which appeared as closed before) and so on.
Also we need to limit the packets entering this interface by creating an In firewall instance on eth0.
We start permitting traffic between the the local and the remote subnet(TCP traffic, UDP traffic and ICMP echo request and echo reply packets):
"set firewall name exttoint rule 10 action accept
set firewall name exttoint rule 10 source network 192.168.10.0/24
set firewall name exttoint rule 10 protocol tcp
set firewall name exttoint rule 10 destination network 192.168.40.0/24
set firewall name exttoint rule 10 state new enable
set firewall name exttoint rule 10 state established enable
set firewall name exttoint rule 10 state related enable
set firewall name exttoint rule 10 state invalid disable
set firewall name exttoint rule 11 action accept
set firewall name exttoint rule 11 source network 192.168.10.0/24
set firewall name exttoint rule 11 protocol udp
set firewall name exttoint rule 11 destination network 192.168.40.0/24
set firewall name exttoint rule 12 action accept
set firewall name exttoint rule 12 source network 192.168.10.0/24
set firewall name exttoint rule 12 protocol icmp
set firewall name exttoint rule 12 destination network 192.168.40.0/24
set firewall name exttoint rule 12 icmp type 8
set firewall name exttoint rule 12 icmp code 0
set firewall name exttoint rule 13 action accept
set firewall name exttoint rule 13 source network 192.168.10.0/24
set firewall name exttoint rule 13 protocol icmp
set firewall name exttoint rule 13 destination network 192.168.40.0/24
set firewall name exttoint rule 13 icmp type 0
set firewall name exttoint rule 13 icmp code 0"
The returning DNS traffic from the DNS server(192.168.22.1), again the "state" parameter would be very useful within this rule:
"set firewall name exttoint rule 14 action accept
set firewall name exttoint rule 14 source address 192.168.22.1
set firewall name exttoint rule 14 destination network 192.168.40.0/24
set firewall name exttoint rule 14 protocol udp
set firewall name exttoint rule 14 source port-number 53"
And the returning HTTP and HTTPS traffic(be careful not to enable the "new" state):
"set firewall name exttoint rule 15 action accept
set firewall name exttoint rule 15 protocol tcp
set firewall name exttoint rule 15 destination network 192.168.40.0/24
set firewall name exttoint rule 15 state established enable
set firewall name exttoint rule 15 state related enable
set firewall name exttoint rule 15 state invalid disable
set firewall name exttoint rule 15 source port-number 80
set firewall name exttoint rule 15 source port-number 443"
And apply "exttoint" as an In firewall instance on eth0:
"set interfaces ethernet eth0 firewall in name exttoint "
Commit your changes.
And the basic firewall setup is done.
Obviously if you do not carefully create your firewall rules you will endup denying traffic which you would want to allow.
Also you need to create some firewall rules for Vyatta itself for DNS and HTTP traffic originating from the Vyatta machine(for updating for example), rules defined within the local firewall instance on eth0. And if you save/load Vyatta configuration on/from a TFTP server firewall rules are needed too.
For example let assume that the TFTP server is 192.168.40.2.
The firewall rule:
"set firewall name intlocal rule 3 action accept
set firewall name intlocal rule 3 source address 192.168.40.2
set firewall name intlocal rule 3 protocol udp
set firewall name intlocal rule 3 source port-range start 44440
set firewall name intlocal rule 3 source port-range stop 44450"
Since TFTP is say, "special", we need a special firewall rule for it. We can see from Figure25 and from Figure26, an attempting to save the configuration from Vyatta to the 192.168.40.2 TFTP server(TFTPD32 is used). First there is a Write Request from Vyatta to the destination UDP port 69 (TFTP port) and then there is a reply from the TFTP server to Vyatta, an Acknowledgement packet, with the source UDP port 44440 and not 69. So the firewall should be aware of that and dynamically allow TFTP traffic. I have specified a local ports pool on the TFTP server (44440:44450), thus Tftpd32 assigns the range of ports used for file transfers from that pool.
The firewall rule created on Vyatta is not very smart because it tells Vyatta to accept any UDP packets from 192.168.40.2 with a source port from the range 44440:44450. If we use nmap and from another host, say 192.168.40.50, spoof both the IP address and source port and run a scan against a random UDP port on Vyatta, nmap will inform us that the port is closed(it receives an ICMP Type 3 Code 3 from Vyatta).

Figure25: TFTP Write Request

Figure26: TFTP Acknowledgement
You can quickly view the rules created by running the Vyatta show firewall command at the Operational Mode. Figure27 shows the intoext firewall instance:
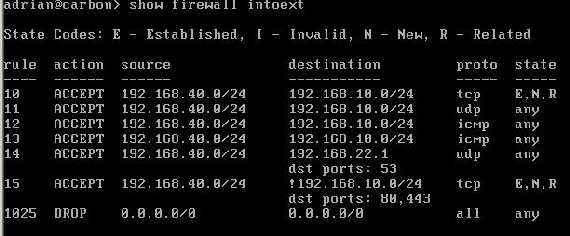
Figure27: Vyatta show firewall intoext
Figure28 shows the intlocal firewall instance:
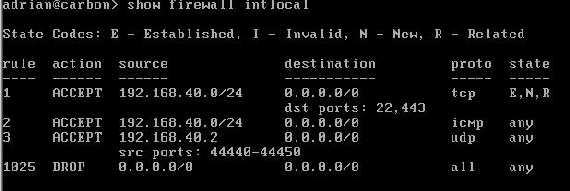
Figure28: Vyatta show firewall intlocal
Also we view the statistis for each firewall instance(and see if our firewall rules work). Figure29 shows the statistics from the intoext firewall instance.
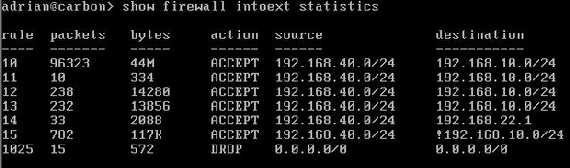
Figure29: Vyatta show firewall intoext statistics
Figure30 shows the statistics from the intlocal firewall instance.
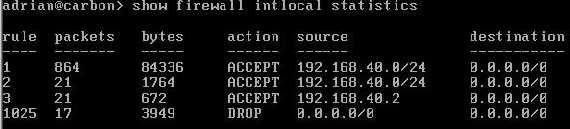
Figure30: Vyatta show firewall intlocal statistics
Figure31 shows the statistics from the extlocal firewall instance.
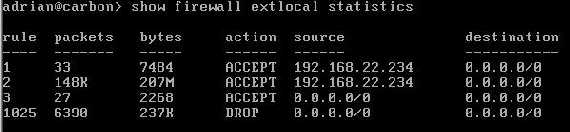
Figure31: Vyatta show firewall extlocal statistics
Figure32 shows the statistics from the exttoint firewall instance.
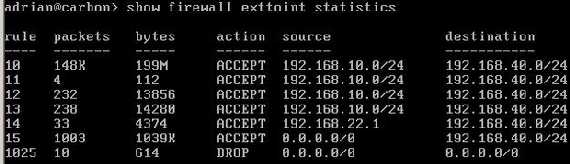
Figure32: Vyatta show firewall exttoint statistics
There are plenty commands available on Vyatta to see your firewall status and configuration(at the Operational Mode or Configuration Mode).
Note that we did not configured any Out firewall instance in this lab.
You can view here the entire Vyatta configuration.
|