A lot of ISA admins have problems with their VPN clients which are not able to resolve single label names.
There is an interesting Microsoft document explaining how single label names are resolved by Windows XP or Vista:
http://download.microsoft.com/download/e/2/0/e2090852-3b7f-40a3-9883-07a427af1560/
DNS-GlobalNames-Zone-Deployment.doc
A simple way to fix that is to have a WINS server.
But that might be another problem, since people may not want to add a WINS server on their network.
Another solution to this is to install the DHCP Relay on ISA and give the VPN clients through DHCP Options the connection-specific DNS Suffix for the VPN adapter.
http://www.isaserver.org/tutorials/2004dhcprelay.html
However there is an issue with the DHCP INFORM packet sent by the VPN Client. It may be dropped by ISA as a spoofed packet.
To fix that, you need to add a registry entry on ISA:
[HKEY_LOCAL_MACHINE\SOFTWARE\Microsoft\RAT\Stingray\Debug\
FWSRV]"FWS_PNP_IPHELPER_QUITE_PERIOD"=dword:000005dc
Other option is to use the GPO and distribute the DNS Suffix search list.
http://technet2.microsoft.com/windowsserver/en/library/
5fe46cef-db12-4b78-94d2-2a0b62a282711033.mspx?mfr=true
http://support.microsoft.com/kb/294785
I was asked by someone if there is another way to give to the VPN clients the connection-specific DNS suffix for the VPN adapter.
The answer is yes, if you use CMAK profiles.
Windows Server 2003 CMAK
You can set the DNSSuffix key to the required value under [TCP/IP&EntryName Tunnel] section in the .cms file.
http://technet2.microsoft.com/windowsserver/en/library/
7a5bd80a-56aa-4cb9-b3c4-006886bf33e71033.mspx?mfr=true
You can do that through the CMAK wizard or by manually editing the .cms file and then re-run the CMAK wizard for that profile without making any changes in order that your manually inserted options to be incorporated into the self-extracting executable profile.
Jason Jones has two great articles about how to use CMAK:
http://blog.msfirewall.org.uk/2008/06/using-cmak-to-configure-isa-server-vpn.html
http://blog.msfirewall.org.uk/2008/06/using-cmak-to-configure-isa-server-vpn_10.html
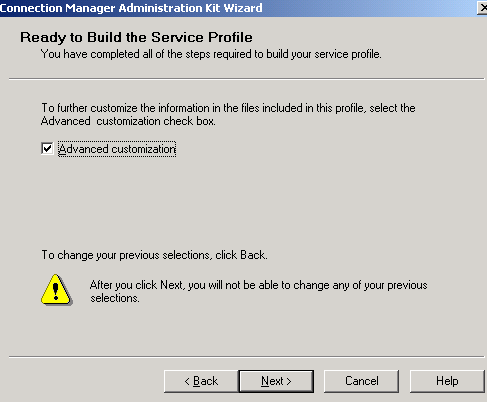
Run as usualy the CMAK wizard to create a new profile.
When you've reached the Ready to Build the Service Profile window, put a checkmark into the Advanced customization checkbox and click Next.
In the Section name drop-down menu select [TCP/IP&EntryName Tunnel], in my case TCP/IP&ISA VPN Tunnel. In the Key name area manually enter DNSSuffix. And in the Value field type your DNS suffix, in my case, carbonwind.net. Click Apply.
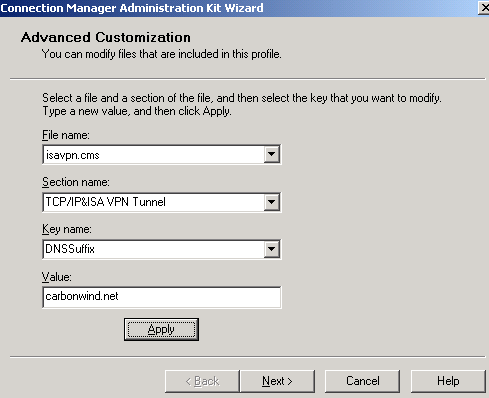
As you can see, the entered values will be saved into the isavpn.cms file. Click Next. And build your cmak profile.
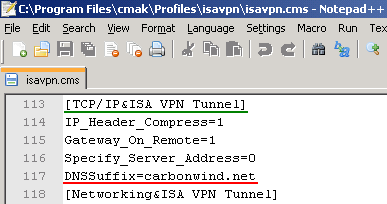
If we take a look at the isavpn.cms file, we can spot the new lines used for our DNS suffix.
As said before, if you already have a CMAK profile and do not want to make the modifications from the wizard, you can manually insert the above lines into your .cms file. And then simply re-run the CMAK wizard without making any modifications in order that the manually modified .cms file to be read and the modifications to be added to the self-extracting executable CMAK profile.
Windows Server 2008 CMAK
The CMAK from Windows Server 2008 allows you to choose on what OS the CMAK profile will run.

If you select Windows Vista, then you have the chance to configure the connection’s DNS suffix from the wizard, within the Edit VPN Entry area, Advanced tab.

Windows Server 2008 R2 Beta CMAK
The CMAK from new Windows Server 2008 R2 Beta also allows you to choose on what OS the CMAK profile will run.

If you select Windows 7 or Windows Vista, then you have the chance to configure the connection’s DNS suffix from the wizard, within the Edit VPN Entry area, Advanced tab.

------------------------------------------------------------------------------------------------------------------------------------
Install the CMAK profile on one of your VPN client machine and connect.
Open cmd.exe and run an ipconfig /all command. You should have a connection-specific DNS suffix on your PPP adapter.
