|
27.04.2011
Using XCA to configure the PKI part needed for L2TP/IPsec VPN connections using certificates for IKE main mode authentification
- 1. Intro
- 2. Using XCA
- 2.1 Using XCA: Create a new database
- 2.2 Using XCA: Create a new CA
- 2.3 Using XCA: Create the L2TP/IPsec VPN server certificate
- 2.4 Using XCA: Create an L2TP/IPsec VPN client certificate
- 2.5 Using XCA: Export the CA certificate
- 2.6 Using XCA: Export the server certificate and private key
- 2.6.1 Using XCA: Export the server certificate(pem format)
- 2.6.2 Using XCA: Export the server private key(pem format)
- 2.6.3 Using XCA: Export the server certificate and private key in PKCS12 format
- 2.7 Using XCA: Export the client certificate and private key
- 2.7.1 Using XCA: Export the client certificate(pem format)
- 2.7.2 Using XCA: Export the client private key(pem format)
- 2.7.3 Using XCA: Export the client certificate and private key in PKCS12 format
- 2.8 Using XCA: Revoke a certficate, create a CRL and export it
1. Intro
In this paper we will use XCA to configure the PKI part needed for L2TP/IPsec VPN connections using certificates for IKE main mode authentification.
With XCA you can create a CA, sign server and client certificates, revoke server or client certificates, create a CRL, etc.; all from a GUI.
So you can view and manage with ease your L2TP/IPsec PKI.
The certificates and their corresponding private keys are stored in a database, database that you can put it into a safe place and access when needed.
This PKI was tested using:
- as L2TP/IPsec VPN servers: Forefront TMG 2010 and Vyatta Core 6.2
- as L2TP/IPsec VPN clients: Windows XP SP3/Vista SP2/7 SP1 and Mac OS X 10.6.7
Note that although below we call IKE peers client and server, IKEv1 does not have any client or server side, one peer acts as an initiator and the other as responder.
2. Using XCA
First download and install XCA(within this paper XCA 0.9.0 will be installed on Windows 7 SP1), you can obtain the setup file from:
http://sourceforge.net/projects/xca
2.1 Using XCA: Create a new database
Open XCA and from the File menu click New Database, see Figure 1:

Figure1: XCA New Database
Save the database and enter a password used to encrypt the private keys, see Figure 2:
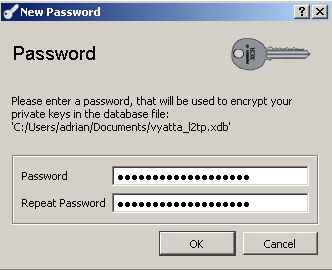
Figure2: XCA New Database - Enter Password
2.2 Using XCA: Create a new CA
Within the XCA GUI click the Certificates tab and click the New Certificate button, see Figure 3:
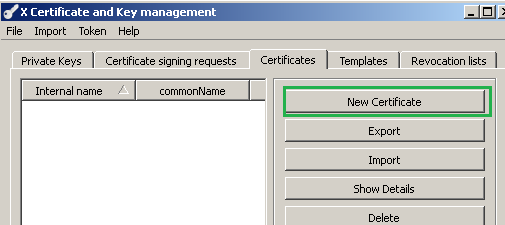
Figure3: XCA Database - New Certificate
On the Source tab we will select the CA template and click the Apply All button, see Figure 4:
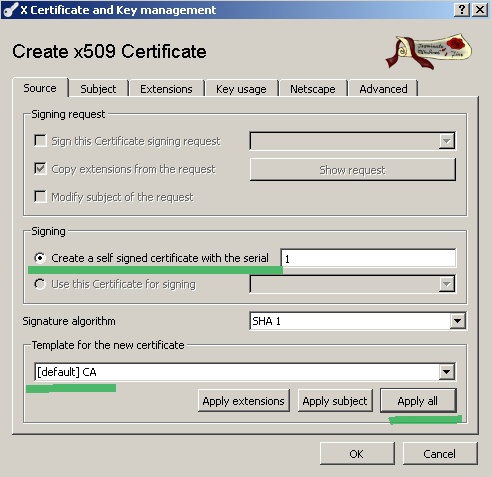
Figure4: XCA Database - New Certificate: Apply CA Template
On the Subject tab enter the certificate details(like CN, internal name(a name used to help you quickly identify a certificate), etc.), see Figure 5, and click the Generate a new key button in order to generate a new RSA key.
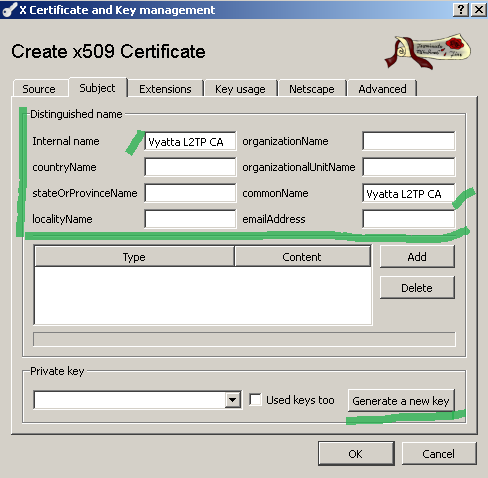
Figure5: XCA Database - New Certificate: Subject tab
Leave the Keytype to RSA, select the key size(2048 bit will be fine) and click the Create button, see Figure 6:
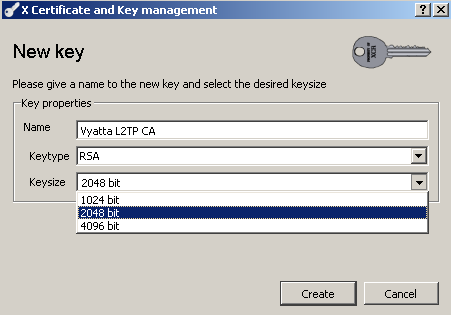
Figure6: XCA Database - New Certificate: Create a new RSA key for the CA
On the Extensions tab you can for example specify the CA certificate validity period, see Figure 7:
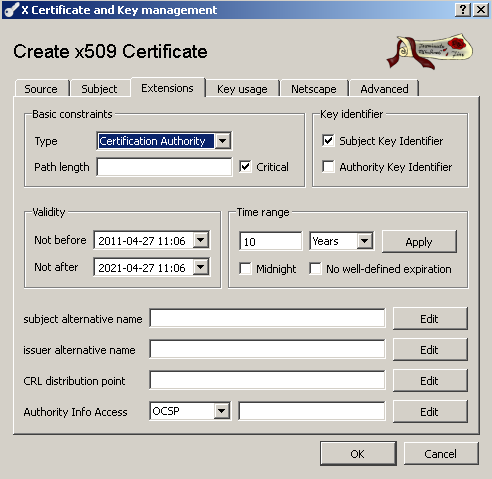
Figure7: XCA Database - New Certificate: Extensions tab
On the Key usage tab there isn't a particular need to change something, see Figure 8:
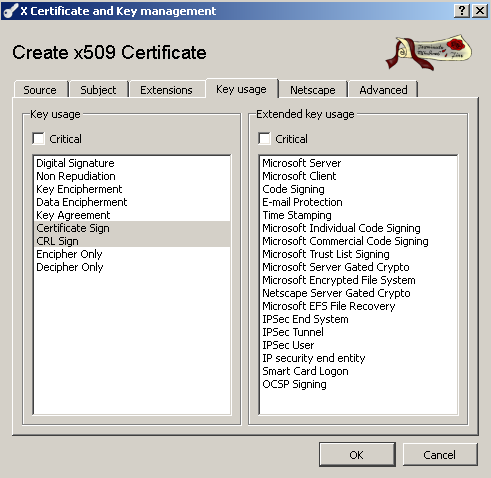
Figure8: XCA Database - New Certificate: Key usage tab
On the Netscape tab you can deselect all the Netscape options, and delete the Comment value, see Figure 9:
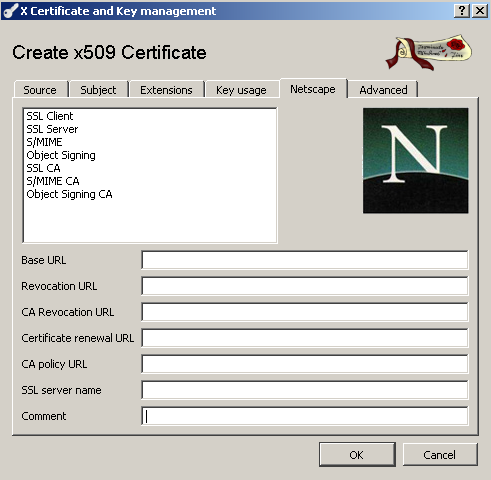
Figure9: XCA Database - New Certificate: Netscape tab
On the Advanced tab you can validate your settings.
Click the OK button to create the CA certificate.
And you've successfully created the CA which will be used to sign server and clients certificates, see Figure 10:

Figure10: XCA Database - CA certificate
2.3 Using XCA: Create the L2TP/IPsec server certificate
Similar with the step from above for the CA certificate, within the XCA GUI click the Certificates tab and click the New Certificate button.
On the Source tab we will select the Use this Certificate for signing option and the created CA certificate; this time the HTTPS Server template will be used, click the Apply All button, see Figure 11:
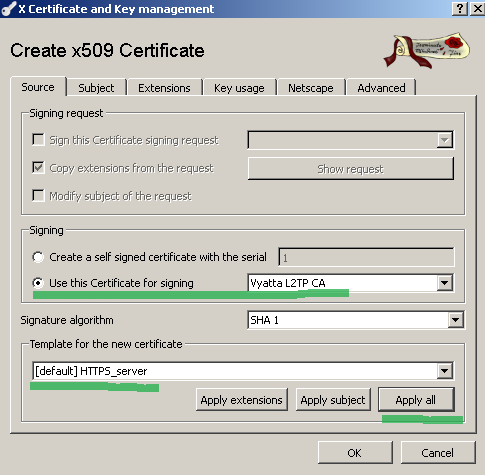
Figure11: XCA Database - New server certificate
On the Subject tab enter the certificate details(like CN, internal name(a name used to help you quickly identify a certificate), etc.), and as we did for the CA, generate a new RSA key(2048 bit will be fine) see Figure 12:

Figure12: XCA Database - New Certificate: Subject tab
On the Extensions tab we will a SAN DNS name entry by clicking the edit button from the indicated area in Figure 13, this SAN DNS name will be used for server name verification by Mac OS X and Windows Vista/7 L2TP/IPsec VPN clients(note that Windows Vista/7 L2TP/IPsec VPN clients do not verify it when the server's address is an IP address and not a DNS name).
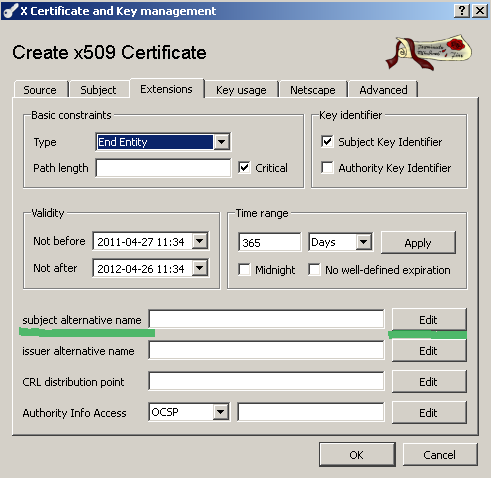
Figure13: XCA Database - New Certificate: Extensions tab, add a SAN entry
In the pop-up window click the add button and add a DNS type with content set to the VPN server's name, seeFigure 14:
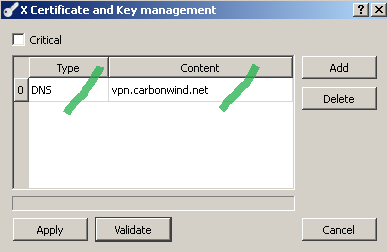
Figure14: XCA Database - New Certificate: Add a SAN DNS name
Click the Apply button to add the DNS name; this will appear now within the Extensions tab's area indicated in Figure 15:
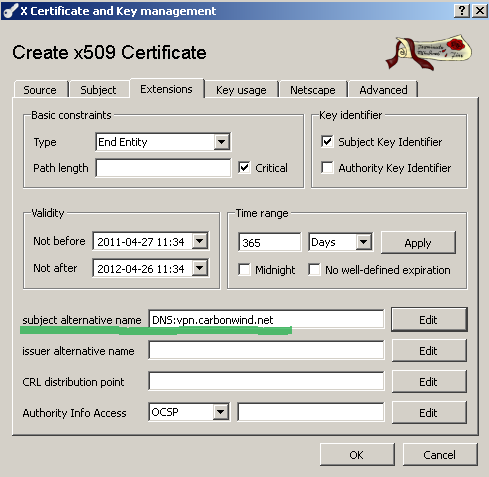
Figure15: XCA Database - New Certificate: Extensions tab, added a SAN DNS name
On the Key usage tab select the Microsoft Server EKU and IP security end entity EKU under the Extended key usage section and deselect Non Repudiation under the Key Usage section, see Figure 16:
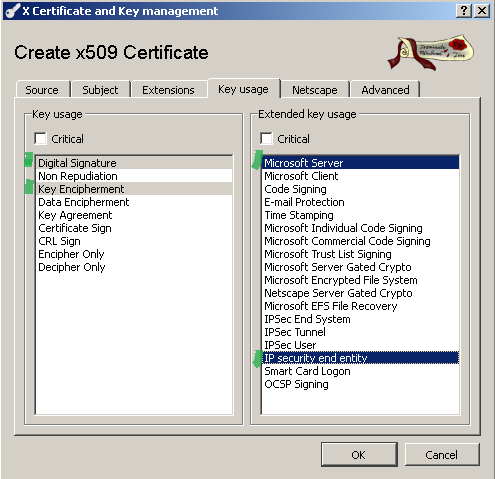
Figure16: XCA Database - New Certificate: Key usage tab
We need to be careful with the EKU fields to satisfy both Mac OS X and Windows Vista/7 L2TP/IPsec VPN clients verification checks.
On the Netscape tab you can deselect the Netscape SSL Server option, and delete the Comment value, see Figure 17:
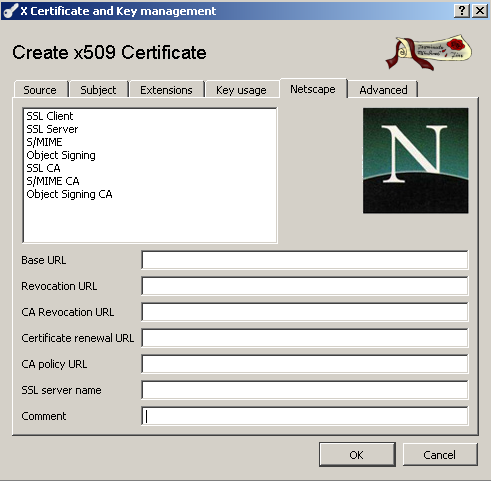
Figure17: XCA Database - New Certificate: Netscape tab
On the Advanced tab you can validate your settings.
Click the OK button to create the server certificate.
And you've successfully created the server certificate used on the L2TP/IPsec server, see Figure 18, note that by default XCA orders the certificates in a tree view:
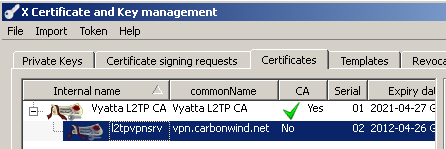
Figure18: XCA Database - server certificate
2.4 Using XCA: Create an L2TP/IPsec client certificate
Similar with the step from above for the server certificate, within the XCA GUI click the Certificates tab and click the New Certificate button.
On the Source tab we will select the Use this Certificate for signing option and the created CA certificate; this time the HTTPS Client template will be used, click the Apply All button, see Figure 19:
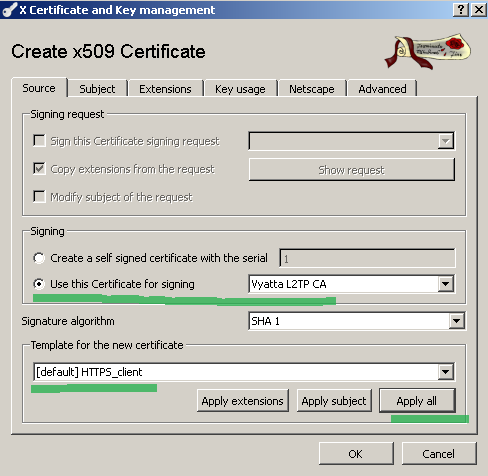
Figure19: XCA Database - New client certificate
On the Subject tab enter the certificate details(like CN, internal name(a name used to help you quickly identify a certificate), etc.), and as we did for the server, generate a new RSA key(2048 bit will be fine) see Figure 20:
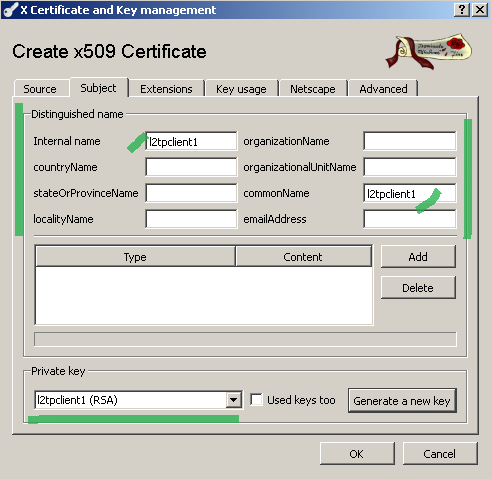
Figure20: XCA Database - New Certificate: Subject tab
On the Extensions tab you can for example specify the server certificate validity period, see Figure 21:

Figure21: XCA Database - New Certificate: Extensions tab
On the Key usage tab select the Microsoft Client EKU under the Extended key usage section; under the Key Usage section deselect Data Encipherment, see Figure 22:
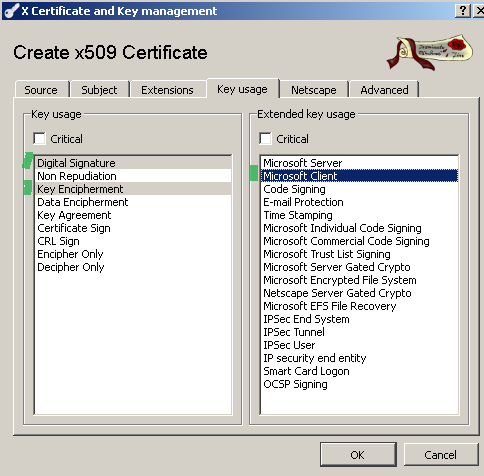
Figure22: XCA Database - New Certificate: Key usage tab
On the Netscape tab you can deselect the Netscape SSL Client and S/MIME options, and delete the Comment value, see Figure 23:
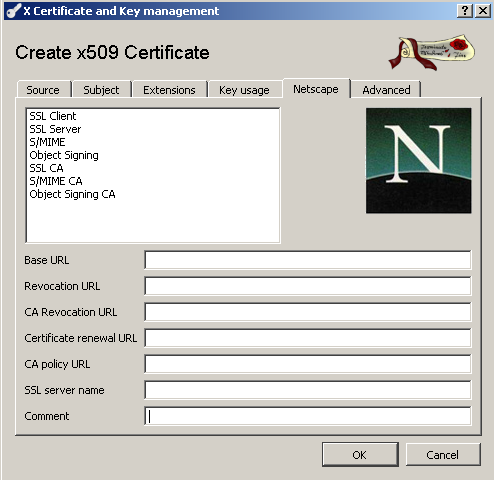
Figure23: XCA Database - New Certificate: Netscape tab
On the Advanced tab you can validate your settings.
Click the OK button to create the client certificate.
And you've successfully created the client certificate used on the L2TP/IPsec client, see Figure 24:
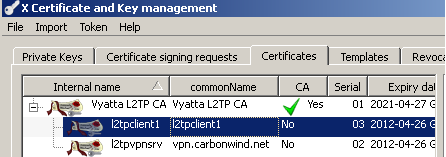
Figure24: XCA Database - client certificate
2.5 Using XCA: Export the CA certificate
On the server or clients we only need the CA certificate, not the associated private key.
Within the XCA GUI click the Certificates tab, select the CA certificate and click the Export button, see Figure 25:

Figure25: XCA Database - exporting the CA certificate
Select PEM as the Export format, indicate the export location and click the OK button to export the certificate, see Figure 26:
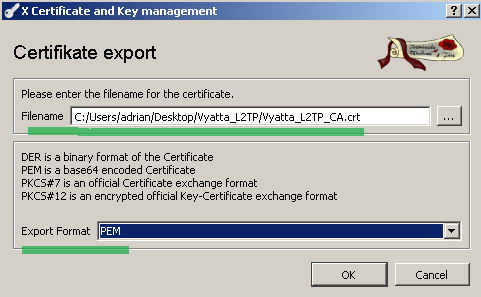
Figure26: XCA Database - export the CA certificate
2.6 Using XCA: Export the certificate and private key
On the server we need the server certificate and the associated private key.
Depending on what the L2TP/IPsec server platform will be, we can export the certificate and private key in a PCSK12 format or have these two in PEM format.
2.6.1 Using XCA: Export the server certificate(pem format)
Within the XCA GUI click the Certificates tab, select the server certificate and click the Export button, see Figure 27:

Figure27: XCA Database - exporting the server certificate
Select PEM as the Export format, indicate the export location and click the OK button to export the certificate, see Figure 28:
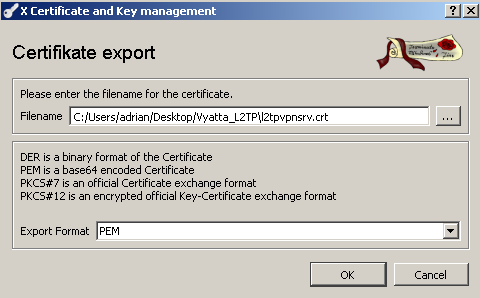
Figure28: XCA Database - export the server certificate
2.6.2 Using XCA: Export the server private key(pem format)
As said, on the server we also need the server's private key.
Within the XCA GUI click the Private Keys tab, select the server private key and click the Export button, see Figure 29:
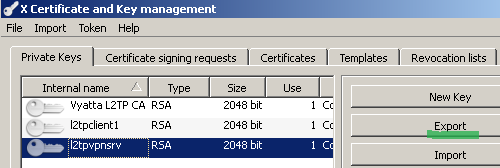
Figure29: XCA Database - exporting the server private key
Select PEM as the Export format, indicate the export location and click the OK button to export the private key, see Figure 30:
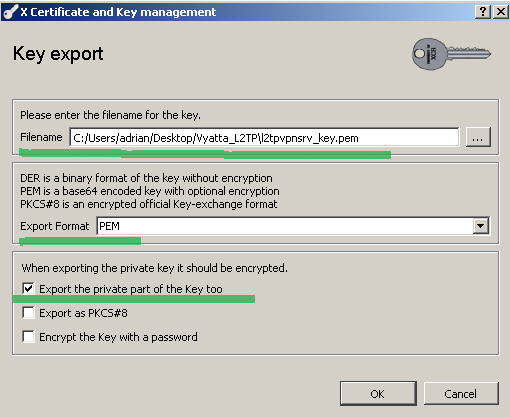
Figure30: XCA Database - export the server private key
Note that the private key is not encrypted, thus be careful with it.
Also the private key was exported using the PKCS#8 format, and not the traditional SSLeay compatible format.
You can spot the PKCS#8 format by opening the exported file with a text editor, it should be something like:
-----BEGIN PRIVATE KEY-----
MIIEvgIBADANBgkqhkiG9w0BAQEFAASCBK...
The traditional SSLeay compatible format will look like(opening the file with a text editor):
-----BEGIN RSA PRIVATE KEY-----
MIIEpAIBAAKCAQEAzCJqwrUlV21lS4vM/Y...
The PCKS#8 format may pose problems, for example, if you configure L2TP/IPsec on Vyatta Core 6.2.
To walk around this issue, unfortunetely, I think, for now, you need to use the OpenSSL CLI(you need to install OpenSSL on your machine, if it wasn't already installed(in case you use Linux)) like so:
openssl rsa -in 'exportedXCAprivatekey' -out 'SSLeaycompatibleformat'
or like:
openssl pkcs8 -nocrypt -in 'exportedXCAprivatekey' -out 'SSLeaycompatibleformat'
To my current knowledge this should be fixed in the next XCA release.
2.6.3 Using XCA: Export the server's certificate and private key(PKCS12 format)
For a L2TP/IPsec Windows based server we will export the server's certificate and private key in PKCS12 format.
Within the XCA GUI click the Certificates tab, select the server certificate and click the Export button, see Figure 31:

Figure31: XCA Database - exporting the server certificate + key in PKCS12 format
Select PKCS #12 as the Export format, indicate the export location and click the OK button to export the certificate, see Figure 32:
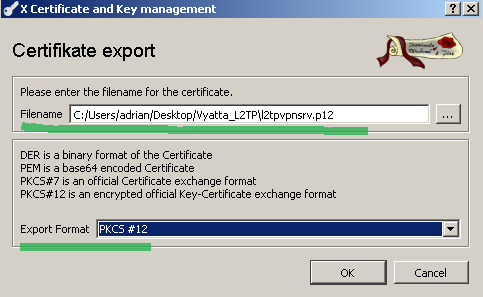
Figure32: XCA Database - export the server certificate + key in PKCS12 format
You will be prompted to enter a password to encrypt the PKCS12 file, so enter a password. You will need this password to import the certificate snd private key from the PKCS12 file on the server.
2.7 Using XCA: Export the client certificate and private key
On the client we need the client certificate and the associated private key.
Depending on what the L2TP/IPsec client platform will be, we can export the certificate and private key in a PCSK12 format or have these two in PEM format.
2.7.1 Using XCA: Export the client certificate(pem format)
Within the XCA GUI click the Certificates tab, select the client certificate and click the Export button, see Figure 33:
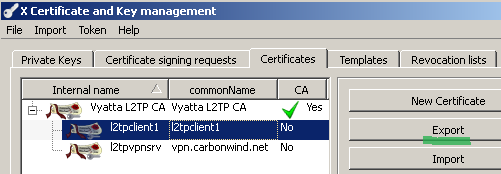
Figure33: XCA Database - exporting the client certificate
Select PEM as the Export format, indicate the export location and click the OK button to export the certificate, see Figure 34:
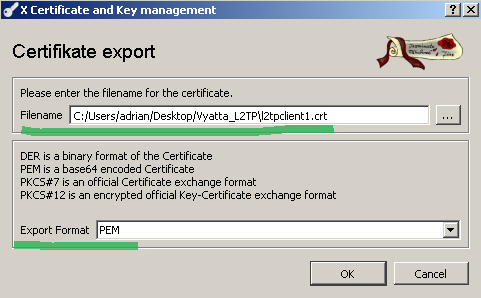
Figure34: XCA Database - export the client certificate
2.7.2 Using XCA: Export the client private key(pem format)
As said, on the client we also need the client's private key.
Within the XCA GUI click the Private Keys tab, select the client private key and click the Export button, see Figure 35
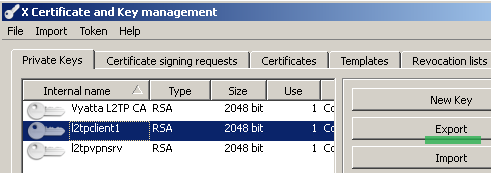
Figure35: XCA Database - exporting the client private key
Select PEM as the Export format, indicate the export location and click the OK button to export the private key, see Figure 36:
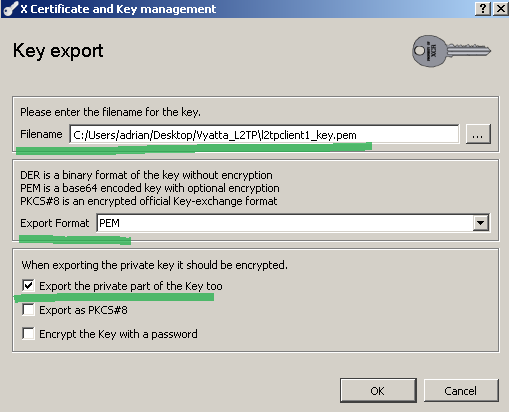
Figure36: XCA Database - export the client private key
Note that the private key is not encrypted, thus be careful with it.
Also, as in the server's case, the private key was exported using the PKCS#8 format, and not the traditional SSLeay compatible format.
2.7.3 Using XCA: Export the client's certificate and private key(PKCS12 format)
For a L2TP/IPsec Windows or Mac OS X based client we will export the client's certificate and private key in PKCS12 format.
Within the XCA GUI click the Certificates tab, select the client certificate and click the Export button, see Figure 37:

Figure37: XCA Database - exporting the client certificate + key in PKCS12 format
Select PKCS #12 as the Export format, indicate the export location and click the OK button to export the certificate, see Figure 39:
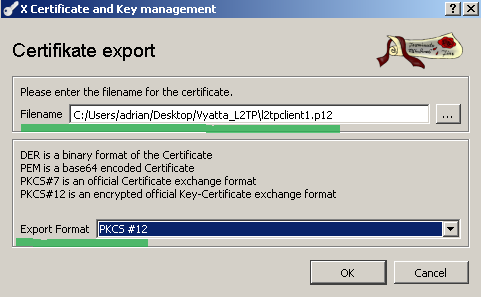
Figure38: XCA Database - export the client certificate + key in PKCS12 format
You will be prompted to enter a password to encrypt the PKCS12 file, so enter a password. You will need this password to import the certificate and private key from the PKCS12 file on the client.
2.8 Using XCA: Revoke a certficate, create a CRL and export it
We did not specify a CRL URL on the issued certficates(client or server) that can be used by IKE peers to download the CRL and have them to verify it in order to see if the other party's certificate was not expired.
Still we can revoke a certificate, create a CRL and manually import it on IKE peers.
Let's revoke the client certificate.
Within the XCA GUI click the Certificates tab, select the client certificate, right-click it and click the Revoke button, see Figure 39:
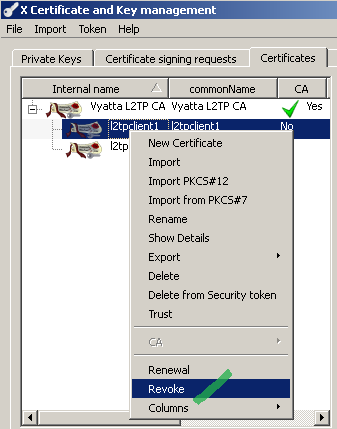
Figure39: XCA Database - Revoke the client certificate
In the pop-up window you can specify the expiration date and a revocation reason, see Figure 40:
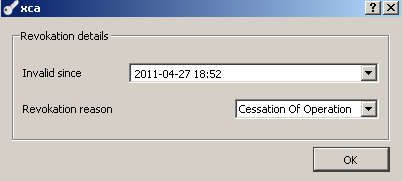
Figure40: XCA Database - Revoke the client certificate: enter revocation details
Click the OK button; now the client certificate should be displayed as revoked within XCA, see Figure 41:

Figure41: XCA Database - Revoked the client certificate
Next we can proceed an create the CRL, within the XCA GUI on the Certificates tab, select the CA certificate, right-click it, click to expand CA and click Generate CRL, see Figure 42:
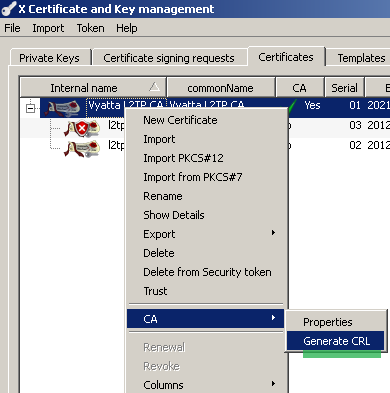
Figure42: XCA Database - Generate CRL
In the pop-up window you can specify the CRL validity period and some CRL options, see Figure 43:
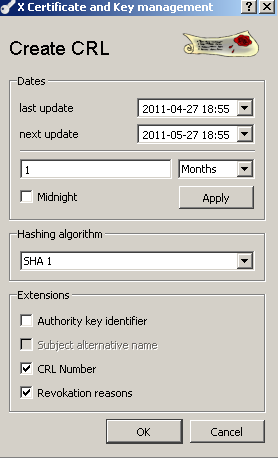
Figure43: XCA Database - Generate CRL options
Click the OK button to generate the CRL.
We can see the generated CRL from the XCA GUI on the Revocation lists tab; from there we can export this CRL by selecting it, right-click it and then click Export, see Figure 44:
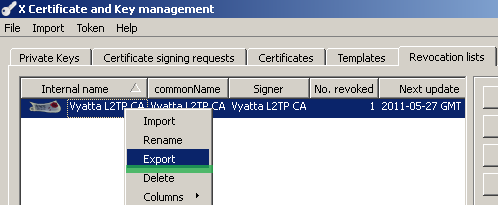
Figure44: XCA Database - Export the CRL
Select PEM as the Export format, indicate the export location and click the OK button to export the CRL, see Figure 45:
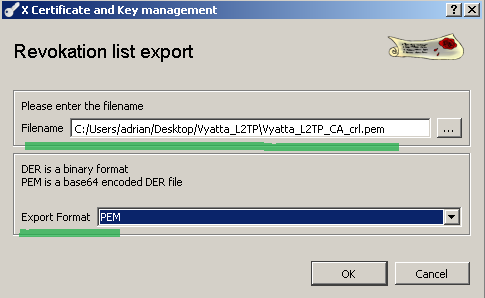
Figure45: XCA Database - Export the CRL options
We can use the exported CRL, for example, on Vyatta Core 6.2 for its L2TP/IPsec VPN server configuration.
|