|
10.08.2007
Updated 21.08.2007
OpenVPN and ISA 2006 - Part 1: OpenVPN on a DMZ
- 1. Overview
- 2. Configure ISA
- 3. Setup the CA and Configure OpenVPN an the DMZ Server
- 4. Configure OpenVPN on the Client
- 5. Test the Configuration
1. Overview
We have installed ISA 2006 as our network firewall, Web Proxy and VPN server.
We have as VPN options PPTP, L2TP/IPsec for remote access plus IPsec tunnel mode for site-to-site VPN.
PPTP is not a real choice these days due to security flaws. And it does not provide per-packet data integrity(proof that the data was not modified in transit), per-packet data origin authentication(proof that the data was sent by the legitimate source) or protection against replay attacks. PPTP provides only per-packet data confidentiality. This is stated on Microsoft's site too.
With L2TP/IPsec we might experience connection problems through some NAT devices or some network admins might block IPsec.
So we are thinking about a SSL VPN option. IAG can do that, but right now we might not have the resources to invest in IAG.
Fortunetely we have OpenVPN which according to its site:
“OpenVPN is a full-featured SSL VPN solution which can accomodate a wide range of configurations, including remote access, site-to-site VPNs, WiFi security, and enterprise-scale remote access solutions with load balancing, failover, and fine-grained access-controls.”
OpenVPN has Diffie-Hellman key agreement, RSA authentication, HMAC-SHA1 integrity checks(for data origin authentication and data integrity per-packet, the usage of HMAC is to first encrypt a packet, then HMAC the resulting ciphertext), explicit IV, replay attacks protection(by using a variant of the sliding-window algorithm, same algorithm used by IPsec, where each packet is tagged with a unique, incrementing sequence). Please reffer to this presentation. And the symmetric encryption algorithm can be even AES-256-CBC. Plus the " --tls-auth" which when used will enable OpenVPN to(see OpenVPN's Man Page):
"sign every TLS control channel packet with an HMAC signature, including packets which are sent before the TLS level has had a chance to authenticate the peer. The result is that packets without the correct signature can be dropped immediately upon reception, before they have a chance to consume additional system resources such as by initiating a TLS handshake".
By default OpenVPN uses UDP for better protection against DoS, port scanning. UDP and the "tls-auth" option provide better protection against DoS attacks or port flooding on the OpenVPN UDP port, port scanning, SSL/TLS handshake initiations from unauthorized machines.
If we use for OpenVPN, say TCP port 443, we can scan with nmap, for example, and receive a result because we are just starting the TCP three-way handshake(with "-sS" scan we will not even complete it).
So the question to ask: where to install OpenVPN: on ISA or an a separate server?
Well, personally I do not like installing any additional services on ISA unless they are third-party add-ons. But if you go for it(at your own expense) we will disscus it in this article. Note that installing OpenVPN on ISA is not recommended or supported, OpenVPN is not a third-party add-n for ISA, so you can run into both security and functionality issues.
In a production environment, you must install OpenVPN on a server behind ISA.
First lets install OpenVPN on a server situated on a perimeter(DMZ) network on ISA.
See Figure1 for the network diagram. 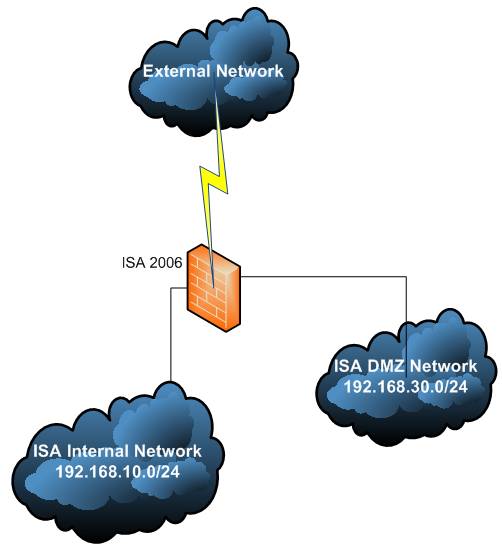
Figure1: The Network Diagram
ISA has 3 NICs: External, Internal and DMZ(perimeter). External:
IP Address: 192.168.22.234
Subnet Mask: 255.255.255.0
DG: 192.168.22.1
DNS: None Internal:
IP Address: 192.168.10.1
Subnet Mask: 255.255.255.0
DG: None
DNS: 192.168.10.2 DMZ:
IP Address: 192.168.30.1
Subnet Mask: 255.255.255.0
DG: None
DNS: None The OpenVPN server lies on 192.168.30.0/24, exactly its IP configuration:
IP Address: 192.168.30.2
Subnet Mask: 255.255.255.0
DG: 192.168.30.1
DNS: Whatever(your Internal DNS servers or ISP’s one, just make sure you have the right rules on ISA) In this article for OpenVPN we will use "dev tun", which will create a routed IP tunnel. We are using routing and not bridging.
Our VPN clients will use the 10.10.10.0/24 subnet.
Now on the server, OpenVPN will use 10.10.10.0/30 for "it", we have a PtP link 10.10.10.1 <-> 10.101.10.2 between our server OS and OpenVPN on the server. See the Figure2. 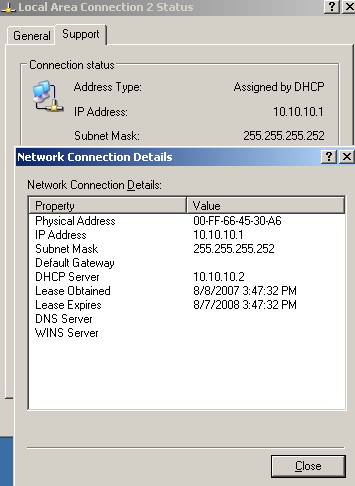
Figure2: TAP Adapter
Why?
If you would like to read more abouting routing and OpenVPN, why it is used a "/30" subnet please reffer to OpenVPN's FAQ, more exactly the section called: "Why does OpenVPN's "ifconfig-pool" option use a /30 subnet (4 private IP addresses per client) when used in TUN mode?".
Now let’s go and install OpenVPN. For the DMZ server the OS is a Windows 2003 Server R2 Standard SP2.
For OpenVPN, I have used openvpn-2.0.9-gui-1.0.3-install.exe.
So right now OpenVPN should be installed but not running yet.
2. Configure ISA
Let’s take care of ISA first.
It’s all about how ISA sees Networks. ISA will receive packets from 10.10.10.0/24 on its DMZ interface. So we must add 10.10.10.0/24 on the DMZ address range: 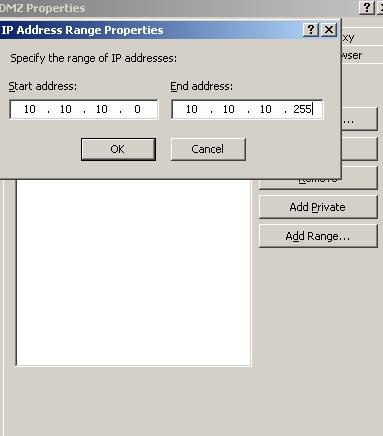
Figure3: DMZ Address Range

Figure4: DMZ Network
We need to tell ISA how it can reach this network(ISA knows according to its DMZ NIC that it is directly connected to 192.168.30.0/24). Use the bellow command to add a permanent route on ISA: 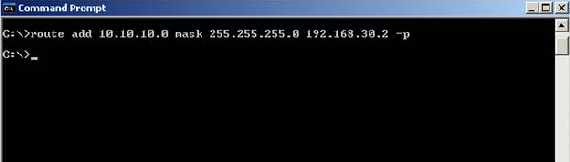
Figure5: Route Add
Have a “Route” network relationship between DMZ and Internal Networks(remember that “Route” relationships are bidirectional, a “Route” relationship exist between Internal and DMZ and vice-versa): 
Figure6: Network Relationship between Internal and DMZ
And a “NAT” network relationship between DMZ and External Networks(remember“NAT” relationships are one-way, bellow addresses are translated from DMZ to External but not vice-versa): 
Figure7: Network Relationship between DMZ and External
Check ISA’s routing table to see if everything is looking good:
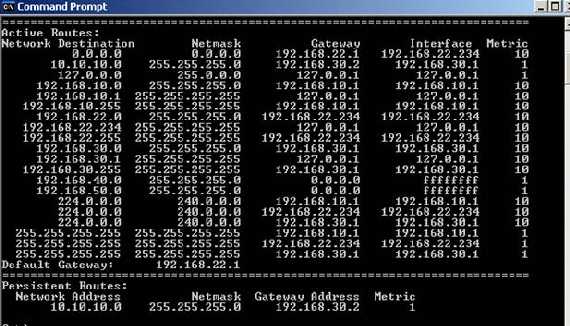
Figure8: ISA's routing table
Probably you will get some alerts on ISA while you are doing these. Just restart the Firewall Service or the machine and check if those alerts reappear. They should not if everything is configured correctly: 
Figure9: No ISA Alerts
If they do, then you must get rid of them, otherwise ISA will probably mark packest as spoofed and dropped them.
I will use for this article TCP port 443 for the OpenVPN server and not the default UDP port 1194(although it is better to use UDP: “While OpenVPN allows either the TCP or UDP protocol to be used as the VPN carrier connection, the UDP protocol will provide better protection against DoS attacks and port scanning than TCP.”, remember the discussion from the start) due to the chance that communication using TCP port 443 to be allowed on many networks. So on ISA we will create some rules:
Publish the OpenVPN server with a Non-Web Server Rule:
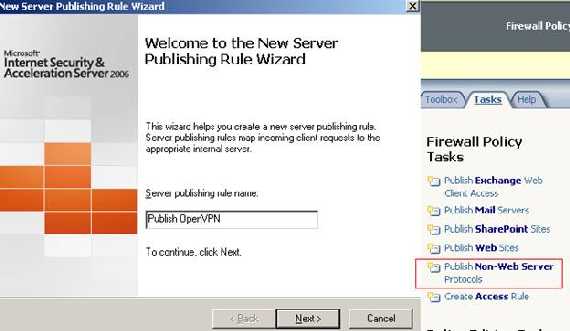
Figure10: New Non-Web Server Publishing Rule
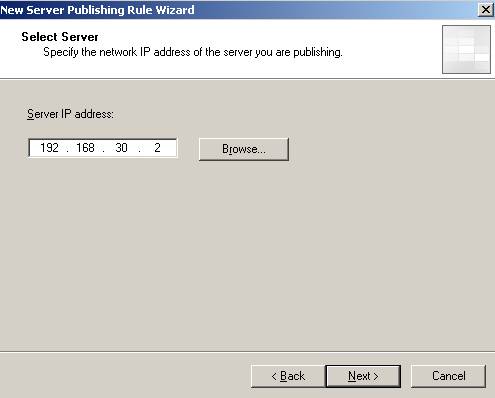
Figure11: OpenVPN Server’s IP address
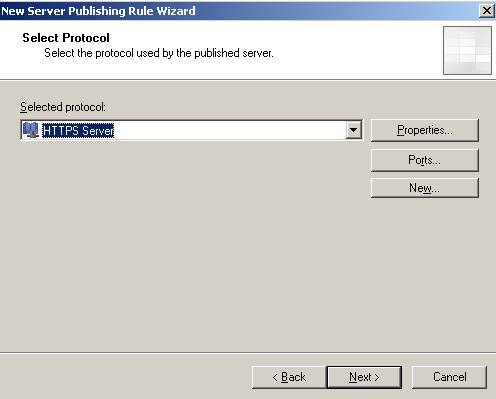
Figure12: HTTPS Server Protocol
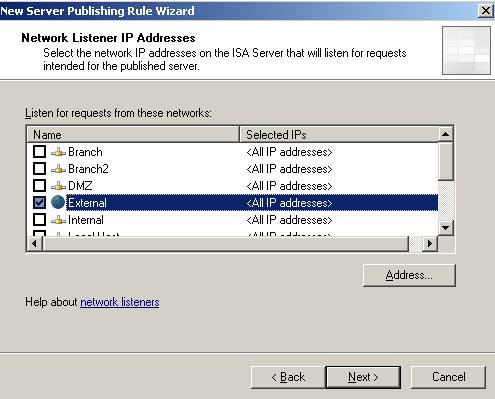
Figure13: ISA listen on its External Network
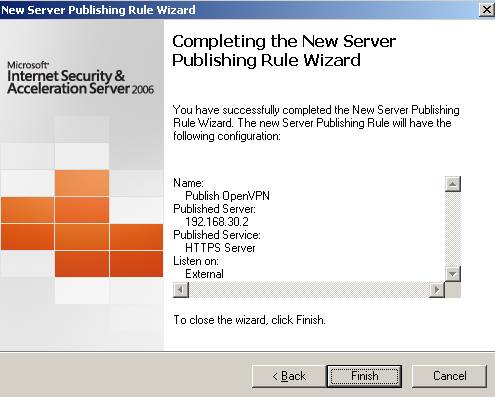
Figure14: That’s it
And create an access rule for allowing access between DMZ and Internal. For testing I have allowed all protocols in both ways:

Figure15: ISA Rules
Also there is a rule allowing HTTP/HTTPS for VPN clients, thus providing them Internet access(no split-tunneling allowed).
3. Setup the CA and Configure OpenVPN an the DMZ Server
Ok. Now let’s proceed and set up the CA and get some certificates(you can check the OpenVPN documentation for more details).
On the OpenVPN server go to C:\Program Files\OpenVPN\easy-rsa and run “init-config”: 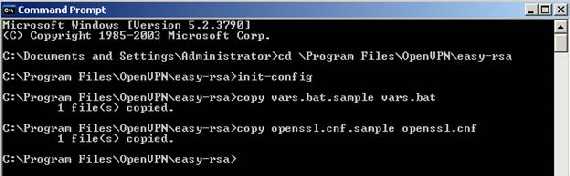
Figure16: Init-config
Let’s edit now the vars.bat file and set the RSA and DH keys size to 2048(I’m not paranoid, just check NIST Guidelines for Public-Key Sizes, see Table2).
Also do not forget to set the KEY_COUNTRY, KEY_PROVINCE, KEY_CITY, KEY_ORG, and KEY_EMAIL parameters. Don’t leave them blank.

Figure17: Editing the Vars.bat file
Initialize the PKI with the following commands:
vars
clean-all
The last command removes any previous KEY_DIR directory(if any).

Figure18: Running the Vars.bat file
Build the CA(I have left the name used in OpenVPN’s documentation, OpenVPN-CA, don't forget to take good care on how you protect the ca.key after use, take it to an offline machine):
build-ca
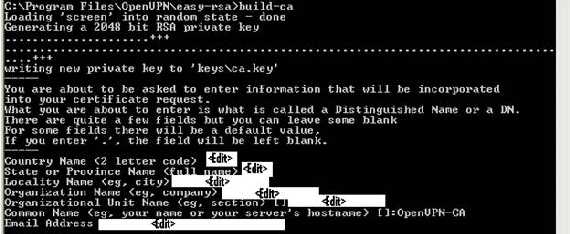
Figure19: Build the CA
Generate a certificate and private key for the server. I have used for the CN(common name) "server". And answer positive to the two questions(I know I have edited by mistake the CN in the bellow picture):
build-key-server server 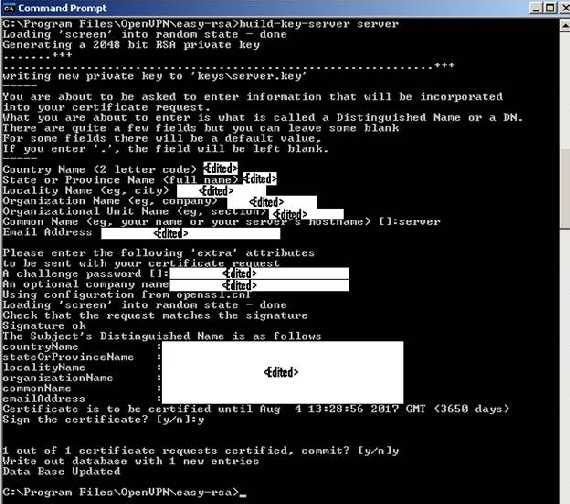
Figure20: Generate a certificate and private key for the server
And also generate certificates and private keys for clients. An example bellow for the user johnvpn(this will be the CN):
build-key johnvpn 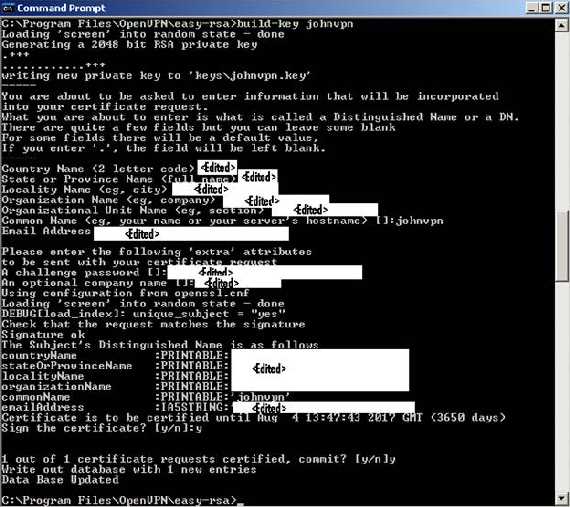
Figure21: Generate a certificate and private key for the client
Diffie Hellman parameters must be generated for the OpenVPN server(their size will be 2048 so it will take some times, be patient):
build-dh 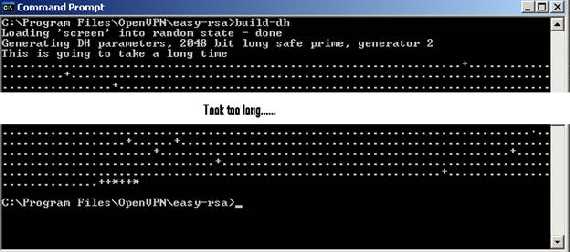
Figure22: Generating Diffie Hellman parameters
Now the server config sample. I do not want to allow split tunneling, I have used “tls-auth” and for that, we need to generate a “ta.key”. Also for clients to be able to resolve names, a DNS server, a WINS server and the DNS connection suffix(I’m not a fan of WINS) are given to the client.
The server config file:
#remote myremote # server mode
port 443 #port used by OpenVPN
proto tcp-server
dev tun
server 10.10.10.0 255.255.255.0 # the subnet used by clients
push "redirect-gateway" # no split tunneling
push "dhcp-option DNS 192.168.10.2"
push "dhcp-option WINS 192.168.10.2"
push "dhcp-option DOMAIN carbonwind.net" # some DHCP options
#the locations of the keys
dh "C:\\Program Files\\OpenVPN\\easy-rsa\\keys\\dh2048.pem"
ca "C:\\Program Files\\OpenVPN\\easy-rsa\\keys\\ca.crt"
cert "C:\\Program Files\\OpenVPN\\easy-rsa\\keys\\server.crt"
key "C:\\Program Files\\OpenVPN\\easy-rsa\\keys\\server.key" # This file should be kept secret
# the tls-auth directive adds an additional HMAC signature to all SSL/TLS #handshake packets for #integrity verification
tls-auth "C:\\Program Files\\OpenVPN\\easy-rsa\\keys\\ta.key" 0
cipher AES-128-CBC # AES you can use AES-256-CBC if you want
# enable LZO compression
comp-lzo
# moderate verbosity
verb 4
mute 10
We can now go and start the OpenVPN service(you can set it to automatic): 
Figure23: The OpenVPN Service
If everything goes fine the OpenVPN should “come up” and have the 10.10.10.1 IP address on it(obviously by now you should already have the “ta.key” generated otherwise it will OpenVPN fail, see bellow for it). If not check for errors by clicking “Connect” on its GUI and see what’s telling you. 
Figure24: The OpenVPN Server “is up”
A quick connectivity check with nmap from my client: 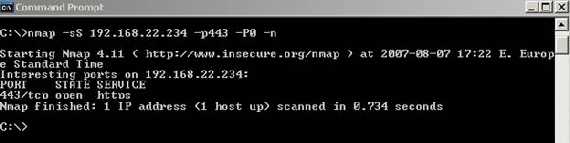
Figure25: A conectivity test
The generation of the ta.key on the server(you must copy this key to all clients): 
Figure26: Generating the ta.key
Now we need to enable routing. The OpenVPN server is located on a Windows Server2003. For this I have used RRAS.
Click “Configure and Enable Routing and Remote Access”: 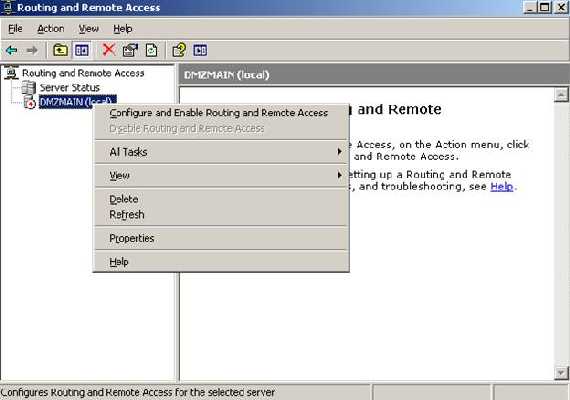
Figure27: Enabling RRAS
Select “Custom Configuration”: 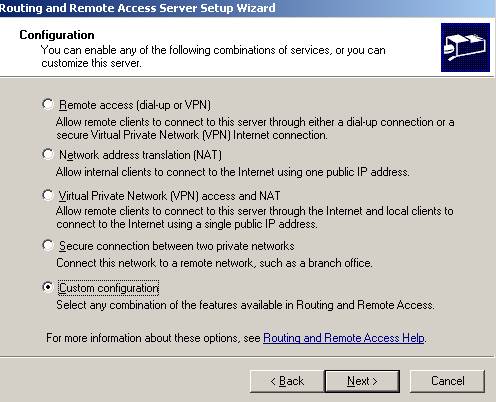
Figure28: RRAS Custom Config
And “Lan Routing”: 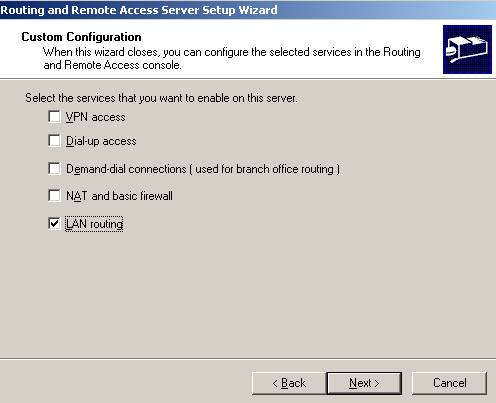
Figure29: RRAS Lan Routing
That’s it: 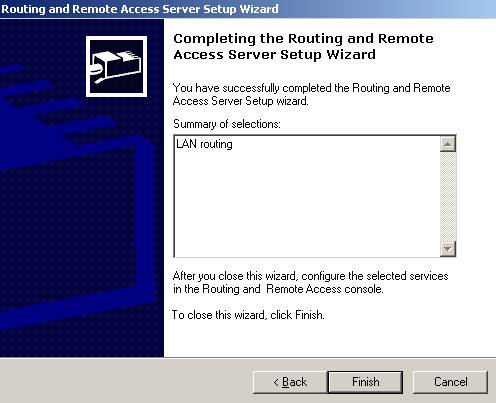
Figure30: RRAS That’s it
If you want you can go and enable “Basic Firewall” by adding a “New Routing Protocol”: 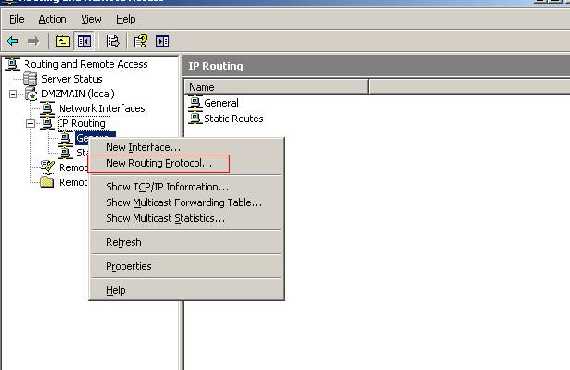
Figure31: RRAS New Routing Protocol
Select “NAT/Basic Firewall”: 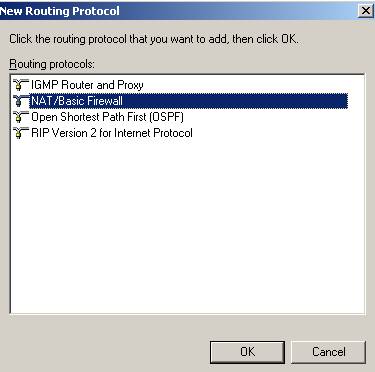
Figure32: RRAS NAT/Basic Firewall
Click on it and add “New Interface”: 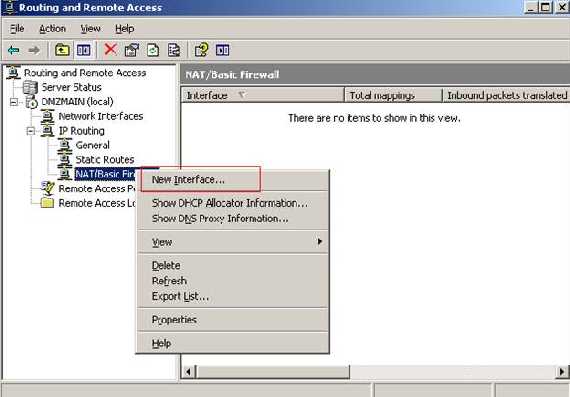
Figure33: New Interface added to Basic Firewall
On my server “Local Area Connection 2” is represented by the TAP adapter. You can add on it the Basic firewall(why not: “In general, it's safe to disable the firewall on the TAP-Win32 adapter because OpenVPN makes sure that only an authenticated machine on the other end of the connection can communicate through it.”).
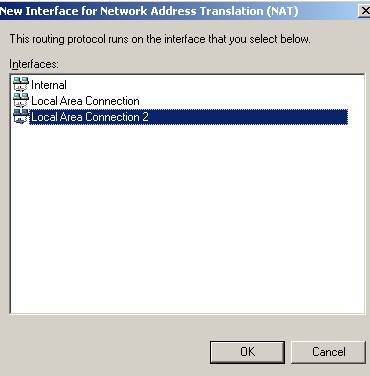
Figure34: Adding the TAP Adapter
Choose “Basic Firewall Only”: 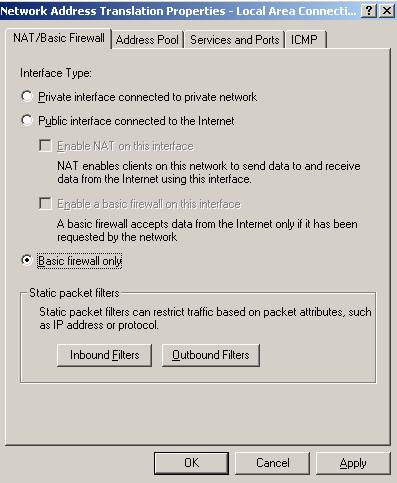
Figure35: RRAS Basic Firewall
Next you can choose what to allow or not.
You can add the “Local Area Connection” to the “Basic Firewall” too. Just repeat the above steps. On this interface you must allow “Secure Web Server(HTTPS)” otherwise the OpenVPN will not be accesible:
Double click on the “Local Area Connection” interface while you are in NAT/Basic Firewall area and put a check in Secure Web Server(HTTPS) checkbox. 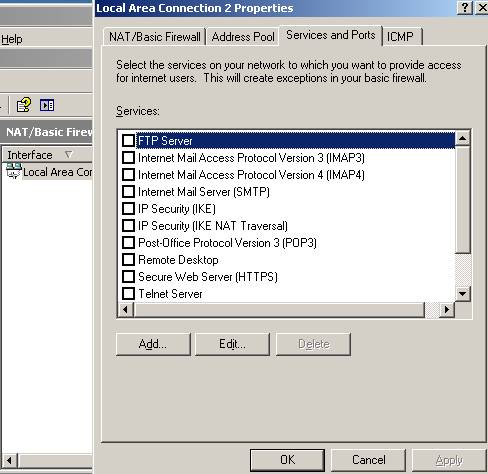
Figure 36: Services and Port on Local Area Connection
For “Private IP Address” use 192.168.30.2: 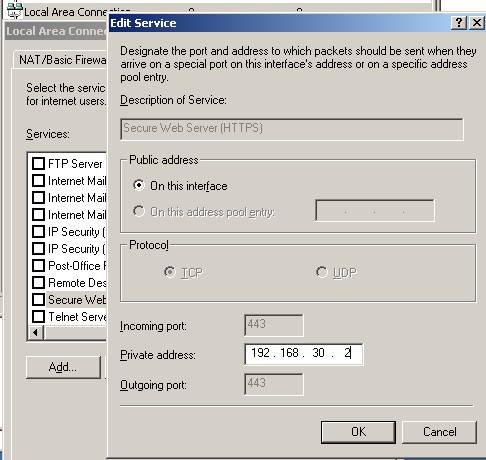
Figure37: Configuring the IP address
%20checked.jpg)
Figure38: Secure Web Server(HTTPS) checked
What you might experience is that if you reboot the Windows 2003 Server you are able to connect but you cannot access anything. If you restart RRAS then everything is fine. What’s happening when you are restarting RRAS:
A new route is added for 10.10.10.0/24(see the “Network Mangement” one)
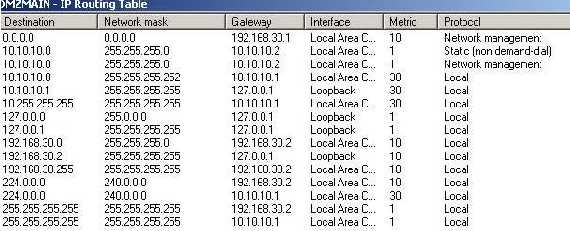
Figure39: RRAS Routing table
As you can see from the Figure39 I have added a static one to “solve” this issue.
Click “New Static Route”: 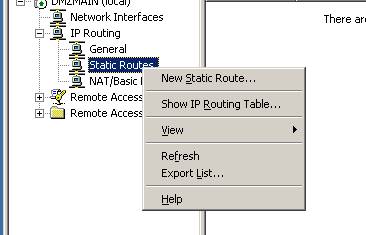
Figure40: RRAS Adding a static route
And add the bellow route: 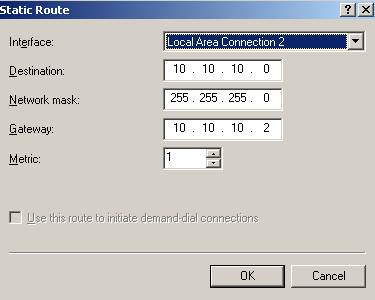
Figure41: The RRAS route
4. Configure OpenVPN on the Client
Let’s head to the client and see what’s its config(go and install OpenVPN GUI here too, no CA needed). It’s config includes the bellow settings. We will use some MITM avoidance options too.
By the way: for this test my client(s) is(are) Windows XP SP2.
The client config file:
remote 192.168.22.234
client
port 443
proto tcp-client
dev tun
nobind
ca "C:\\Program Files\\OpenVPN\\easy-rsa\\keys\\ca.crt"
cert "C:\\Program Files\\OpenVPN\\easy-rsa\\keys\\johnvpn.crt"
key "C:\\Program Files\\OpenVPN\\easy-rsa\\keys\\johnvpn.key" # This file should be kept secret
tls-auth "C:\\Program Files\\OpenVPN\\easy-rsa\\keys\\ta.key" 1
#MITM avoidance
ns-cert-type server< br>tls-remote"/C=XX/ST=X/O=XX/CN=server/emailAddress=XX@XX.XX"
cipher AES-128-CBC # AES
# enable LZO compression
comp-lzo
# moderate verbosity
verb 4
mute 10
5. Test the Configuration
Another quick connectivity check, just before the first login: 
Figure42: Another quick connectivity test
And “Connect”: 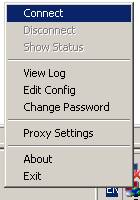
Figure43: Finnaly: Connect
If evrything is working fine the GUI should turn into green: 
Figure44: And it’s working!
We can check its log to see what happened: 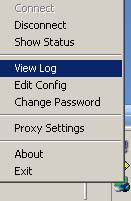
Figure45: OpenVPN Client Log
Here it is some part of it:
"Thu Aug 09 16:32:05 2007 us=694696 Control Channel Authentication: using
'C:\Program Files\OpenVPN\easy-rsa\keys\ta.key' as a OpenVPN static key file
Thu Aug 09 16:32:05 2007 us=694745 Outgoing Control Channel Authentication:
Using 160 bit message hash 'SHA1' for HMAC authentication
Thu Aug 09 16:32:05 2007 us=694761 Incoming Control Channel Authentication:
Using 160 bit message hash 'SHA1' for HMAC authentication
Thu Aug 09 16:32:05 2007 us=694793 LZO compression initialized
Thu Aug 09 16:07:41 2007 us=135124 Local Options String: 'V4,dev-type tun,
link-mtu 1560,tun-mtu 1500,proto TCPv4_CLIENT,comp-lzo,keydir 1,cipher
AES-128-CBC,auth SHA1,keysize 128,tls-auth,key-method 2,tls-client'
Thu Aug 09 16:07:41 2007 us=135138 Expected Remote Options String: 'V4,
dev-type tun,link-mtu 1560,tun-mtu 1500,proto TCPv4_SERVER,comp-lzo,keydir 0,
cipher AES-128-CBC,auth SHA1,keysize 128,tls-auth,key-method 2,tls-server'
Thu Aug 09 16:07:41 2007 us=135487 Attempting to establish TCP connection with
192.168.22.234:443
Thu Aug 09 16:07:41 2007 us=148287 TCP connection established with
192.168.22.234:443
Thu Aug09 16:07:41 2007 us= 640680 VERIFY OK :depth=1,
/C=XX/ST=XX/L=XX/O=XX/CN=OpenVPN-CA/emailAddress=XX@XX.XX
Thu Aug 09 16:07:41 2007 us=643270 VERIFY OK: nsCertType=SERVER
Thu Aug 09 16:07:41 2007 us= 643292 VERIFY X509 NAME OK:
/C=XX/ST=X/O=XX/CN=server/emailAddress=XX@XX.XX
Thu Aug09 16:07:41 2007 us=643302 VERIFYOK:depth=0,
/C=XX/ST=XX/O=XX/CN=server/emailAddress=XX@XX.XX
Thu Aug 09 16:07:42 2007 us=712353 Data Channel Encrypt:
Cipher 'AES-128-CBC' initialized with 128 bit key
Thu Aug 09 16:07:42 2007 us=713704 Data Channel Encrypt:
Using 160 bit message hash 'SHA1' for HMAC authentication
Thu Aug 09 16:07:42 2007 us=713756 Data Channel Decrypt:
Cipher 'AES-128-CBC' initialized with 128 bit key
Thu Aug 09 16:07:42 2007 us=713783 Data Channel Decrypt:
Using 160 bit message hash 'SHA1' for HMAC authentication
Thu Aug 09 16:07:42 2007 us=720004 Control Channel:
TLSv1, cipher TLSv1/SSLv3 DHE-RSA-AES256-SHA, 2048 bit RSA
Thu Aug 09 16:07:42 2007 us=720063 [server] Peer Connection
Initiated with 192.168.22.234:443
Thu Aug 09 16:07:43 2007 us=966724 SENT CONTROL [server]:
'PUSH_REQUEST' (status=1)
Thu Aug 09 16:07:44 2007 us=106701 PUSH: Received control message:
'PUSH_REPLY,redirect-gateway,dhcp-option DNS 192.168.10.2,
dhcp-option WINS 192.168.10.2,dhcp-option DOMAIN carbonwind.net,
route 10.10.10.1,ifconfig 10.10.10.6 10.10.10.5'
Thu Aug 09 16:32:08 2007 us=524278 OPTIONS IMPORT: --ifconfig/up
options modified
Thu Aug 09 16:32:08 2007 us=524290 OPTIONS IMPORT: route options modified
Thu Aug 09 16:32:08 2007 us=524300 OPTIONS IMPORT: --ip-win32 and/or
--dhcp-option options modified
Thu Aug 09 16:32:08 2007 us=542354 TAP-WIN32 device [Local Area Connection 5]
opened:
Thu Aug 09 16:32:08 2007 us=544274 Notified TAP-Win32 driver to set a DHCP
IP/netmask of 10.10.10.6/255.255.255.252 on interface {03502C2C-5CA3-4B87-8537-04…
Thu Aug 09 16:32:09 2007 us=643034 Route: Waiting for TUN/TAP interface to come up...
Thu Aug 09 16:32:10 2007 us=677438 TEST ROUTES: 2/2 succeeded len=1 ret=1 a=0 u/d=up
Thu Aug 09 16:32:10 2007 us=677478 route ADD 192.168.22.234
MASK 255.255.255.255 192.168.22.1
Thu Aug 09 16:32:10 2007 us=683375 Route addition via IPAPI succeeded
Thu Aug 09 16:32:10 2007 us=683411 route DELETE 0.0.0.0
MASK 0.0.0.0 192.168.22.1
Thu Aug 09 16:32:10 2007 us=689048 Route deletion via IPAPI succeeded
Thu Aug 09 16:32:10 2007 us=689082 route ADD 0.0.0.0
MASK 0.0.0.0 10.10.10.5
Thu Aug 09 16:32:10 2007 us=693500 Route addition via IPAPI succeeded
Thu Aug 09 16:32:10 2007 us=693536 route ADD 10.10.10.1
MASK 255.255.255.255 10.10.10.5
Thu Aug 09 16:32:10 2007 us=701507 Route addition via IPAPI succeeded
Thu Aug 09 16:32:10 2007 us=701538 Initialization Sequence Completed"
Now let’s see if we can ping an Internal host named dcmain. To see what’s happening we will use Wireshark capturing packets on the TAP adapter to see inside the SSL tunnel(OK, it’s from another address 10.10.10.10 and on the Wireshark trace there is a differrent time, but same client, because I have disconnected it and then I have connected with another client/machine and so on… ): 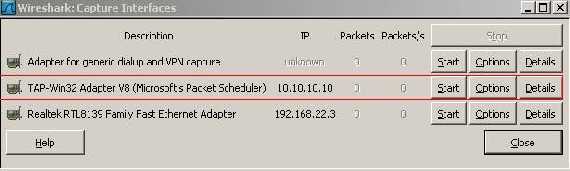
Figure46: Wireshark Interface
Here is the ping which went fine: 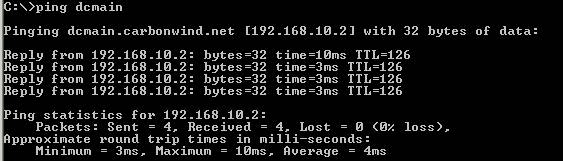
Figure47: Testing ping and name resolution
And the DNS query for dcmain using the the correct DNS suffix: 
Figure48: Wireshark Capture
A Google search to see if we have Internet connectivity and bellow are the ISA’s logs: 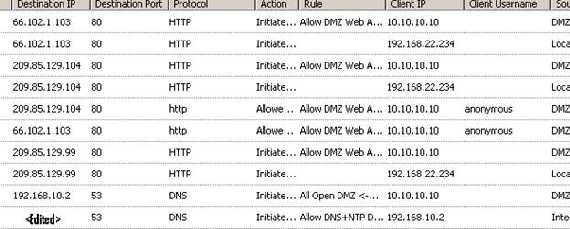
Figure49: ISA’s logs, no split-tunneling
We can enabled the Web Proxy on ISA’s DMZ Network and use it on the client browser: 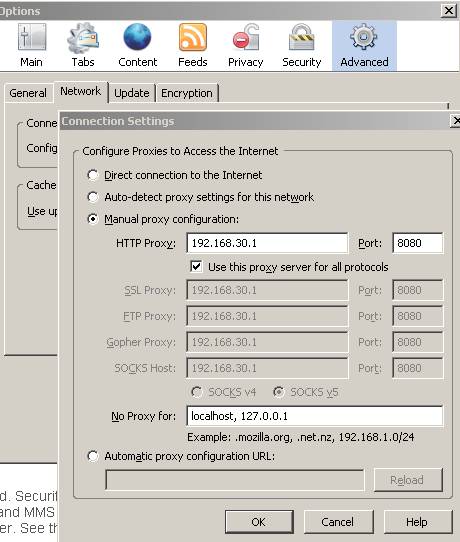
Figure50: Optional, using the Proxy Server
And again the ISA logs, this time with the proxy set: 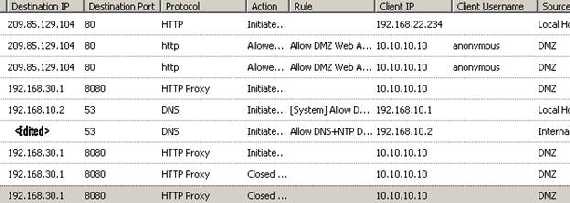
Figure51: ISA’s Web proxy server logs
|