|
01.11.2008
Creating a Site-to-Site VPN Between Two ISA Server 2006 SE Over a Dedicated Connection - Part 1: Using IPsec Tunnel Mode
- 1. Introduction
- 2. ISA HQ's NICs
- 3. Create the IPSec Tunnel Mode VPN Site-to-Site Connection on ISA HQ
- 4. ISA Branch's NICs
- 5. Create the IPSec Tunnel Mode VPN Site-to-Site Connection on ISA Branch
- 6. Test the IPsec Tunnel Mode VPN Site-to-Site Connection
1. Introduction
You currently have an ISA Server 2006 SE on your network.
And you may have an existent site-to-site VPN connection, or plan to add one. For several reasons, you may like to move the existent site-to-site VPN connection over a dedicated connection(say, to buy for that a new Internet connection). Or you may want to create the new VPN tunnel over a dedicated Internet connection.
Depending on the nature of the remote VPN gateway, another ISA Server 2006 or a third-party VNP gateway, and your requirements, you need to choose between the IPsec tunnel mode VPN site-to-site connection or the L2TP/IPsec site-to-site VPN connection(I do not count PPTP, as personal, I dislike the use of it these days due to security reasons).
If you connect to a remote third-party VPN gateways, likely, your only option would be the IPsec tunnel mode VPN site-to-site connection.
If you connect to another ISA Server 2006, you may like to use, per Microsoft's recommendations, the L2TP/IPsec site-to-site VPN connection.
In this part we will establish an IPsec tunnel mode VPN site-to-site connection between two ISA Server 2006 SE SP1 installed on Windows 2003 Standard Edition R2 SP2.
In the second part we will establish a L2TP/IPsecVPN site-to-site connection between two ISA Server 2006 SE SP1 installed on Windows 2003 Standard Edition R2 SP2.
Figure1 describes the network diagram used in this article. We can notice the networks behind the two ISAs, ISA HQ and ISA Branch, and the VPN tunnel which is ran over a dedicated connection(say an Internet connection with a static IP address).
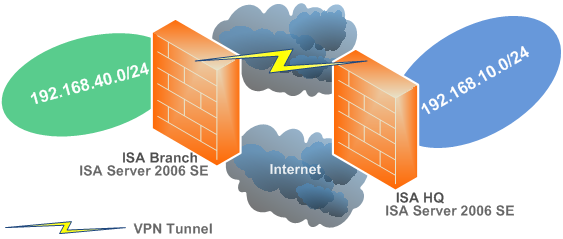
Figure1: The Network Diagram
Figure2 describes the lab diagram used in this article. For convenience, the lab was created in VMware ESXi 3.5.
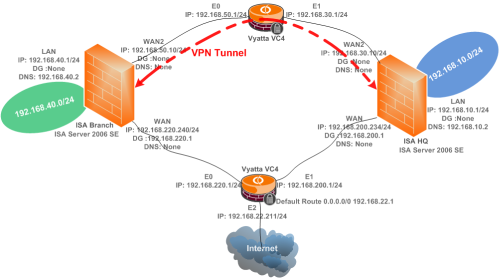
Figure2: The Lab Diagram
ISA's network interfaces(if you wonder) have been configured like in Jason's article:
http://blog.msfirewall.org.uk/2008/06/isa-servers-recommeded-network-card.html
2. ISA HQ's NICs
On ISA HQ, the default external interface(the one and only interface on ISA HQ that was configured with a default gateway) is the WAN interface, see Figure3.
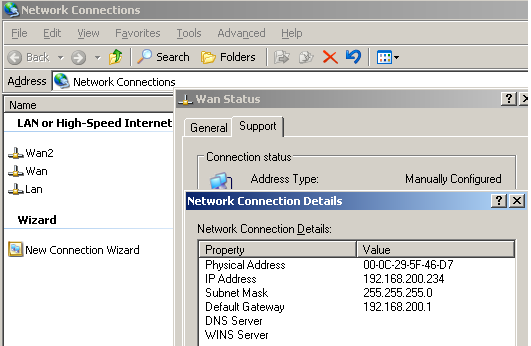
Figure3: ISA HQ WAN NIC
The WAN2 NIC will be used for the site-to-site VPN connection. It can correspond to an ordinary Internet connection with a static IP address, however you cannot enter a default gateway on this NIC, see Figure4. Remember, ISA 2006 does not support multiple default gateways. You can have multiple external interfaces, but there must be only one default external interface. For example the default gateway for the WAN2 connection is 192.168.30.1/24, DG which we cannot configure on the WAN2 NIC.
This WAN2 interface is an external interface, 192.168.30.0/24 is part of ISA HQ's External Network(I have not defined any new network for this adapter on ISA HQ).
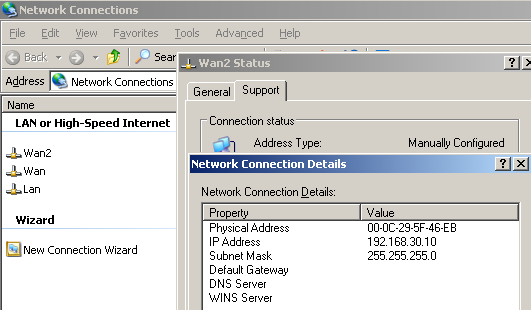
Figure4: ISA HQ WAN2 NIC
And the LAN NIC corresponds to the Internal Network of ISA HQ, see Figure5.
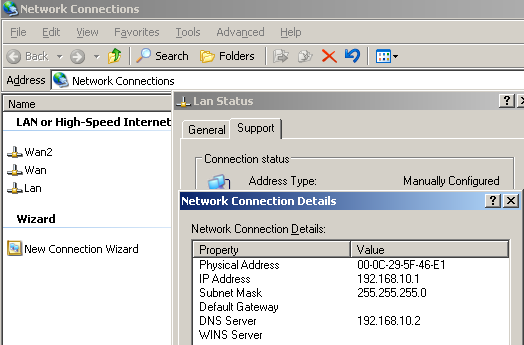
Figure5: ISA HQ LAN NIC
3. Create the IPSec Tunnel Mode VPN Site-to-Site Connection on ISA HQ
Using the site-to-site connection wizard we are going to create on ISA HQ the VPN site-to-site connection to ISA Branch.
Open the ISA Server management console, and in the console tree, select Virtual Private Networks (VPN). Next, in the details pane, select the Remote Sites tab. Now, in the task pane, under the Remote Site Tasks, click Create VPN Site-to-Site Connection.
The site-to-site connection wizard starts. We'll name the remote site Branch, see Figure6.
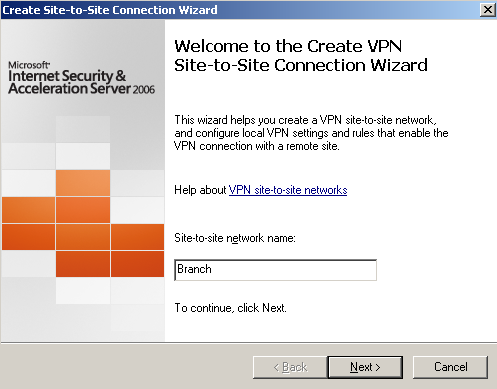
Figure6: Site-to-Site Wizard on ISA HQ: Adding the Connection to ISA Branch - Welcome Screen
Choose IP Security protocol (IPsec) tunnel mode, see Figure7.

Figure7: Site-to-Site Wizard on ISA HQ: Choose IP Security protocol (IPsec) tunnel mode
Enter the remote VPN gateway IP address address(the IP address from the WAN2 NIC on ISA Branch), and the local VPN gateway IP address(the IP address from the WAN2 NIC on ISA HQ), see Figure8.

Figure8: Site-to-Site Wizard on ISA HQ: The Remote and Local VPN Gateways' IP Addresses
In this article, we will use a pre-shared key for IKE authentication, see Figure9. If the third-party VPN gateway does not support IKE authentication with certificates, use a very long and complex pre-shared key. If the remote VPN gateway does support IKE authentication with certificates, my advice is to not use certificates from your Enterprise CA, instead create a CA to issue certificates for this VPN connection, an OpenSSL CA, for example. ISA does not check additional fields on the certificate of the remote VPN gateway, we can only specify which CA has issued those certificates, and this may cause security issues. With the separated CA, we will know, that this CA was only used for issueing certificates for this IPsec tunnel mode VPN site-to-site connection(or maybe a couple of such connections), thus to avoid for example, the situation, when a VPN client, may try to impersonate the remote VPN gateway, for various "reasons".
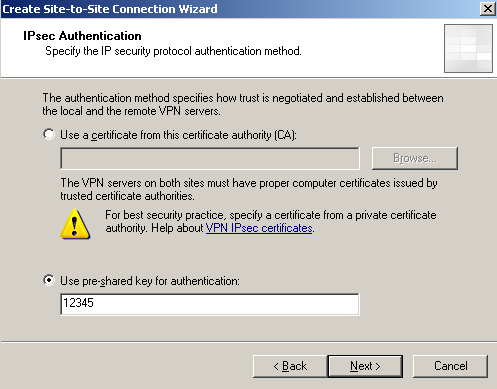
Figure9: Site-to-Site Wizard on ISA HQ: IKE Authentication with a Pre-shared Key
Specify the IP addresses ranges of the remote site network, see Figure10. The wizard automatically added the IP address of the remote VPN gateway to this range. The same thing will happen on ISA Branch, thus we will be able to test connectivity from ISA itself to hosts from the remote site, and also to avoid certain issues with the HTTP traffic sent over the VPN tunnel.
If the remote VPN gateway would be a third-party VPN gateway, and there is no wizard to automatically add the IP address of the remote VPN gateway to the network range of the remote site on that product, here is an example for a Cisco router.
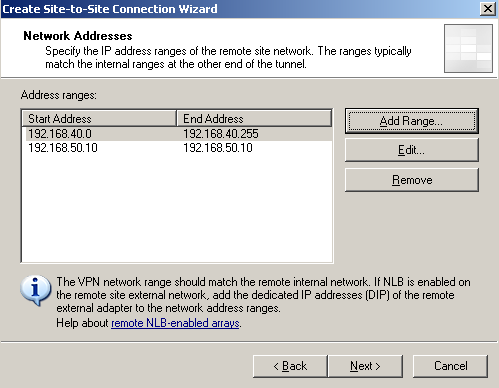
Figure10: Site-to-Site Wizard on ISA HQ: Network Addresses
Next, the wizard will create a network rule between the Internal Network and the remote network, with a route relationship, see Figure11.
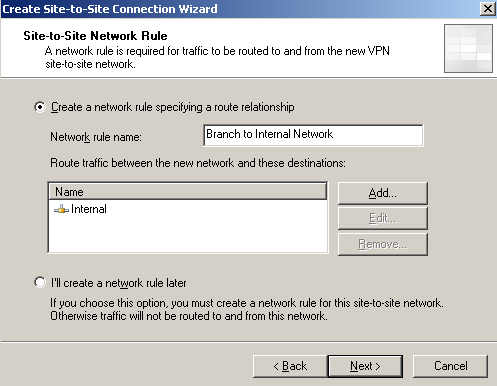
Figure11: Site-to-Site Wizard on ISA HQ: Network Rule
And, of course, we need an access rule, allowing access between the Internal Network and the remote site(and vice-versa). I'll just create an "All outbound traffic" one, see Figure12.
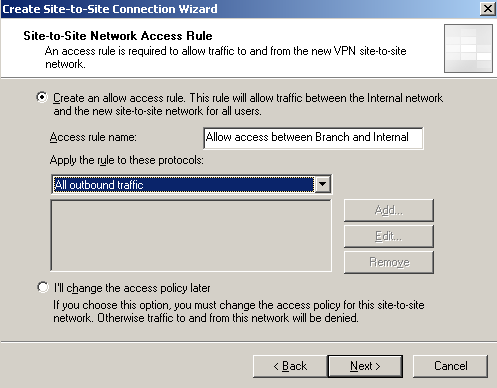
Figure12: Site-to-Site Wizard on ISA HQ: Firewall Policy - Access Rule
Click Finish, see Figure13.
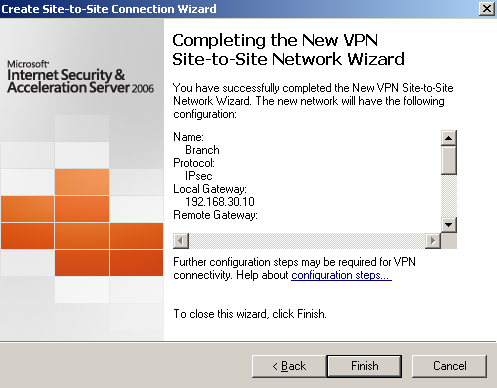
Figure13: Site-to-Site Wizard on ISA HQ: Finish
Now we can access the properties of the newly created remote site, see Figure14.
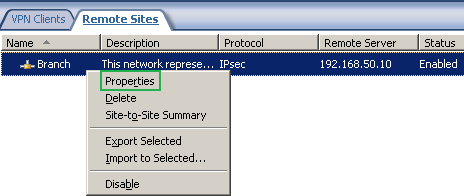
Figure14: Branch Remote Site: Properties
For example to modify the IPsec Settings, see Figure15.
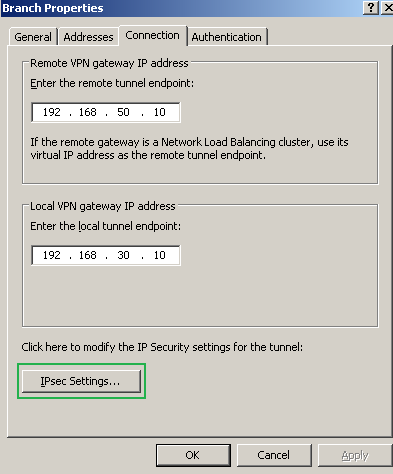
Figure15: Branch Remote Site: Properties - Connection Tab
Say to choose a stronger Diffie-Hellman group(to match 3DES' strength), the MODP group 14, over the default one, for IKE MM, see Figure16. Note that not many third-party VPN gateways support this DF group, most of them will support Diffie-Hellman MODP group 5, unfortunately unsupported by ISA.
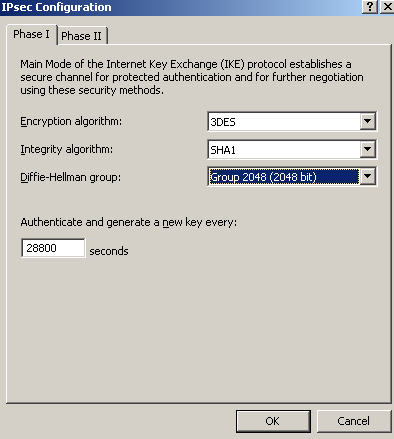
Figure16: Branch Remote Site: Properties - Connection Tab: IPsec Settings - IKE MM
Since we are using PFS, we will also select the Diffie-Hellman MODP group 14 for IKE QM too, see Figure17. And also specify an IPsec SA lifetime in kilobytes too.
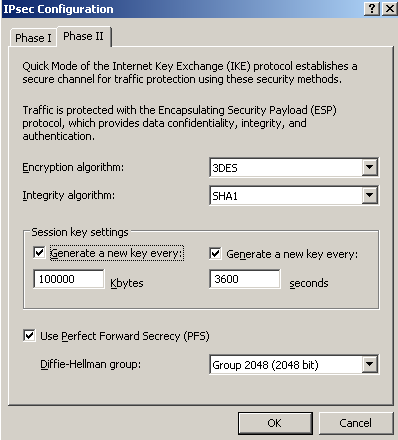
Figure17: Branch Remote Site: Properties - Connection Tab: IPsec Settings - IKE QM
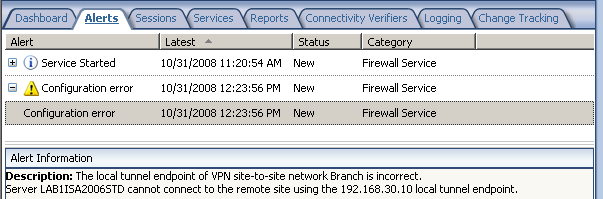
Now if we go in ISA Server management console, in the console tree, select Monitoring, and in the details pane, select the Alerts tab, we will notice an alert telling us that ISA cannot connect to the remote site using the specified local tunnel endpoint, see Figure18.
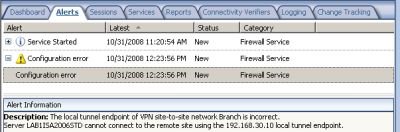
Figure18: ISA HQ Alert
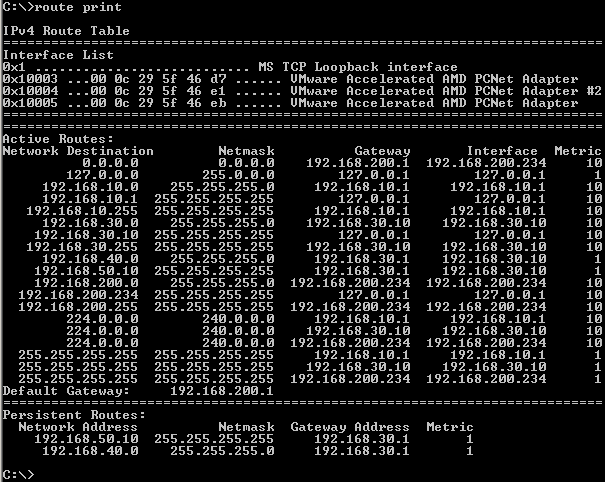
So we are going to add a permanent route to ISA HQ's routing table, to the remote VPN gateway IP address, through WAN2 connection's gateway, which is 192.168.30.1, seeFigure19.

Figure19: Permanent Route on ISA HQ to the Remote VPN Gateway IP Address
However, we are not done yet, as ISA does not know how to route traffic to the remote site. With IPsec tunnel mode, the tunneling process is accomplished by IPsec. With Microsoft implementation of IPsec tunnel mode, we need to add a route to the remote subnet(s) of the remote site, through WAN2 connection's gateway, see Figure20.

Figure20: Permanent Route on ISA HQ to the Remote Subnets
If you want to read more about that, please refer to Stefaan Pouseele's article:
http://blogs.isaserver.org/pouseele/2006/09/22/an-ipsec-tunnel-mode-connection-is-not-implemented-as-a-routable-interface-on-a-windows-based-server/
A route print command on ISA HQ, see Figure21.
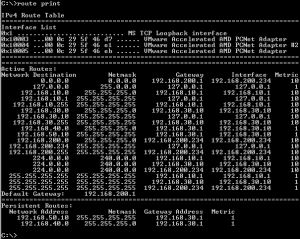
Figure21: ISA HQ - Route Print
In Figure22, we can see the access rule created by the site-to-site connection wizard on ISA HQ.

Figure22: ISA HQ - The Access Rule Created by the Site-to-Site Connection Wizard
On ISA HQ we end up with the Networks from Figure23.
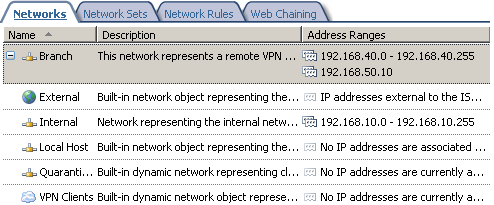
Figure23: ISA HQ - Networks
In Figure24, we can see the network rule between the Branch and the Internal Networks created by the site-to-site connection wizard on ISA HQ.
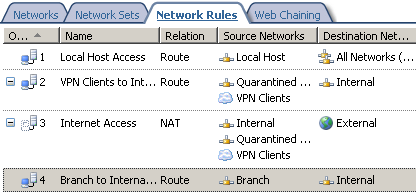
Figure24: ISA HQ - Network Rules
4. ISA Branch's NICs
On ISA Branch, the default external interface(the one and only interface on ISA Branch that was configured with a default gateway) is the WAN interface, see Figure25.
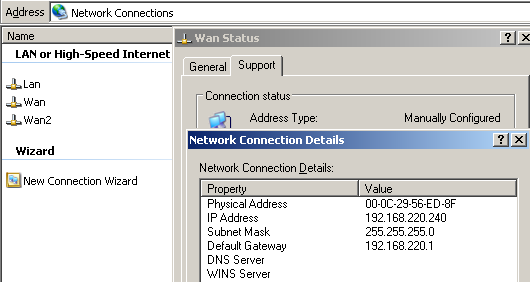
Figure25: ISA Branch WAN NIC
The WAN2 NIC will be used for the site-to-site VPN connection. As said before, it can correspond to an ordinary Internet connection with a static IP address, however you cannot enter a default gateway on this NIC, see Figure26. Remember, ISA 2006 does not support multiple default gateways. You can have multiple external interfaces, but there must be only one default external interface. For example the default gateway for the WAN2 connection is 192.168.50.1/24, DG which we cannot configure on the WAN2 NIC.
This WAN2 interface is an external interface, 192.168.50.0/24 is part of ISA Branch's External Network(I have not defined any new network for this adapter on ISA Branch).
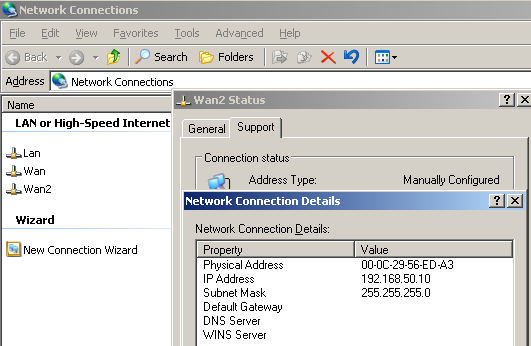
Figure26: ISA Branch WAN2 NIC
And the LAN NIC corresponds to the Internal Network of ISA Branch, see Figure27.
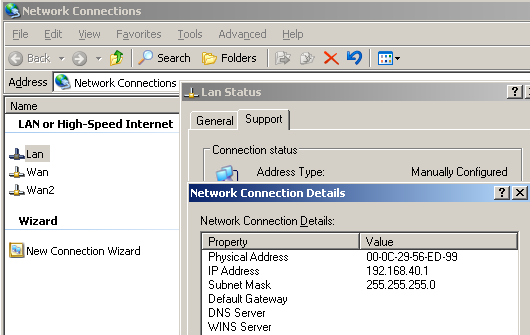
Figure27: ISA Branch LAN NIC
5. Create the IPSec Tunnel Mode VPN Site-to-Site Connection on ISA Branch
Using the site-to-site connection wizard we are going to create on ISA Branch the VPN site-to-site connection to ISA HQ.
Open the ISA Server management console, and in the console tree, select Virtual Private Networks (VPN). Next, in the details pane, select the Remote Sites tab. Now, in the task pane, under the Remote Site Tasks, click Create VPN Site-to-Site Connection.
The site-to-site connection wizard starts. We'll name the remote site HQ, see Figure28.
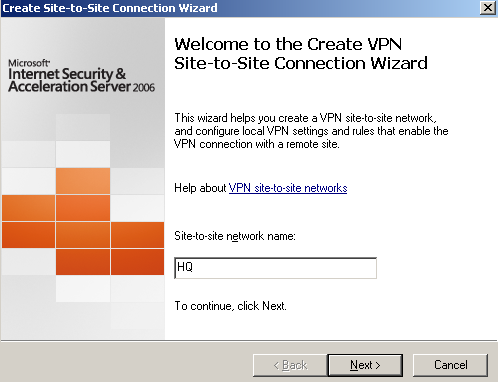
Figure28: Site-to-Site Wizard on ISA Branch: Adding the Connection to ISA HQ - Welcome Screen
Choose IP Security protocol (IPsec) tunnel mode, see Figure29.
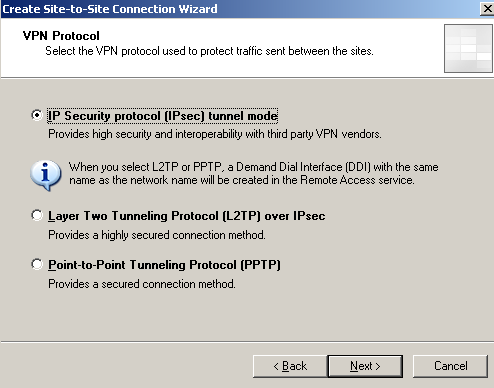
Figure29: Site-to-Site Wizard on ISA Branch: Choose IP Security protocol (IPsec) tunnel mode
Enter the remote VPN gateway IP address address(the IP address from the WAN2 NIC on ISA HQ), and the local VPN gateway IP address(the IP address from the WAN2 NIC on ISA Branch), see Figure30.
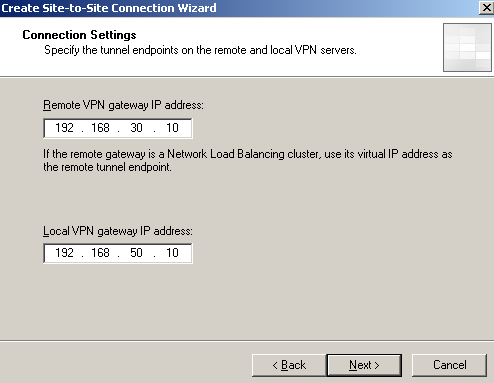
Figure30: Site-to-Site Wizard on ISA Branch: The Remote and Local VPN Gateways' IP Addresses
Specify the pre-shared key for IKE authentication, see Figure31.

Figure31: Site-to-Site Wizard on ISA Branch: IKE Authentication with a Pre-shared Key
Specify the IP addresses ranges of the remote site network, see Figure32. As on ISA HQ, the wizard automatically added the IP address of the remote VPN gateway to this range.
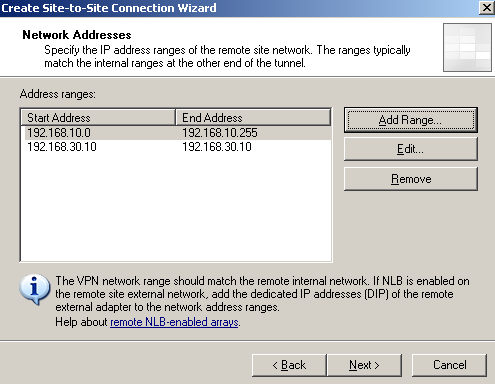
Figure32: Site-to-Site Wizard on ISA Branch: Network Addresses
Next, the wizard will create a network rule between the Internal Network and the remote network, with a route relationship, see Figure33.
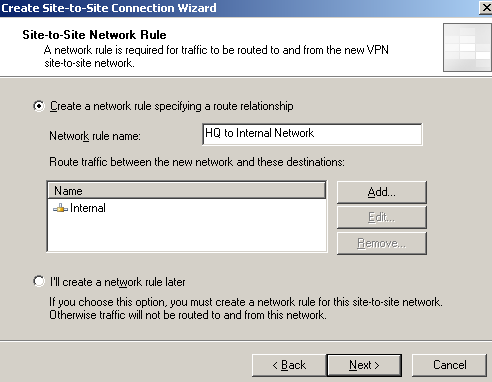
Figure33: Site-to-Site Wizard on ISA Branch: Network Rule
And, of course, we need an access rule, allowing access between the Internal Network and the remote site(and vice-versa). I'll just create an "All outbound traffic" one, see Figure34.

Figure34: Site-to-Site Wizard on ISA Branch: Firewall Policy - Access Rule
Click Finish, see Figure35.
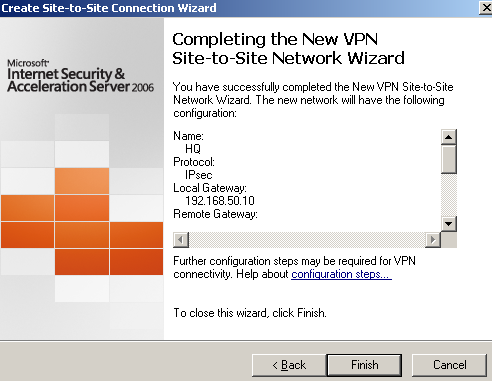
Figure35: Site-to-site Wizard on ISA Branch: Finish
Now we can access the properties of the newly created remote site, see Figure36.
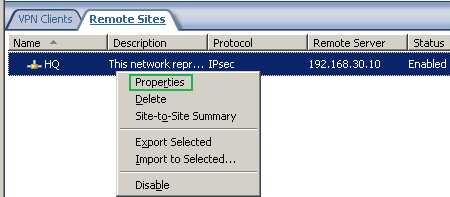
Figure36: HQ Remote Site: Properties
To modify the IPsec Settings, to match the ones from ISA HQ, see Figure37.
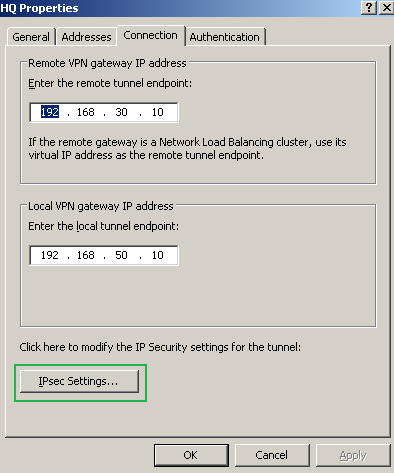
Figure37: HQ Remote Site: Properties - Connection Tab
As on ISA HQ, we will choose a stronger Diffie-Hellman group(to match 3DES' strength), the MODP group 14, over the default one, for IKE MM, see Figure38.

Figure38: HQ Remote Site: Properties - Connection Tab: IPsec Settings - IKE MM
And we will select the Diffie-Hellman MODP group 14 for IKE QM too(we are using PFS), see Figure39.
Also specify an IPsec SA lifetime in kilobytes.

Figure39: HQ Remote Site: Properties - Connection Tab: IPsec Settings - IKE QM
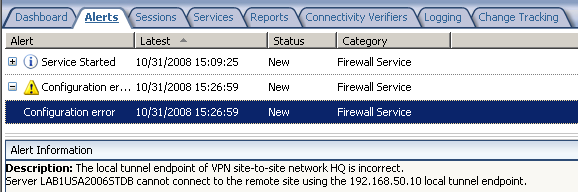
Now if we go in ISA Server management console, in the console tree, select Monitoring, and in the details pane, select the Alerts tab, we will notice an alert telling us that ISA cannot connect to the remote site using the specified local tunnel endpoint, see Figure40.

Figure40: ISA Branch Alert
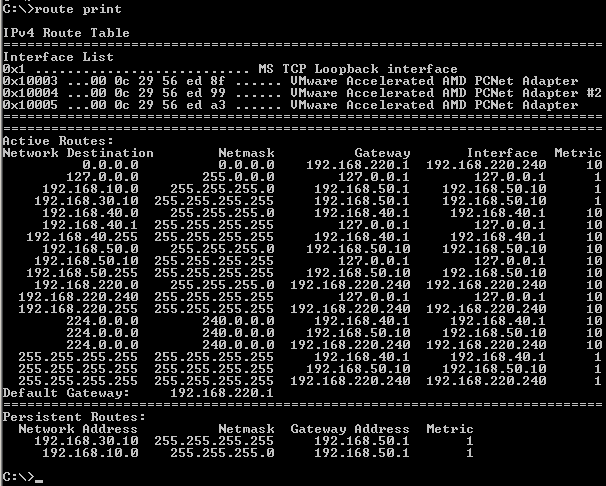
So we are going to add a permanent route to ISA Branch's routing table, to the remote VPN gateway IP address, through WAN2 connection's gateway, which is 192.168.50.1, seeFigure41.

Figure41: Permanent Route on ISA Branch to the Remote VPN Gateway IP Address
Like in case of ISA HQ, we are not done yet, as ISA Branch does not know how to route traffic to the remote site. We need to add a route to the remote subnet(s) of the remote site, through WAN2 connection's gateway, see Figure42.

Figure42: Permanent Route on ISA Branch to the Remote Subnets
A route print command on ISA Branch, see Figure43.

Figure43: ISA Branch - Route Print
In Figure44, we can see the access rule created by the site-to-site connection wizard on ISA Branch.

Figure44: ISA Branch - The Access Rule Created by the Site-to-Site Connection Wizard
On ISA Branch we end up with the Networks from Figure45.
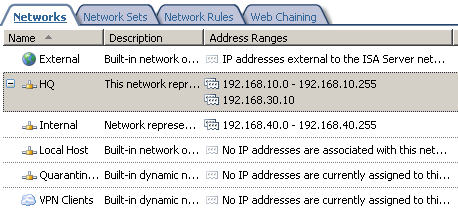
Figure45: ISA Branch - Networks
In Figure46, we can see the network rule between the HQ and the Internal Networks created by the site-to-site connection wizard on ISA Branch.
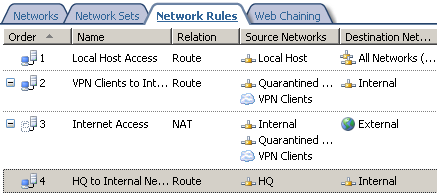
Figure46: ISA Branch - Network Rules
6. Test the IPsec Tunnel Mode VPN Site-to-Site Connection
Time to test and see if our IPsec tunnel mode VPN site-to-site connection is working.
I will run a ping command from a host behind ISA HQ to a host behind ISA Branch(this will also initiate the VPN tunnel), see Figure47. The tunnel comes up and we have connectivity.
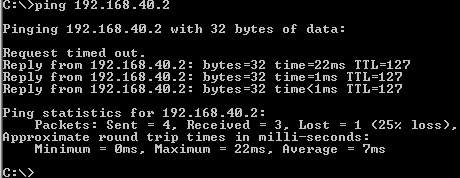
Figure47: Ping from a host behind ISA HQ to a host behind ISA Branch
Another ping test, this time from a host behind ISA Branch to a host behind ISA HQ, seeFigure48.
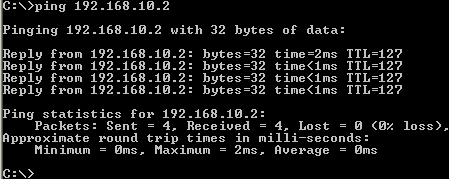
Figure48: Ping from a host behind ISA Branch to a host behind ISA HQ
We should be able to ping for example, from ISA HQ to a host behind ISA Branch, over the VPN tunnel, the logs on ISA Branch showing this, see Figure49.
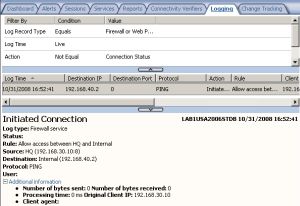
Figure49: ISA Branch Logs - Ping Traffic
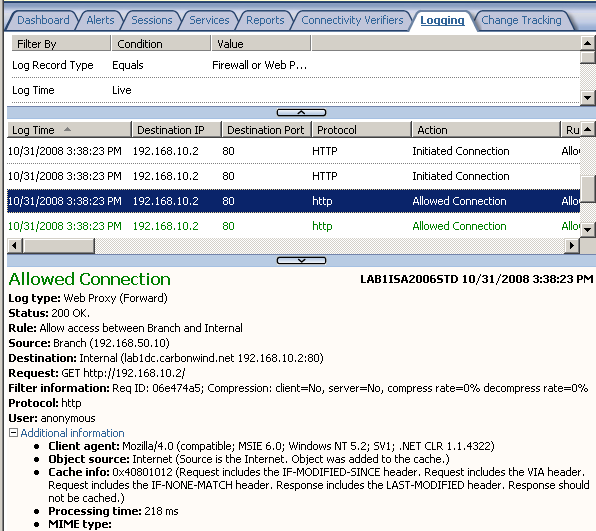
Also we should be able to access a web site located behind ISA HQ, from hosts behind ISA Branch, look carefully at the source IP address from the log on ISA HQ, see Figure50.
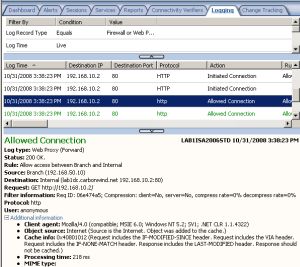
Figure50: ISA HQ Logs - HTTP Traffic
We can start a Wireshark or Netmon trace on ISA's WAN2 interface, see Figure51 and Figure52, observing if the packets indeed flow as expected.
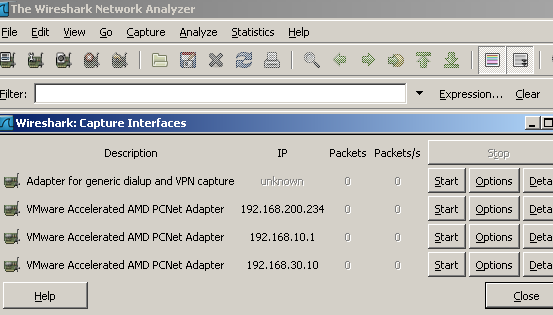
Figure51: ISA HQ - Wireshark: Capture Interfaces
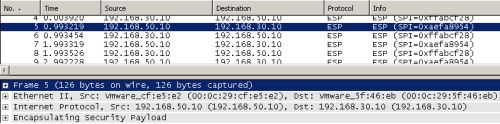
Figure52: ISA HQ - Wireshark: Captured VPN Traffic
In Part 2 we will repeat this scenario, using L2TP/IPsec instead of IPsec tunnel mode.
|