|
15.06.2007
Updated 21.08.2007
ISA 2004/2006 Virtual PC 2004/2007 Simple Lab
Microsoft Virtual PC can be a useful software.
You can used it for testing, learning or for real environments.
And it is free(its latest version is Virtual PC 2007, in fact this article was written for VPC 2004 and ISA
Server 2004 but it can be applied to VPC 2007 and ISA Server 2006 too).
The ability to run multiple virtual machines with different operating systems and different network settings makes it a very good tool in testing ISA Server 2004/2006.
One of the most important topic here about Virtual PC is networking.
You can master very easy other stuff like installation of an OS, allocate memory, create a virtual drive and others. So please take a look on this article: VPC Networking Options.
Virtual PC 2004/2007 can be very useful if you want to test or to learn about ISA Server. The goal of our lab is to setup a Trihomed DMZ design. Bellow is the lab diagram.
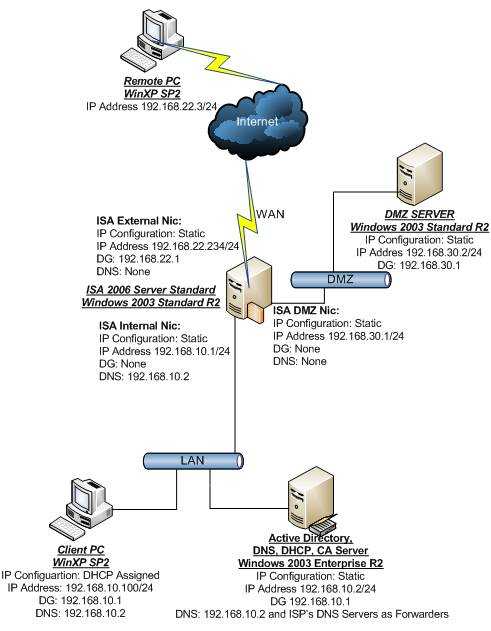
Figure1: Lab Diagram
I have a broadband router for my Internet connection(192.168.22.1)
We need 4 VMs for our lab.
ISAMain=Windows 2003 Server R2 Trial(with RAM settings 256 MB from VPC)
DCMain=Windows 2003 Server R2 Trial(with RAM settings 256 MB from VPC)
DMZMain=Windows 2003 Server R2 Trial(with RAM settings 256 MB from VPC)
XPMain=Windows XP SP2 Pro(with RAM settings 128 MB from VPC).
You can give them the amount of RAM you might want based on your real host RAM capacity(I have 2 GB of RAM on my PC).
First thing to do: install two loopback network cards. Make sure they only have virtual machines network services enabled.
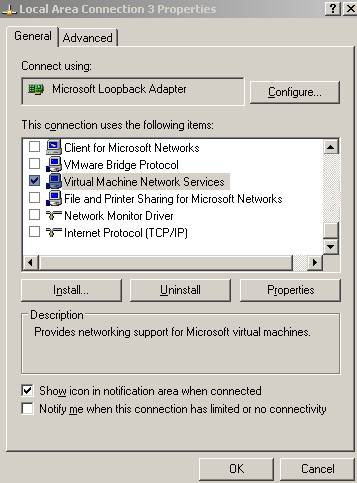
Figure2: Loopback Adapter Services
I've name them Loopback1 and Loopback2.
ISAMain has three network adapters: Extern, Intern, DMZ. You can name them how you want, just make sure you don’t name the Intern adapter “Internal” because for example when using the DHCP relay on ISA confusion might appear. Some good names might be Wan, Lan, DMZ. See the bellow picture for details.
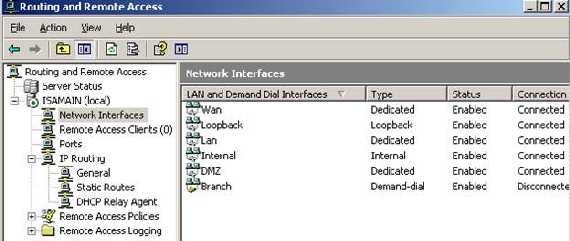
Figure3: RRAS Example
My real network is 192.168.22.0/24 and the IP of the real host on which is installed VPC is 192.168.22.3(on our diagram it appears as RemotePC).
The default gateway is 192.168.22.1(the router).
On the real host I only have 1 real network adapter( + 2 loopback addresses obviously).
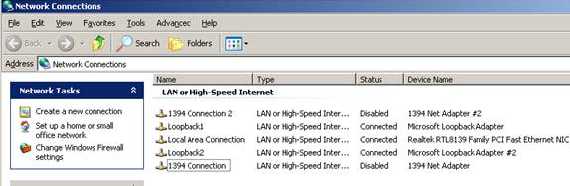
Figure4: Network Connections Panel from Real PC
We are going to use two loopback adapters for two different Lans: Loopback1 for 192.168.10.0( Internal Network of ISA); Loopback2 for 192.168.30.0 for DMZ. All the host from Internal Network are using Loopback1 and 192.168.10.0(DCMain and XPMain) and all the Host from DMZ are using Loopback2 and 192.168.30.0(DMZMain).
Pay attention to ISAMain. It has 3 network adapters: Loopback1, Real adapter, Loopback2. You can use any other order, but pay attention to the fact that on ISA VM they the NICs will be listed in the order you have selected.
Go on and install the OSs.
After the Windows 2003 Server R2 is installed on the ISA VM, you will see in network connections something like that:
Intel 21140-Based PCI Fast Ethernet Adapter (Generic),
Intel 21140-Based PCI Fast Ethernet Adapter (Generic)#2,
Intel 21140-Based PCI Fast Ethernet Adapter (Generic)#3
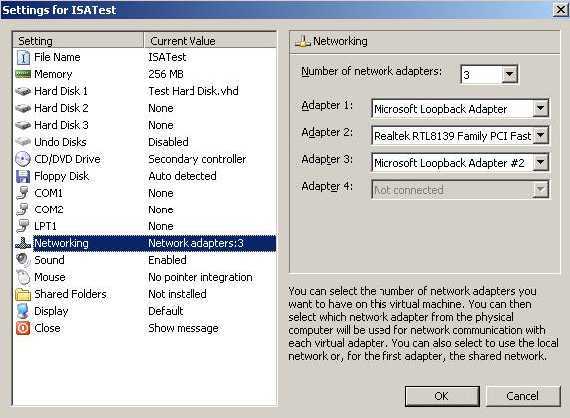
Figure5: ISAMain VM Networking
Keep the right order(don’t modify it yet). Remember:
Loopback1 as Intel 21140-Based PCI Fast Ethernet Adapter (Generic)= Intern.
Real Adapter as Intel 21140-Based PCI Fast Ethernet Adapter (Generic)#2= Extern.
Loopback2 as Intel 21140-Based PCI Fast Ethernet Adapter (Generic)#3= DMZ.
If you don't keep the right order it will probably not work.
With this order in mind assign the IP addresses:
ISAMain: Adapter1(Intern): 192.168.10.1, DG : None, DNS : 192.168.10.2
Adapter2(Extern): 192.168.22.234, DG: 192.168.22.1, DNS : None
Adapter3(DMZ): 192.168.30.1, DG : None, DNS : None
Now you can go and arrange the adapters in the correct order as required and renamed them.
DCMain: Intern: 192.168.10.2 DG: 192.168.10.1 DNS:192.168.10.2
XPTMain: Intern: 192.168.10.3 DG: 192.168.10.1 DNS:192.168.10.2
DMZMain: DMZ: 192.168.30.2 DG: 192.168.30.1
From now you can proceed and install the Active Directory services, the DNS Server, make the ISA VM a domain member and finally install the ISA firewall software.
- VPC Networking Options
|